AE2 Web Integration
通过桌面或移动浏览器访问你的 Applied Energistics 2 网络。实时浏览存储和合成 CPU,请求合成任务,探索资源历史,并通过固定资源构建个人仪表盘。公共服务器可以为每个玩家提供专属账户及其网络的访问权限。
适用于专用服务器和单人世界。多人游戏客户端无需安装此模组。
它不添加任何物品或方块。
可选的 Icon Generator(图标生成器)客户端模组(ae2webintegration-icon-generator-*.jar)
可从你的整合包和资源包中生成物品图标。
? 官方网站 · ▶️ 在线演示
? 安装指南 · ? API 文档
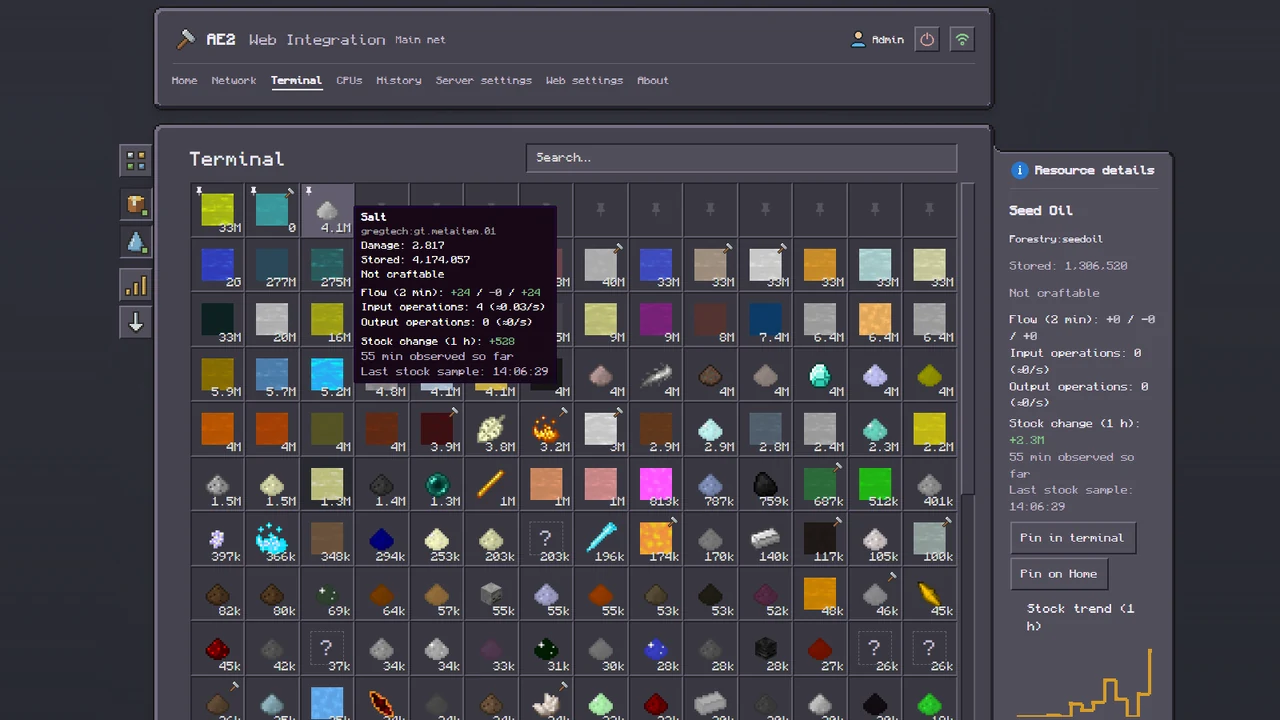
当前功能
终端
- 浏览、排序和筛选多个 AE2 网络,支持实时存储状态和选定 CPU 更新
- 提交合成请求,支持自动或手动选择 CPU,并可取消正在运行的任务
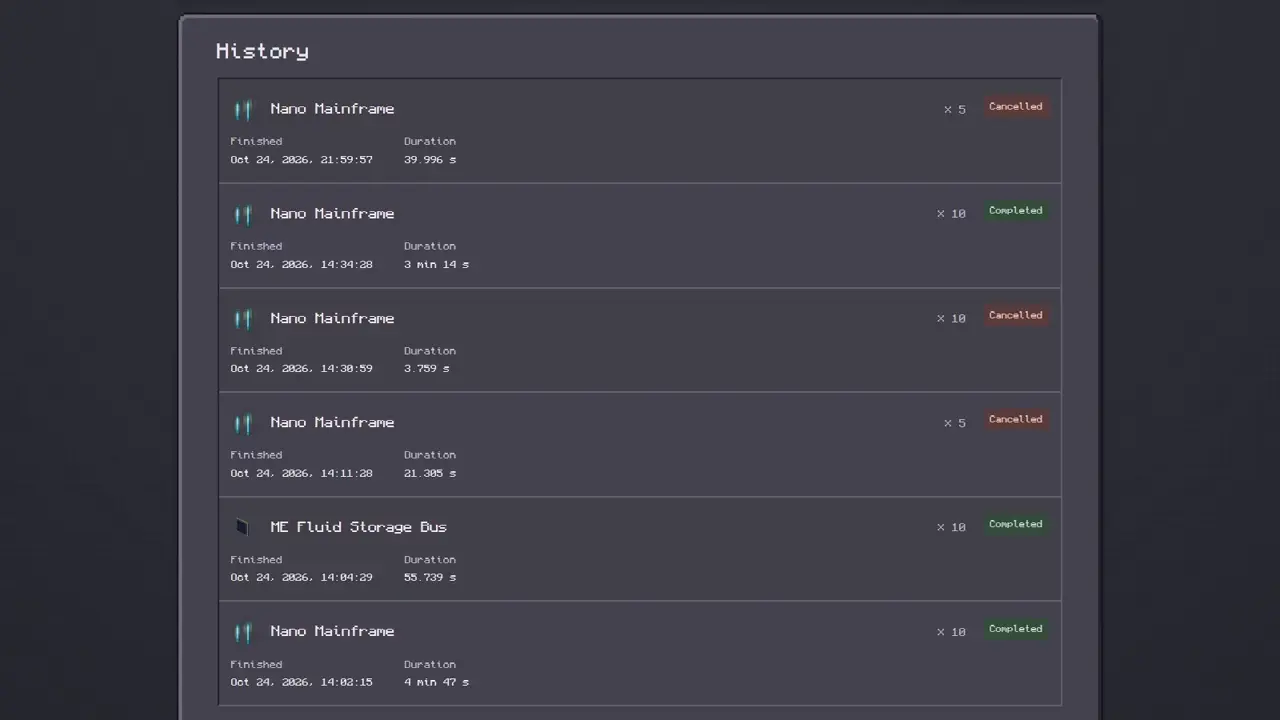
- 在服务器重启后查看已完成和已取消的合成任务
- 通过交互式历史图表追踪资源库存、输入和输出
- 使用响应式桌面和移动端布局、亮色/暗色/系统外观模式,以及 Monocraft 或 Lato 字体
- 自定义名称、图标或两者兼有,可配置列数和每页数量,包括无分页选项
- 当公共模式禁用时,通过 Discord 或 ntfy 接收合成通知
固定与主页
从上下文菜单或 Resource details(资源详情)中固定一个资源。Pin in terminal(固定在终端)会将其保持在对应网络终端搜索栏和过滤器上方。Pin on Home(固定在主页)会添加一个包含可配置图表和摘要的仪表盘卡片,无论当前选中的是哪个网络均可显示。
固定项属于你的网页账户。每位玩家可以拥有自己的终端固定项和主页布局;主页可以同时将来自多个网络的资源展示在一起。即使资源不再存在于存储中,固定资源仍保留对其记录历史的访问权限。
合成计划图片
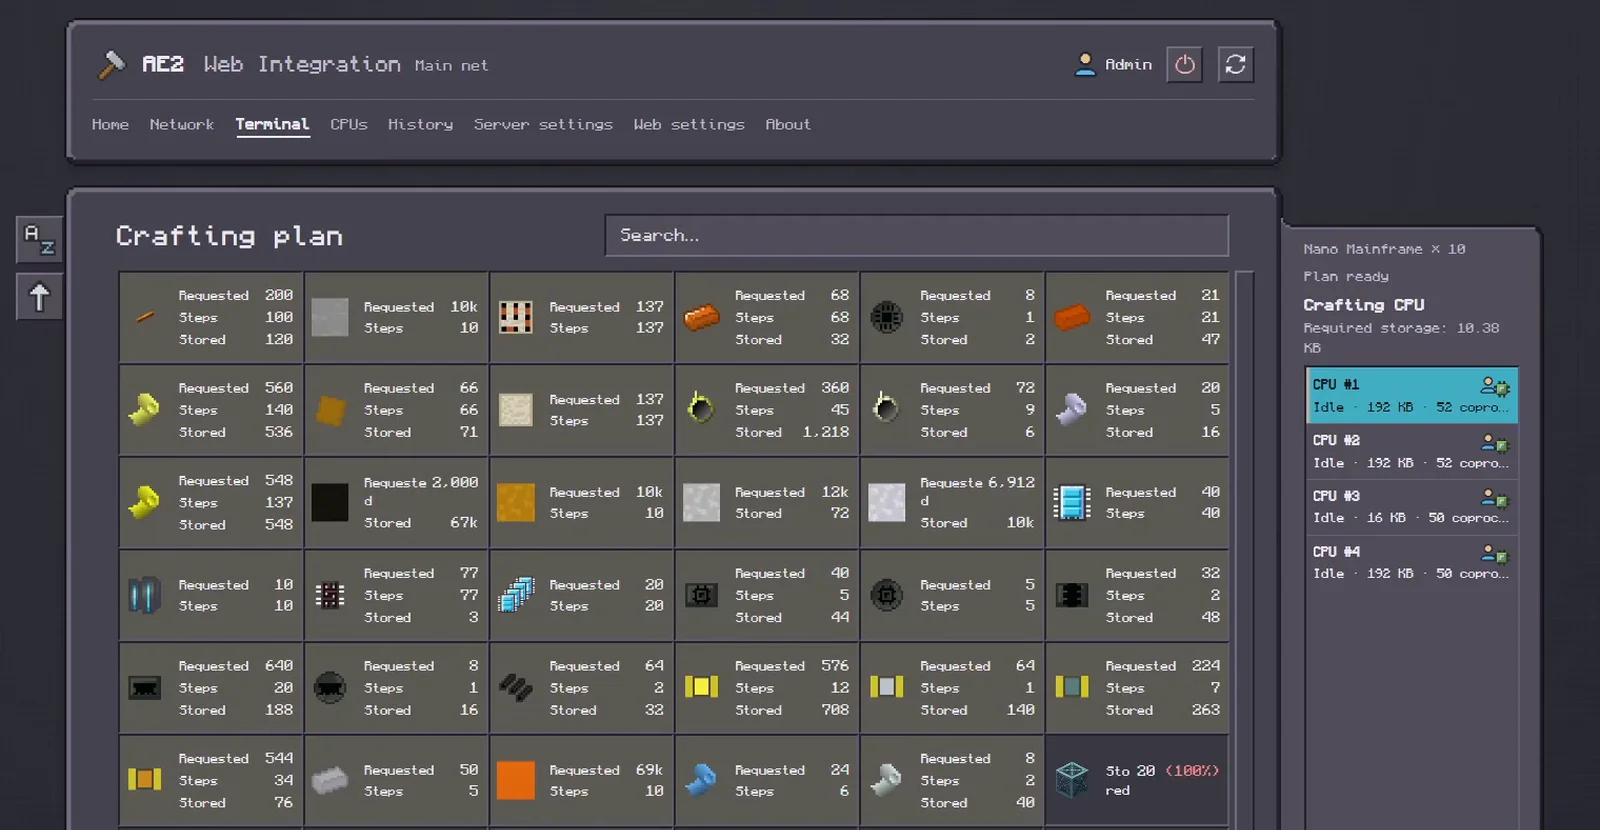
在计算完计划后,在默认主题下点击计划左下角的 Export(导出)(移动端为图像图标)。选择网格布局、图块内容、排序方式和背景,然后下载单个 PNG 文件。导出的计划独立于当前的搜索条件,且无需图标包即可工作。设置和图像比例会在下次导出时自动记忆;对于非常大的图像,会自动降低分辨率以适应页面。
兼容性
该模组目前支持 Minecraft 1.21.1 (NeoForge)、1.20.1 (Forge)、1.12.2 (Forge) 和 1.7.10 (Forge/GTNH)。不同版本的构建版本之间不可互换。
一些额外的兼容性说明:
要求
- 针对支持的 Minecraft 版本之一安装的兼容 AE2
- 一个已加载且包含有效 ME Controller 的 ME 网络
- 内置 Web 服务器所需的可用 TCP 端口
- 如果希望从本地网络外部访问面板,需配置防火墙/NAT 规则
默认情况下,面板可通过 http://your-server-ip-or-domain:2324/ 访问。端口号可自定义。
画廊
合成、资源历史、移动端视图和通知
合成计划与 CPU 选择
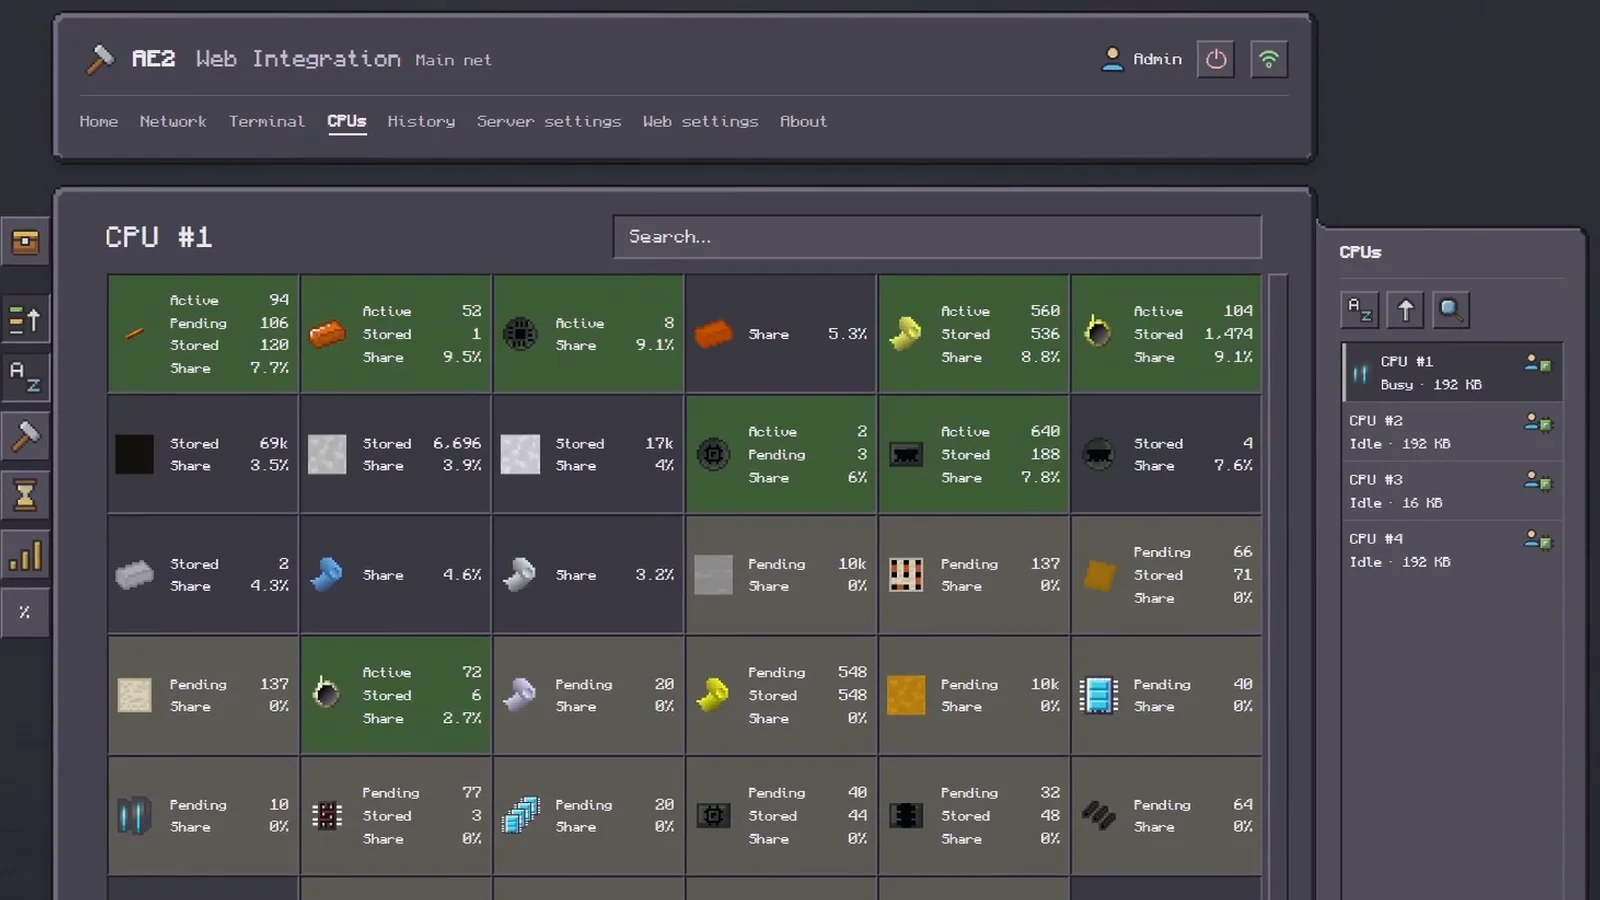
实时 CPU 视图
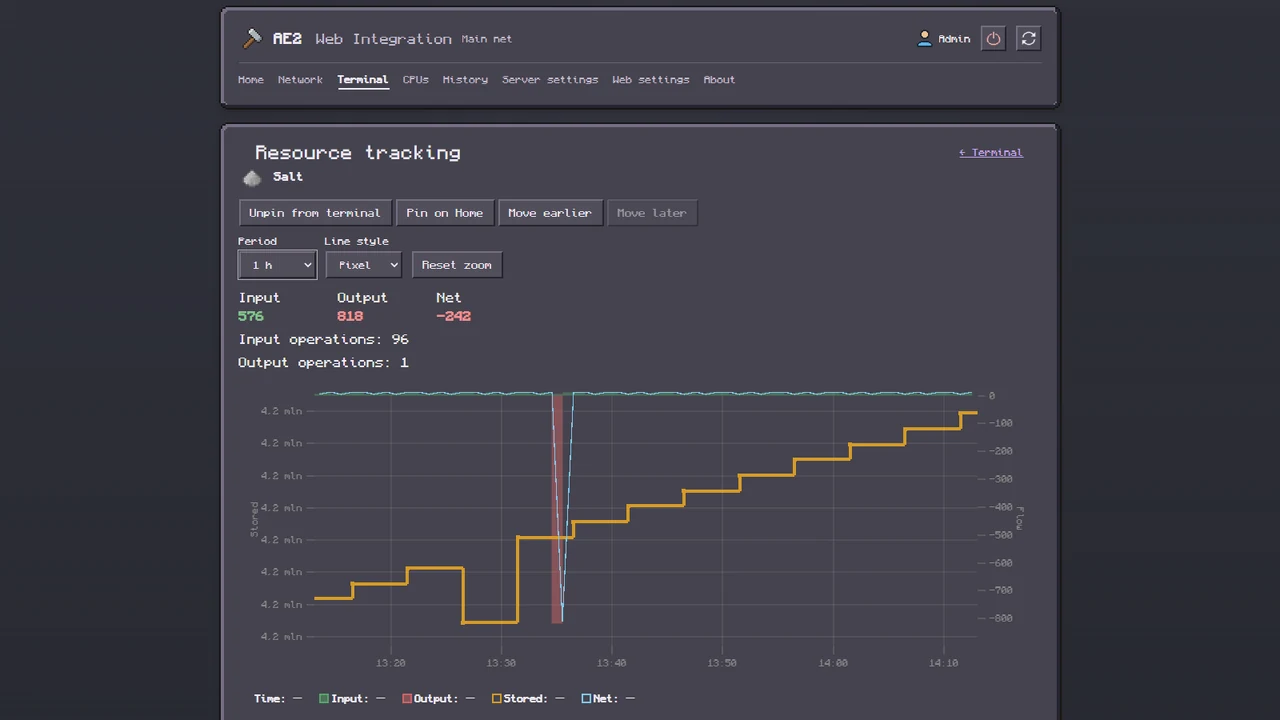
资源历史
已完成和已取消的合成
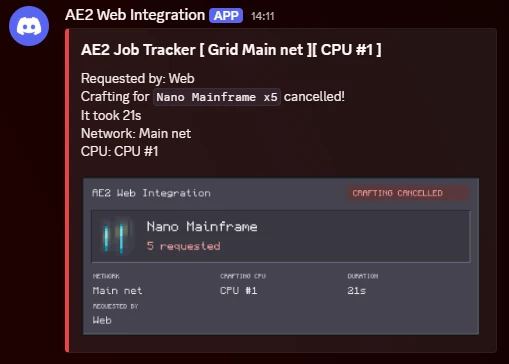
Discord 通知
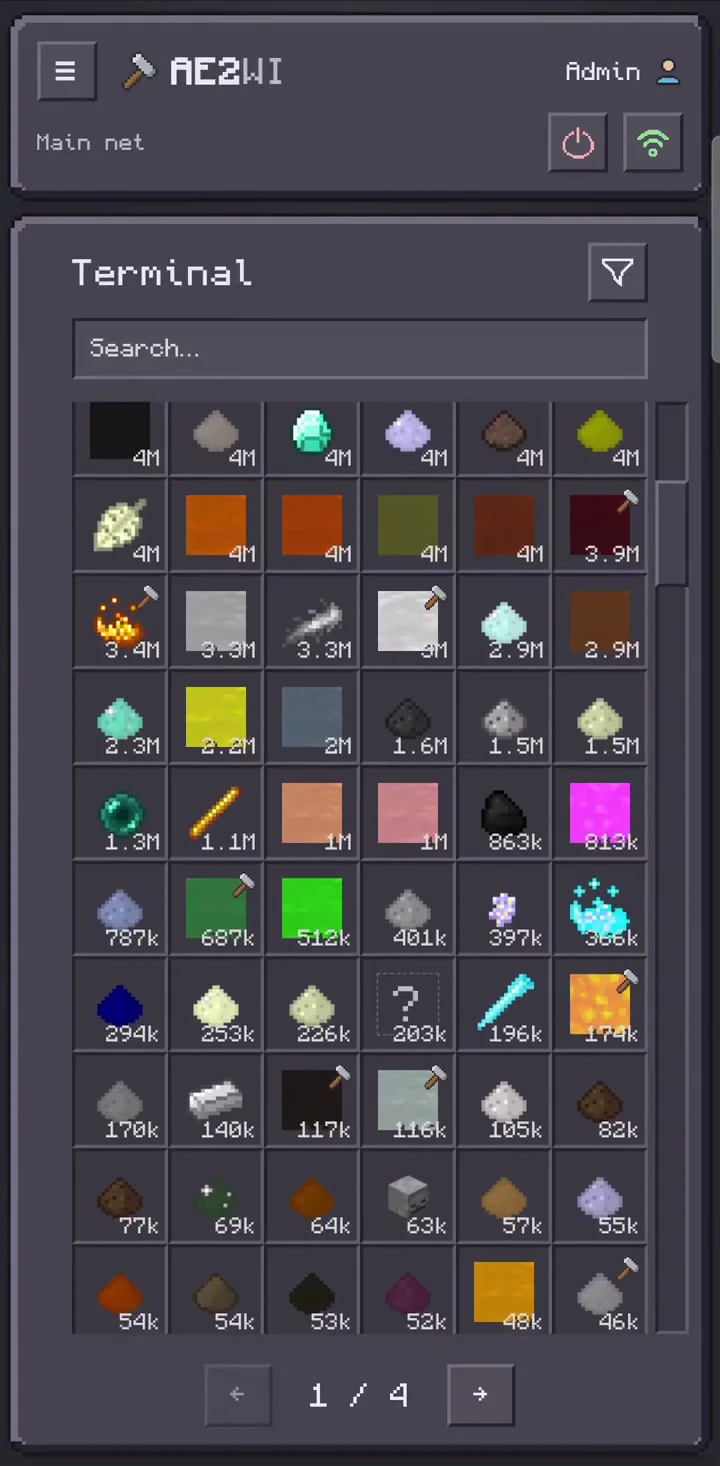
移动端终端
早期视频展示
这些视频展示了较早版本的界面。请参见上方的画廊和演示以了解当前 UI。
使用方法
该模组在其 HTTP 服务器上托管了 Web 面板和 API,该服务器随 Minecraft 服务器或单人世界一同启动。
- 从本项目的下载页面下载适用于你 Minecraft 版本和加载器的主模组 JAR 文件。
文件名中包含
icon-generator 的独立文件是可选的客户端图标生成器。
- 将模组放入服务器的
mods 文件夹,或单人游戏实例的 mods 文件夹中。
在多人游戏中,只有服务器需要安装该模组。
- 启动服务器或打开一个单人世界以生成配置文件。
- 打开
config/ae2webintegration/config.toml。根据需要配置端口、管理员
密码、公共模式及其他设置。
- 对于单人游戏或所有玩家共享 Admin 账户的私有服务器,请禁用公共模式。
如果玩家需要独立的账户并访问各自的网络,请保持启用状态。
- 使用
/ae2webintegration reload 重新加载配置,或者重启服务器或单人世界。
- 根据需要允许配置的端口通过防火墙和路由器,或通过反向代理路由访问权限。
- 访问
http://your-server-ip-or-domain:configured-port/,并使用配置中的 Admin 账户和密码登录。
在公共模式下,玩家可以在登录页面创建账户。选择密码后,页面会显示一条
/ae2webintegration auth <token> 命令。玩家必须在游戏中运行该命令以完成注册。
网络访问
网络必须拥有有效的 ME Controller,并在其出现在 Web 面板之前处于加载且完成初始化的状态。没有控制器的子网络无法通过网站访问。
在所有支持的版本上,玩家可以通过拥有连接到网络的 ME Controller、无线接入点或受支持的终端来获得 Web 访问权限。放置你自己的无线接入点是设置访问权限的一种直接方式。
在 GTNH 1.7.10 和 AE2 UEL 1.12.2 中,可用的安全终端提供了另一种方式:添加带有全部四种权限(Build, Extract, Inject and Craft)的玩家生物识别卡。未分配的生物识别卡不提供 Web 访问权限。
Admin Web 账户无需逐人授权即可访问所有可用网络。
请妥善保护其密码。在 Web 面板中选择网络即可打开其终端。
可选物品图标
要在 Web 面板中显示物品图标,请从你的 Minecraft 客户端生成图标包:
- 从本项目的下载页面下载适用于你 Minecraft
版本和加载器的 Icon Generator 文件(
ae2webintegration-icon-generator-*.jar)。将其放入客户端的 mods 文件夹。
使用与服务器相同的整合包。
- 启动游戏并加载你想要用于图标的资源包,然后进入一个世界。
- 在聊天栏中运行
/ae2webicons export 并等待进度窗口完成。
- 在游戏目录内的
ae2webicons 文件夹中找到生成的 .ae2wi-icons 文件。
- 停止服务器并将该文件复制到
config/ae2webintegration/ 中。保留其 .ae2wi-icons 扩展名;
文件名可以保持不变。
- 启动服务器。当图标包可用时,新浏览器会自动显示 Icons and names。
使用 Web Settings → Terminal display 将其更改为 Icons only 或 Names only。
图标使用的是已加载资源包的外观。你可以从
进度窗口取消生成。要替换或删除服务器的图标包,请先停止服务器,然后再重新启动它。
该文件夹中只保留一个 .ae2wi-icons 文件。如果存在多个文件,服务器会记录它们的名称
并在解决冲突及重启服务器之前禁用图标。
图标是可选的;如果没有图标包,终端将显示物品名称。
Web 主题
该模组目前包含一个内置主题。更多主题正在计划中。
在 Web Settings → Choose a theme 中选择主题。要为所有人安装一个主题,请将其
ZIP 文件放入 config/ae2webintegration/themes/ 并重启服务器。在
config/ae2webintegration/config.toml 中将 general.default_theme 设置为 server:<theme id> 以使其成为服务器默认值,或
设置为 builtin:default 以使用内置 UI。用户可以遵循该默认值或保留自己的浏览器选择。
如果某个主题导致正常使用受阻,请在其 # 片段之前使用 ?safe=1 打开页面以
使用内置 UI。
合成历史
在网络设置中启用 Record crafting history 以跟踪其合成任务。启用
Include machine-requested crafting 以同时跟踪由该网络上机器发起的任务。
机器选项仅适用于新任务。启用跟踪不会重建正在进行中的任务的历史记录。
已完成和取消的任务会与世界一起保存,并在服务器重启后仍然可用。
在网络设置中选择合成历史记录保留时间。默认为 7 天,每个网络限制为
1,000 个任务。管理员可以在 crafting_history 中更改保留范围和任务限制。
资源历史
网络设置具有输入/输出历史和周期性存储数量的独立开关。
在那里选择每个网络的存储采样间隔、输入/输出间隔和历史保留时间,需在服务器允许的范围内。单独的输入/输出记录不会扫描库存;
接受的输入包括被虚空存储消耗的资源。在终端中选择资源并打开
其详细信息中的 Resource history 即可查看测量数据。
输入/输出历史默认每 60 秒保存聚合总数;存储采样默认值为五分钟。最近的摘要显示 两分钟的流量 和 一小时的库存变化。
流量摘要使用五秒间隔;库存摘要使用网络配置的存储
采样间隔。图表显示每个测量间隔的实际跨度,并在收集出现间隙时保留可用的部分计数。
Flow 还会记录已接受的输入和输出操作数量。最近的摘要会在测量间隔结束时显示每秒的大致速率。一次包含 64 个物品的传输计为一次操作;这些计数描述的是网络传输,而非单个机器的配方处理。
历史记录存储在世界目录下的 ae2webintegration/grids.sqlite 中的嵌入式 SQLite 数据库里。无需安装数据库软件。如果无法初始化数据库,服务器启动将会失败。默认情况下,每个网络最多保留 7 天和 250,000 条记录;当达到任一限制时,最旧的记录将被移除。每种资源可能保留一条较旧的库存测量值作为带时间戳的基线,且受相同记录数限制约束。在 config.toml 的 resource_history 下配置最小值、最大值、默认值以及记录上限,并通过 /ae2webintegration reload 或重启服务器来应用更改。超出新范围的现有网络选择将调整至最近的边界值。记录上限可以缩短所选的保留时长,但它不是字节限制。已过期的数据会从历史查询中隐藏;物理清理会在数据库初始化、写入和定期后台维护期间运行。缺失的测量值会显示为空白,而非零活动状态。
启用自动更新后,终端和选定的 CPU 视图会通过 SSE(Server-Sent Events)接收实时变更。CPU 列表会定期刷新。实时查看不需要追踪资源历史记录,也不会增加保存存储测量的频率。连接中断或存储拓扑变更后,终端会自动加载新的快照。
通知服务集成
仅在禁用公共模式时可用制作完成通知。
可以使用 minimum_crafting_duration_seconds 和 minimum_crafting_amount 过滤制作完成通知。通知必须同时满足两个配置的最低要求。这两个值的默认值均为 0,这意味着所有制作完成通知均保持启用状态。
为需要发送制作通知的每个网络启用记录制作历史。
制作更新会包含请求玩家的信息(如果能识别),通过 Web 终端下达订单时使用经过身份验证的账户。管理员和本地主机访问没有玩家身份标识。
Discord
创建一个 Discord Webhook,并将其 URL 设置为 AE2 Web Integration 配置中的 discord.webhook。
discord.role_id 配置可选的角色提及。
制作通知包含一张深色图片卡片,展示结果、网络名称、CPU、持续时间和请求者。设置 discord.crafting_style 为 IMAGE_CARD(默认)以显示完整卡片,SMALL_ICON 以显示带有物品缩略图的文本嵌入,或 SIMPLE 以仅显示文本。安装图标包以提供物品图像。当没有可用的图标时,SMALL_ICON 仅发送文本;如果渲染失败,IMAGE_CARD 会回退到文本。
ntfy
ntfy 将相同的制作更新作为手机或桌面通知发送。将 ntfy.host 设置为 ntfy.sh 或您自己的服务器,并将 ntfy.topic 设置为您在应用中订阅的主题。如果不带 http:// 或 https:// 的主机名将通过 HTTPS 发送。
当主题为公开时,请留空 ntfy.user 和 ntfy.password。私有主题需要两者都设置。仅设置其中之一会关闭 ntfy。
notifications.full_domain 是可选的。当设置此项时,点击通知将跳转到该地址。
服务器设置
管理员和可信的本机用户可以在服务器设置中编辑当前配置。保存并应用会写入 config.toml 并在不重启 Web 服务器的情况下应用更改。监听端口、管理员密码、公共模式、免密本机访问、可信代理和无认证请求限制在面板中为只读;请直接在配置文件中更改它们。手动编辑文件后,需重新加载配置或重启服务器才能生效。在 config.toml 中设置 general.allow_server_settings_editing = false 并重新加载,即可禁用通过 Web 读取和编辑服务器设置的功能,包括对管理员和本机可信用户的限制。此时标签页将显示禁用提示而非设置内容。访问权限默认为启用;开关只能在文件中更改。
已保存的 Discord Webhook 和 ntfy 密码永远不会显示。若要保留它们,请保持其替换字段不变,或者明确替换或清除它们。
安全性
公共模式
在公共模式下,每位玩家都可以创建自己的 Web 账户,并访问他们有权使用的 AE2 网络。注册从网站开始,并必须在游戏中使用 Web 面板显示的命令进行确认。
玩家必须在线才能注册。
玩家密码以加盐的 PBKDF2-HMAC-SHA1 哈希值存储。会话在没有活动的情况下一小时后过期,但可以通过使用延长至登录后的十二小时内。记住我功能可跨越服务器重启,在没有活动的情况下七天后过期,并且可以从登录起延长至六十天内。观看实时终端或 CPU 被视为活动。更改密码会使现有会话失效。
每个账户可以保留二十个“记住我”会话;另一个“记住我”登录将使最旧的一个登出。
公共模式禁用
当公共模式被禁用时,仅 Admin 账户可用。其密码在模组的配置文件中配置。会话机制与公共模式相同。
本机访问
来自回环地址(127.0.0.1/localhost)的连接默认以管理员身份进行身份验证。这由 allow_no_password_on_localhost 控制。当使用反向代理时,此规则适用于从代理标头解析出的客户端地址。
反向代理设置
模组内置支持解析反向代理背后的真实客户端 IP。解析出的地址一致地用于本机身份验证规则和基于 IP 的频率限制。
该模组仅在直接 TCP 连接来自以下来源时读取 X-Forwarded-For 或 X-Real-IP:
- 运行在与 Minecraft 服务器同一台机器上的代理;或
- 列在
trusted_proxies(受信任的代理)中的地址或网络。
同一台机器上的代理会自动受到信任,无需添加到配置中。对于运行在其他机器上的代理,请将 trusted_proxies 设置为逗号分隔的字面 IPv4/IPv6 地址或 CIDR 范围列表。例如,在 TOML 配置中:
[general]
trusted_proxies = '192.168.1.10, 10.20.0.0/24, 2001:db8::10'
不接受主机名;请使用字面地址或 CIDR 范围代替。
X-Forwarded-For 的优先级高于 X-Real-IP。对于类似 client, proxy1, proxy2 的链式结构,模组会从右向左遍历,跳过已配置的受信任代理,并使用第一个不受信任的地址作为客户端。这可以防止客户端通过直接发送伪造的 X-Forwarded-For: 127.0.0.1 标头来给自己授予 localhost 访问权限。
对于 HTTPS 终止,请保留公共 Host 标头(包括任何非标准端口),并将 X-Forwarded-Proto 设置为公共协议 http 或 https。模组仅从上述受信任的代理接受此协议标头。当缺少 Sec-Fetch-Site 时,它用于验证浏览器登录和注册表单的来源。代理必须覆盖 X-Forwarded-Proto,而不是转发任意客户端值或附加列表。对于多个代理跳数,最后一个受信任的代理必须提供经过验证的公共协议。
在同一台机器上运行的代理的 Nginx 配置示例:
location / {
    proxy_pass http://127.0.0.1:2324;
    proxy_set_header Host $http_host;
    proxy_set_header X-Forwarded-Proto $scheme;
    proxy_set_header X-Real-IP $remote_addr;
    proxy_set_header X-Forwarded-For $proxy_add_x_forwarded_for;
}
通过其他 Web 服务器托管
tools/php-proxy 目录包含一个 PHP 反向代理,它通过现有的 Web 服务器为模组的网站、资源和 API 提供服务。
遥测数据
遥测功能在非开发环境中默认启用。模组会在服务器启动十分钟后以及大约每小时发送一次小型 HTTPS 使用报告:
包含已安装模组 JAR 文件的加盐指纹、Minecraft 版本、公共模式与单人游戏设置,以及一个在服务器重启时和每个新 UTC 日首次报告时更改的随机会话 ID。
不会报告任何玩家身份、世界或网络内容。
有关数据处理和保留策略,请参阅 隐私政策。
我们感谢您保持开启状态,以帮助指导开发工作。
要在 Server settings(服务器设置)中禁用报告,请在 config/ae2webintegration/config.toml 的 [telemetry] 下设置 enabled = false,然后重新加载配置;或者使用命令 /ae2webintegration telemetry off。使用 on 可重新启用,或使用 status 检查设置状态。
单人游戏的房主可以使用这些命令而无需作弊权限;在专用服务器上,他们需要权限等级 4。
许可证
项目代码和原始界面图标采用 LGPL-3.0-or-later 许可证授权。
捆绑的第三方资产保留其各自的许可证:
第三方游戏资产
截图和交互式演示可能会显示来自 Minecraft、Applied Energistics 2、GT New Horizons (GTNH) 和其他第三方模组的物品图标和纹理。
这些资产仍归其各自的权利持有人所有,并受其原始许可证约束。它们仅用于演示 AE2 Web Integration 的界面和图标支持,不包含在项目 LGPL-3.0-or-later 许可证范围内。
AE2 Web Integration
Access your Applied Energistics 2 networks from a desktop or mobile browser. Browse storage and crafting
CPUs live, request crafts, explore resource history and build a personal dashboard with pinned resources.
Public servers can give each player their own account and access to their networks.
Works on dedicated servers and in single-player worlds. Multiplayer clients do not need the mod.
It adds no items or blocks.
The optional Icon Generator client-side mod (ae2webintegration-icon-generator-*.jar)
generates item icons from your modpack and resource packs.
? Official website · ▶️ Try the live demo
? Installation guide · ? API documentation
Current features
Terminal
- Browse, sort and filter multiple AE2 networks, with live storage and selected-CPU updates
- Submit crafting requests with automatic or manual CPU selection, and cancel running jobs
- View completed and cancelled crafting jobs after a server restart
- Track resource stock, input and output with interactive history charts
- Use responsive desktop and mobile layouts, light/dark/system appearance, and Monocraft or Lato fonts
- Choose names, icons or both, with configurable columns and page sizes, including no pagination
- Receive crafting notifications through Discord or ntfy when public mode is disabled
Pins and Home
Pin a resource from its context menu or Resource details. Pin in terminal keeps it at the top
of that network's terminal, above search and filters. Pin on Home adds a dashboard card with
configurable charts and summaries, visible regardless of the currently selected network.
Pins belong to your web account. Each player can keep their own terminal pins and Home layout;
Home can show resources from several networks together. Pinned resources retain access to recorded
history when they are no longer present in storage.
Crafting plan images
After calculating a plan, choose Export at the bottom left of the plan in the default theme
(the image icon on mobile). Choose the grid layout, tile contents, ordering and background, then
download a single PNG. The export includes
the full plan independently of the current search and works without an icon pack. Settings and the
image proportions are remembered for the next export; very large images use a lower resolution to fit.
Compatibility
The mod currently supports Minecraft 1.21.1 (NeoForge), 1.20.1 (Forge), 1.12.2 (Forge), and 1.7.10 (Forge/GTNH).
Builds for different versions are not interchangeable.
A few additional compatibility notes:
Requirements
- A compatible AE2 installation for one of the supported Minecraft versions
- A loaded ME network with a valid ME Controller
- An available TCP port for the built-in web server
- A firewall/NAT rule if you want to reach the panel from outside your local network
By default, the panel is available at http://your-server-ip-or-domain:2324/. The port is configurable.
Gallery
Crafting, resource history, mobile view and notifications
Crafting plan and CPU selection
Live CPU view
Resource history
Completed and cancelled crafts
Discord notification
Mobile terminal
Earlier video showcases
These videos show an earlier interface. See the gallery and demo above for the current UI.
How to use
The mod hosts its web panel and API on an HTTP server that starts with your Minecraft server or single-player world.
- Download the main mod JAR for your Minecraft version and mod loader from this project's downloads.
The separate file with
icon-generator in its name is the optional client-side icon generator.
- Drop the mod into the server's
mods folder, or your Minecraft instance's mods folder for single-player.
In multiplayer, only the server needs the mod.
- Start the server or open a single-player world once to generate the config.
- Open
config/ae2webintegration/config.toml. Configure the port, admin
password, public mode, and other settings as needed.
- For single-player or a private server where everyone shares the Admin account, disable public mode.
Keep it enabled if players need separate accounts and access to their own networks.
- Reload the config with
/ae2webintegration reload, or restart the server or single-player world.
- Allow the configured port through your firewall and router as needed, or route access through a reverse
proxy.
- Visit
http://your-server-ip-or-domain:configured-port/ and log in with the Admin account and the password
from the config.
In public mode, a player can create an account from the login page. After choosing a password, the page displays
an /ae2webintegration auth <token> command. The player must run that command in game to finish registration.
Access to networks
Networks must have a valid ME Controller, be loaded and finish starting before they
appear in the web panel. Controllerless subnetworks are not available through the website.
On all supported versions, a player can gain web access through ownership of an ME Controller,
Wireless Access Point or supported terminal connected to the network. Placing your own Wireless
Access Point is one straightforward way to set up access.
On GTNH 1.7.10 and AE2 UEL 1.12.2, a working Security Terminal provides another way: add the player's
biometric card with all four permissions — Build, Extract, Inject and Craft. Unassigned biometric
cards do not grant web access.
The Admin web account can access all available networks without a per-player access grant.
Protect its password accordingly. Choose a network in the web panel to open its terminal.
Optional item icons
To show item icons in the web panel, generate an icon pack from your Minecraft client:
- Download the Icon Generator file (
ae2webintegration-icon-generator-*.jar) for your Minecraft
version and mod loader from this project's downloads. Place it in your client's mods folder.
Use the same modpack as the server.
- Start the game with the resource packs you want to use for the icons, then enter a world.
- Run
/ae2webicons export in chat and wait for the progress window to finish.
- Find the generated
.ae2wi-icons file in the ae2webicons folder inside your game directory.
- Stop the server and copy that file into
config/ae2webintegration/. Keep its .ae2wi-icons extension;
the filename can stay unchanged.
- Start the server. A fresh browser shows Icons and names automatically when the pack is available.
Use Web Settings → Terminal display to change this to Icons only or Names only.
The icons use the appearance of your loaded resource packs. You can cancel generation from the
progress window. To replace or remove the server's icon pack, stop the server first and restart it afterward.
Keep only one .ae2wi-icons file in that folder. If several are present, the server logs their names
and disables icons until the conflict is resolved and the server is restarted.
Icons are optional; without an icon pack, the terminal displays item names.
Web themes
The mod currently includes one built-in theme. More themes are planned.
Choose a theme in Web Settings → Choose a theme. To install one for everyone, place its
ZIP in config/ae2webintegration/themes/ and restart the server. Set general.default_theme in
config/ae2webintegration/config.toml to server:<theme id> to make it the server default, or
builtin:default for the built-in UI. Users can follow that default or keep their own browser choice.
If a theme prevents normal use, open the page with ?safe=1 before its # fragment to
use the built-in UI.
Crafting history
Enable Record crafting history in a network's settings to track its crafting jobs. Enable
Include machine-requested crafting there to also track jobs started by machines on that network.
The machine option applies to new jobs. Enabling tracking does not reconstruct an ongoing job's history.
Completed and cancelled jobs are saved with the world and remain available after a server restart.
Choose crafting history retention in the network settings. The default is 7 days, with a limit of
1,000 jobs per network. Administrators can change the retention bounds and job limit in crafting_history.
Resource history
Network settings have independent switches for input/output history and periodic storage quantities.
Choose each network's storage sampling interval, input/output interval and history retention there,
within the server's allowed ranges. Input/output recording alone does not scan the inventory;
accepted input includes resources consumed by void storage. Select a resource in the terminal and open
Resource history in its details to view measurements.
Input/output history saves aggregated totals every 60 seconds by default; storage sampling defaults
to five minutes. Recent summaries show two minutes of flow and one hour of stock changes.
Flow summaries use five-second intervals; stock summaries use the network's configured storage
sampling interval. Charts show each measured interval's actual span and retain available partial
counts when collection has gaps.
Flow also records the number of accepted input and output operations. Recent summaries show an
approximate rate per second when the measured interval is complete. One transfer of 64 items counts
as one operation; these counts describe network transfers, not individual machine recipes.
History is stored in an embedded SQLite database at ae2webintegration/grids.sqlite in the world directory.
No database installation is needed. Server startup fails if the database cannot be initialized.
The defaults retain up to 7 days and 250,000 records per network;
the oldest records are removed when either limit is reached. One older stock measurement per resource
may remain as a dated baseline, within the same record limit. Configure minimum, maximum and default
values, plus the record cap, under resource_history in config.toml and apply them with /ae2webintegration reload
or a server restart.
Existing network choices outside new bounds are adjusted to the nearest bound. The record cap can
shorten the selected retention and is not a byte limit. Expired data is hidden from history queries;
physical cleanup runs during database initialization, writes and periodic background maintenance.
Missing measurements are shown as gaps, not zero activity.
With Automatic updates enabled, the terminal and selected CPU view receive live changes over SSE.
The CPU list refreshes periodically. Live viewing does not require resource history tracking or
increase the frequency of saved storage measurements. After a connection interruption or storage
topology change, the terminal loads a fresh snapshot automatically.
Notification services integration
Crafting notifications are available only when public mode is disabled.
Crafting completion notifications can be filtered with minimum_crafting_duration_seconds and
minimum_crafting_amount. A notification must meet both configured minimums. Both values default to 0,
which keeps all crafting completion notifications enabled.
Enable Record crafting history for each network that should send crafting notifications.
Crafting updates include the requesting players when identified, using the authenticated account for
orders placed through the web terminal. Administrator and localhost access have no player identity.
Discord
Create a Discord webhook and set its URL as discord.webhook in the AE2 Web Integration config.
discord.role_id configures an optional role mention.
Crafting notifications include a dark image card with the result, network name, CPU, duration and requesters.
Set discord.crafting_style to IMAGE_CARD (default) for the full card, SMALL_ICON for a text embed with an item thumbnail, or SIMPLE for text only.
Install an icon pack to supply item images. SMALL_ICON sends text only when no usable icon is available; IMAGE_CARD falls back to text if rendering fails.
ntfy
ntfy sends the same crafting updates as a phone or desktop notification. Set ntfy.host to ntfy.sh or to your own server, and set ntfy.topic to a topic you subscribed to in the app. A host without http:// or https:// is sent over HTTPS.
Leave ntfy.user and ntfy.password empty when the topic is public. A private topic needs both. Setting only one of them turns ntfy off.
notifications.full_domain is optional. When it is set, opening the notification goes to that address.
Server settings
Administrators and trusted localhost users can edit the active configuration in Server settings.
Save and apply writes config.toml and applies the changes without restarting the web server.
The listener port, administrator password, public mode, password-free localhost access, trusted proxies
and unauthenticated request limit are read-only in the panel; change them directly in the configuration file.
Manual file edits take effect after reloading the configuration or restarting the server.
Set general.allow_server_settings_editing = false in config.toml and reload to disable reading and
editing server settings through the web, including for administrators and trusted localhost users.
The tab then shows a disabled notice instead of the settings. Access is enabled by default; the switch
can only be changed in the file.
Saved Discord webhooks and ntfy passwords are never displayed. Leave their replacement fields unchanged
to keep them, or explicitly replace or clear them.
Security
Public mode
In public mode, every player can create their own web account and access the AE2 networks they are allowed to
use. Registration starts on the website and must be confirmed in game with the command shown by the web panel.
The player must be online to register.
Player passwords are stored as salted PBKDF2-HMAC-SHA1 hashes. Sessions expire after one hour without activity
and can be extended by use for up to twelve hours from login. Remember me survives server restarts,
expires after seven days without activity and can be extended for up to sixty days from login. Watching a
live terminal or CPU counts as activity. Changing the password revokes existing sessions.
Each account can keep twenty remembered sessions; another remembered login signs out the oldest one.
Public mode disabled
When public mode is disabled, only the Admin account is available. Its password is configured in the mod's
config file. The session mechanism is the same as in public mode.
Localhost access
Connections from the loopback address (127.0.0.1/localhost) are authenticated as admin by default. This is
controlled by allow_no_password_on_localhost. When a reverse proxy is used, this rule applies to the client
address resolved from the proxy headers.
Reverse proxy setup
The mod has built-in support for resolving the real client IP behind a reverse proxy. The resolved address is
used consistently for both the localhost authentication rule and per-IP rate limiting.
The mod only reads X-Forwarded-For or X-Real-IP when the direct TCP connection comes from:
- a proxy running on the same machine as the Minecraft server; or
- an address or network listed in
trusted_proxies.
A proxy on the same machine is trusted automatically and does not need to be added to the config. For a proxy
running on another machine, set trusted_proxies to a comma-separated list of literal IPv4/IPv6 addresses or
CIDR ranges. For example, in the TOML config:
[general]
trusted_proxies = '192.168.1.10, 10.20.0.0/24, 2001:db8::10'
Hostnames are not accepted; use a literal address or CIDR range instead.
X-Forwarded-For takes priority over X-Real-IP. For a chain such as client, proxy1, proxy2, the mod walks
from right to left, skips configured trusted proxies, and uses the first untrusted address as the client. This
prevents a client from granting itself localhost access by sending a forged
X-Forwarded-For: 127.0.0.1 header directly.
For HTTPS termination, preserve the public Host header (including any nonstandard port) and set
X-Forwarded-Proto to the public protocol, http or https. The mod accepts this protocol header only
from the same trusted proxies described above. It is used to validate the origin of browser login and
registration forms when Sec-Fetch-Site is absent. The proxy must overwrite X-Forwarded-Proto, not
forward an arbitrary client value or append a list. With multiple proxy hops, the last trusted proxy
must supply the verified public protocol.
Example Nginx configuration for a proxy running on the same machine:
location / {
    proxy_pass http://127.0.0.1:2324;
    proxy_set_header Host $http_host;
    proxy_set_header X-Forwarded-Proto $scheme;
    proxy_set_header X-Real-IP $remote_addr;
    proxy_set_header X-Forwarded-For $proxy_add_x_forwarded_for;
}
Hosting through another web server
The tools/php-proxy directory contains a PHP reverse proxy that serves
the mod's website, assets and API through an existing web server.
Telemetry
Telemetry is enabled by default outside development environments. The mod sends a small HTTPS usage
report ten minutes after server startup and approximately once per hour:
a salted fingerprint of the installed mod JAR, Minecraft version, public-mode and singleplayer settings,
and a random session ID that changes on server restart and at the first report of each new UTC day.
No player identities, world or network contents are reported.
See the privacy policy for data handling and retention.
We’d appreciate you keeping it enabled to help guide development.
Disable reporting in Server settings, with enabled = false under [telemetry] in
config/ae2webintegration/config.toml followed by a config reload, or with
/ae2webintegration telemetry off. Use on to re-enable or status to inspect the setting.
The singleplayer owner can use these commands without cheats; on a dedicated server they require permission level 4.
License
Project code and original interface icons are licensed under LGPL-3.0-or-later.
Bundled third-party assets retain their own licenses:
Third-Party Game Assets
Screenshots and the interactive demo may display item icons and textures from Minecraft, Applied Energistics 2, GT New Horizons (GTNH), and other third-party mods.
These assets remain the property of their respective rights holders and are subject to their original licenses. They are used to demonstrate AE2 Web Integration's interface and icon support and are not covered by the project's LGPL-3.0-or-later license.


 模组

 模组

 模组
 模组

 模组
 模组
评论 0
登录后参与评分
还没有评论,来抢沙发吧