由 cyber.98 制作的模组
这个非常简单的模组允许你连接到互联网(或本地机器)上运行的 API,以验证或撤销 Minecraft UUID 的有效性。这最初是打算与运行 API 的 Discord 机器人一起使用,但在其他用例中也是完全有效的。如果你想使用 Discord 机器人来确保特定人员在加入服务器前拥有某个角色,请跳过到该部分。
配置设置
模组有两个配置设置:
api:[默认URL]
message:[默认字符串]
- API URL 定义了所有请求应指向的基础地址。可以是一个网站或 IP,但服务器必须允许 HTTP 连接。
- 消息字符串是在 API 在线且对该 UUID 返回虚假验证时显示给玩家的内容。
设置 API
API 设置非常简单。它应符合以下指南:
- 至少有一个端点,位于 '/verify'
- 在大约 2 秒内响应,以确保在被踢出之前玩家无法取得进展
- 遵循此 JSON 指南以获取 URL 和响应:
URLS:
[配置中定义的基础URL]/[从服务器发送的Minecraft UUID] // 确保你有东西解析URL栏,因为服务器发送的是GET请求而不是POST请求。

Responses:

{
  "verified":布尔值
}
就这么简单(至少对于这个版本来说是这样)
Discord 机器人设置
本模组自带功能完整的 Discord 机器人!
按照以下步骤让用户通过 Discord 机器人进行身份验证,而不必自己制作 API!
先决条件
- 系统上启用了脚本运行(参见 微软关于此的页面)
- 已安装 NodeJS 和 npm(我是 JS 开发者,不知道你想让我做什么)
使用方法:
/link uuid:[UUID] -> 将你的 Discord 账户链接到你的 Mojang 账户。如果你不知道自己的 UUID,尝试先加入服务器,服务器会告诉你(假设 API 已经在运行)。
/unlink -> 很明显,会从数据库中删除你的条目,允许你重新链接
/ping -> 获取 API 的状态和一些响应时间
设置指南
前往 机器人的 GitHub 页面
并下载源代码为 zip 文件。解压后打开根文件夹并运行
npm install
并等待片刻让它获取所需的包。
之后,创建一个包含以下信息的 config.json 文件(填写字段)
{
    "token":"Discord 机器人令牌",
    "botname":"你在终端中想看到的机器人名称",
    "author":"你的名字",
    "clientId":"机器人的客户端 ID",
    "adminids":["你的用户 ID"],
    "authorid":"你的用户 ID",
    "roleID":"你要查找的角色 ID"
}
你的 Discord 机器人需要:
仅限 Guild 安装。
公开机器人关闭(除非你不是 Discord 服务器管理员)
服务器成员意图。
这些权限:
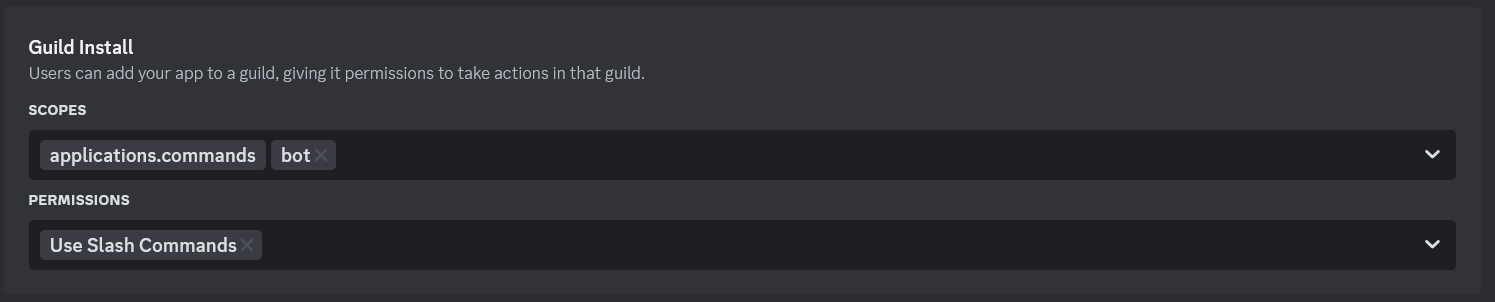
添加你的令牌,你就可以开始使用了!
要运行脚本,打开文件夹并运行
npm start
A mod by cyber.98
This very simple mod allows you to connect to an api running somewhere on the internet (or on your machine) to validate or invalidate minecraft UUIDS. This was originally intended to be used with a discord bot running an api, but is completely valid outside of that use case. If you'd like to use the discord bot to make sure specific people have a role before joining, please skip to that section.
Configuration settings
The mod has two configuration settings:
api:[a url by default]
message:[a string by default]
- The api url is what defines the base of where all requests should go. This can be a site, or an ip, but the server must allow for http connections.
- The message string is what is shown to the player if the api is online, and responds with a false verification for that uuid.
Setting up an API
API setup is super simple. It should meet the following guidelines:
- Have at least one endpoint, being at '/verify'
- Respond within about 2 seconds to ensure no progress can be made by players before being kicked
- follow this json guide for urls and responses:
URLS:
[base url defined in config]/[minecraft uuid sent from the server] // make sure you have something to parse the url bar, as the server sends get requests, not post requests.

Responses:

{
  "verified":boolean
}
It's that easy (at least for this version)
Discord bot setup
This mod comes feature complete with a discord bot!
Follow these steps to allow users to authenticate using the discord bot instead of having to make your own api!
Prerequisites
- Script running is enabled on your system (see microsoft's page on this)
- You have nodeJS and npm installed (I'm a js developer idk what you want me to do)
Usage:
/link uuid:[uuid] -> will link your discord account to your mojang account. if you don't know your uuid, try joining the server first, the server will tell it to you (assumming the api is running already).
/unlink -> pretty self-explanatory, will remove your entry from the database, allowing you to relink it
/ping -> gets the status of the api and some response times
setup guide
Head to The github page for the bot
and download the source code as a zip. extract it, and open the root folder and run
npm install
and wait a few moments for it to get the required packages.
afterwards, create a config.json file with the following information (fill in the fields)
{
    "token":"discord bot token",
    "botname":"a name you wanna see in the terminal for the bot",
    "author":"your name",
    "clientId":"the bots client id",
    "adminids":["your user id"],
    "authorid":"your user id",
    "roleID":"the id of the role you want to look for"
}
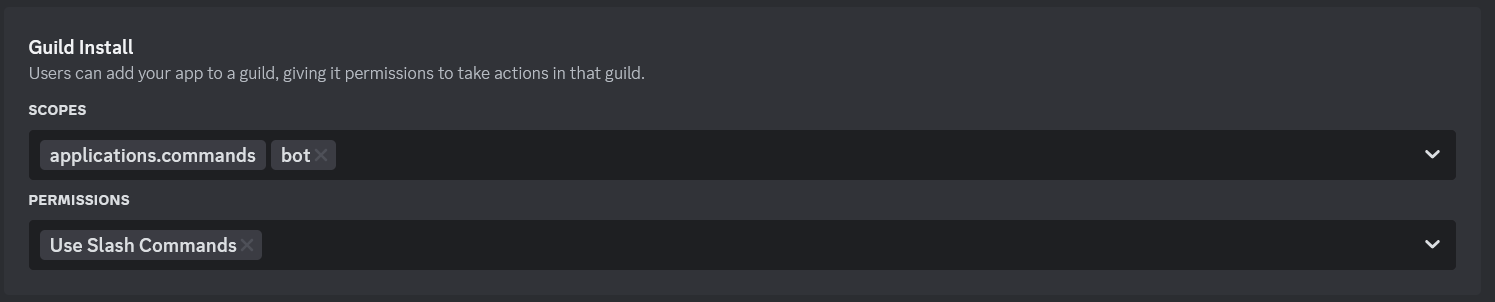
your discord bot will need:
Guild install only.
Public bot off (unless you are not discord server admin)
Server members intent.
These permissions:
Add in your token, and you're ready to hit the ground running!
To run the script, open the folder and run
npm start

 模组

 模组

 模组
 模组

 模组

 模组
评论 0
登录后参与评分
还没有评论,来抢沙发吧