一个用于规划和建造信标范围的 Fabric 模组。单独作为客户端使用;将相同的 jar 文件放入服务器,整个团队即可共享同一个计划。
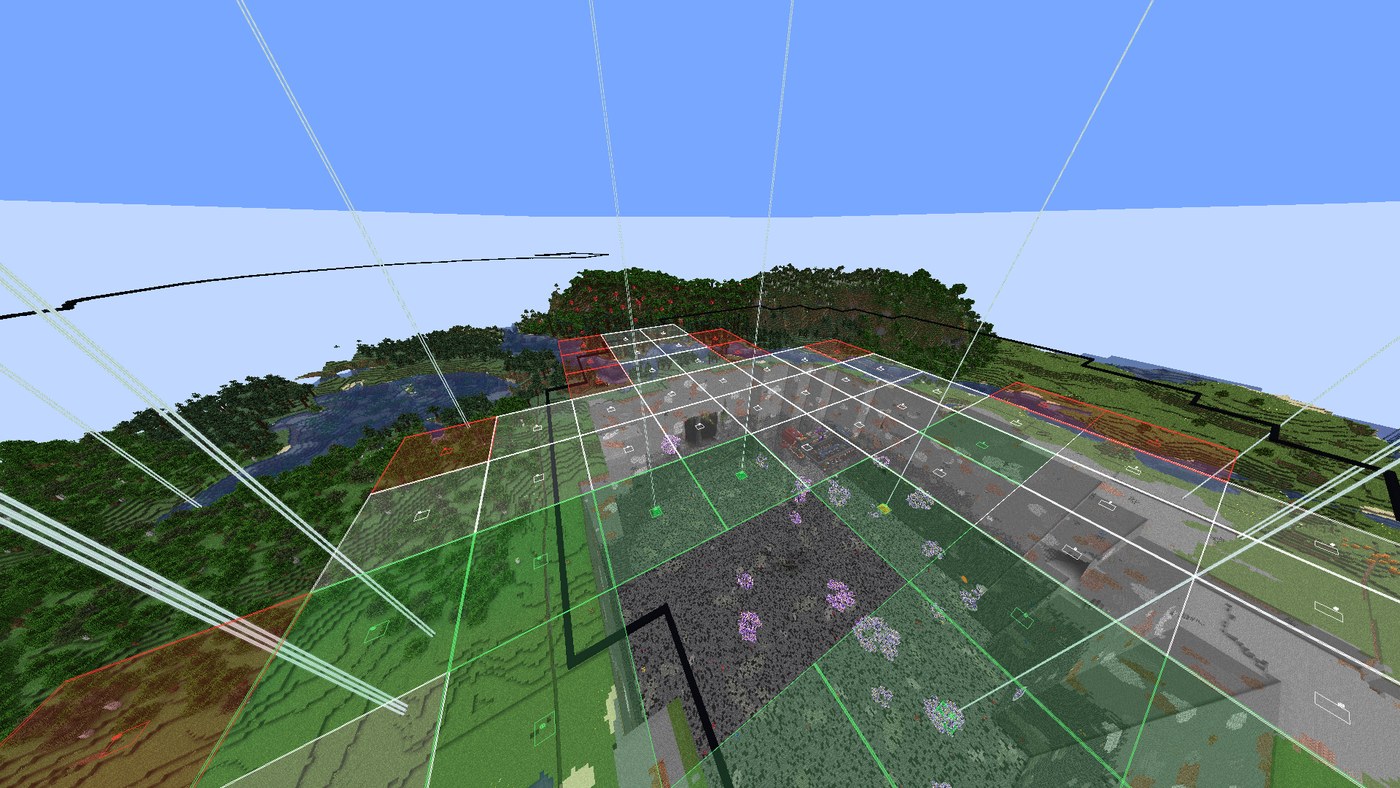
在中心放置一个信标,滚动以扩展网格,Beaconator 会计算出每个其他信标的位置,绘制每个信标覆盖的确切地面范围,并跟踪哪些已经建成。
Español
为什么需要它
结构模组(Schematic mods)能完成任务,但在这一特定任务中它们反而会造成干扰:
- 每个结构方块都会被高亮显示,包括空气和泥土,这些噪音需要你费力去忽略。
- 没有任何东西显示信标实际覆盖的区域,所以你只能走进盲区才能发现范围中的空洞。
- 区分已建成的部分和未建成的部分意味着你需要用肉眼与结构图进行比对。
Beaconator 只专注于信标范围,因此它可以将其做得非常完善。
功能特性
- 可用于规划地图。 模组绘制自己的地图,每像素代表一个方块,基于你游玩时加载的区块,并将整个网格叠加在上面。你可以决定哪些节点包含在内、哪些排除在外、哪些被移除,只需点击它们即可。这正是规划范围的真正方式:俯视形状,而不是站在远处一百个方块外眯着眼看方块盒子。瓦片会缓存到磁盘上,所以你所飞越过的区域会保持绘制状态。
- 从一个点生成网格。 放置中心点,滚动以逐步遍历同心环:1 个节点、9 个、25 个、49 个。当范围不是正方形时,边可以单独扩展。
- 真实的覆盖体积。 每个节点都按照原版实际应用效果的体积绘制。即宽
2r + 1 个方块,向下 r 个方块,向上无限制,而不是立方体。
- 每个节点 1 到 5 个信标 位于同一个共享金字塔上,因此你可以同时运行所有主要效果。层级大小和方块数量由模组自动计算。
- 节点状态。 左键单击会从计划中删除节点,右键单击将其标记为范围之外,这会在其顶部放置黑色染色玻璃,以便从远处识别为“非我方”。
- 实时扫描。 当你建造它们时,节点会自动变绿,半建成的金字塔随着方块的放置逐渐向绿色着色。
- 材料清单 显示计划所需以及仍缺少的材料。
- 辅助放置 会从你的快捷栏中选择正确的方块,并拒绝让你将计划中的方块放置在计划不需要的位置。
- 层级过滤器 允许你一次处理一层。
- Litematica 导入和导出,这样你可以拾取你已经建成的范围,并将结构图交给没有运行此模组的人。如果安装了 Litematica,Easy Place 会遵循其切换开关而不是与之冲突。
- 通往分拣器的水流线。 范围只是一半的建设:另一半是将你投入信标的物品运送到中间分拣器的通道。Water 选项卡会根据计划计算出整个网络,在金字塔基座之间留出的那一层上进行,并将其成本降至你必须挖掘的冰潜影盒。你可以自己绘制和擦除路径,地图上显示的就是将要建造的。
- 由服务器共享的计划。 将 jar 文件放入 Fabric 服务器,一个计划属于所有人:当你加入时它会到达,任何人放置、排除或移除的节点都会实时显示给其他人。发布它是管理员的决定,标记节点则是任何人的权限。如果没有在服务器上安装此模组,则没有任何变化,且 vanilla 客户端永远不会收到任何内容。
- 英文和西班牙文,通过屏幕而非游戏语言进行切换。
- 每个按键均可重新绑定 来自模组的 Keys 选项卡,并且屏幕也可以从 Mod Menu 打开。
要求
- Minecraft 1.21 至 1.21.8、1.21.11、26.1.2 和 26.3,每个版本一个 jar 文件
- Fabric Loader 0.16 或更高版本适用于 1.21;0.19.5 或更高版本适用于 26.3
- Fabric API
将 jar 文件放入 mods/ 目录并启动游戏。1.21 使用 Java 21,26.x 使用 Java 25。
更新会保留你保存的计划、节点状态、水流线和材料总量。保留你的 config/beaconator/ 文件夹和 config/beaconator.json 设置以及服务器世界。在 26.x 上,压力板显示为标记而不是完整的幽灵方块模型。
显示设置有两个页面:使用 Colours / layers 进入第二页。
可选,仅当你希望整个团队共用一个计划时:将相同的 jar 文件也放入 Fabric 服务器。即使没有它,模组仍然有效,只是你只能独自保留计划。
入门指南
Beaconator 只做一件事:均匀地在大面积区域内布置信标,不留空洞,并清楚知道你还需要建造什么。如果你正在为出生点建立防御范围,这就是你要用的模组。
1. 打开屏幕。 按 Shift + B。这是整个界面:顶部是选项卡,底部是 Done。单独按 B 可开启或关闭编辑模式。
2. 制定计划。 大致站在区域的中心,在 Plan 选项卡上,按 New plan here。如果范围已经建了一半,改为按 Detect from world,模组会读取已有的信标及其真实坐标。
3. 在地图上塑造形状。 Map 选项卡是模组自己的地图,根据你加载的区块绘制,每像素代表一个方块,上面叠加了你的网格。
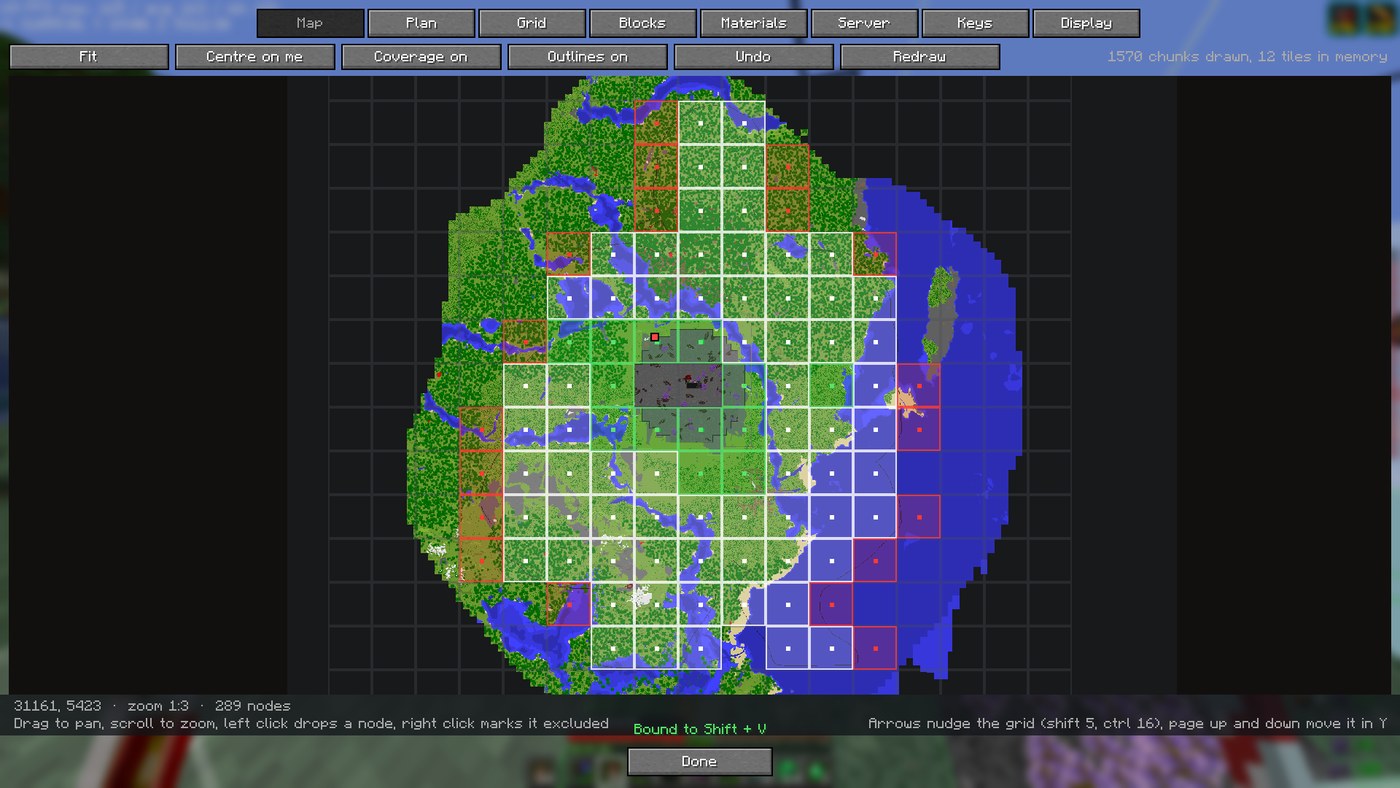
在其中移动:
| 输入 |
功能 |
| 拖拽 |
移动地图 |
| 滚轮 |
缩放 |
| 适配按钮 |
缩小视图,直到整个计划显示在屏幕上 |
| 居中于我按钮 |
跳转到你站立的位置 |
| 左键点击节点 |
从计划中移除(完全未建造) |
| 右键点击节点 |
标记为排除(已建造,但不属于周长范围) |
| Shift + 拖拽,左方向 |
移除矩形区域内的所有内容 |
| Shift + 拖拽,右方向 |
排除矩形区域内的所有内容 |
| Ctrl + 拖拽 |
将矩形区域恢复为待定状态 |
| Ctrl + Z,或撤销 |
撤销最后一次更改,可以是单个节点或整个矩形区域 |
| 方向键 |
将整个网格推移一个方块(Shift 推5格,Ctrl 推16格) |
| Page Up / Down |
沿 Y 轴移动网格 |
| Alt + 拖拽节点,或移动按钮 |
将该节点移出网格 |
关闭屏幕不会丢失任何内容:计划会自动保存,下次加入该服务器时自动重新打开。
移动单个节点
有时节点会落在信标无法放置的位置:比如在峡谷中、在有价值的物体上,或者在你挖掘形状外的几个方块处。为了修正这一个节点而推动整个网格会导致其他两百个节点也发生移动,因此你可以只移动这一个节点,通过开启移动模式或按住 Alt 键实现,而其他所有节点保持原位不动。
当拖拽的节点落回到距离其所在行或列四个方块以内时,它会自动吸附回该行或列。这通常是符合预期的:与行对齐的节点能保持该行水渠笔直。在拖拽时按住 Control 键可以将其放置在任意位置。当开启移动模式时,方向键将微调你上次点击的节点,而不是整个网格,用于最后几个方块的精确调整。
地图会从移动的节点画一条线回到它所属的单元格,这样即使边缘经过微调,看起来仍然是有意的布局,而不是测量失误的网格。偏离其行的节点会被排除在水网络之外:它保留自己的信标和金字塔,但不会有水渠通向它。
4. 设置参数。 在网格选项卡上:每个节点的信标数量、金字塔层级、间距以及网格覆盖范围。保持间距跟随层级开启,这样覆盖范围将精确对齐,既无重叠也无空隙。按钮下方的线条会提示你是否满足这些条件。
5. 开始建造。 现在去挖吧。在游戏中你将看到:
-
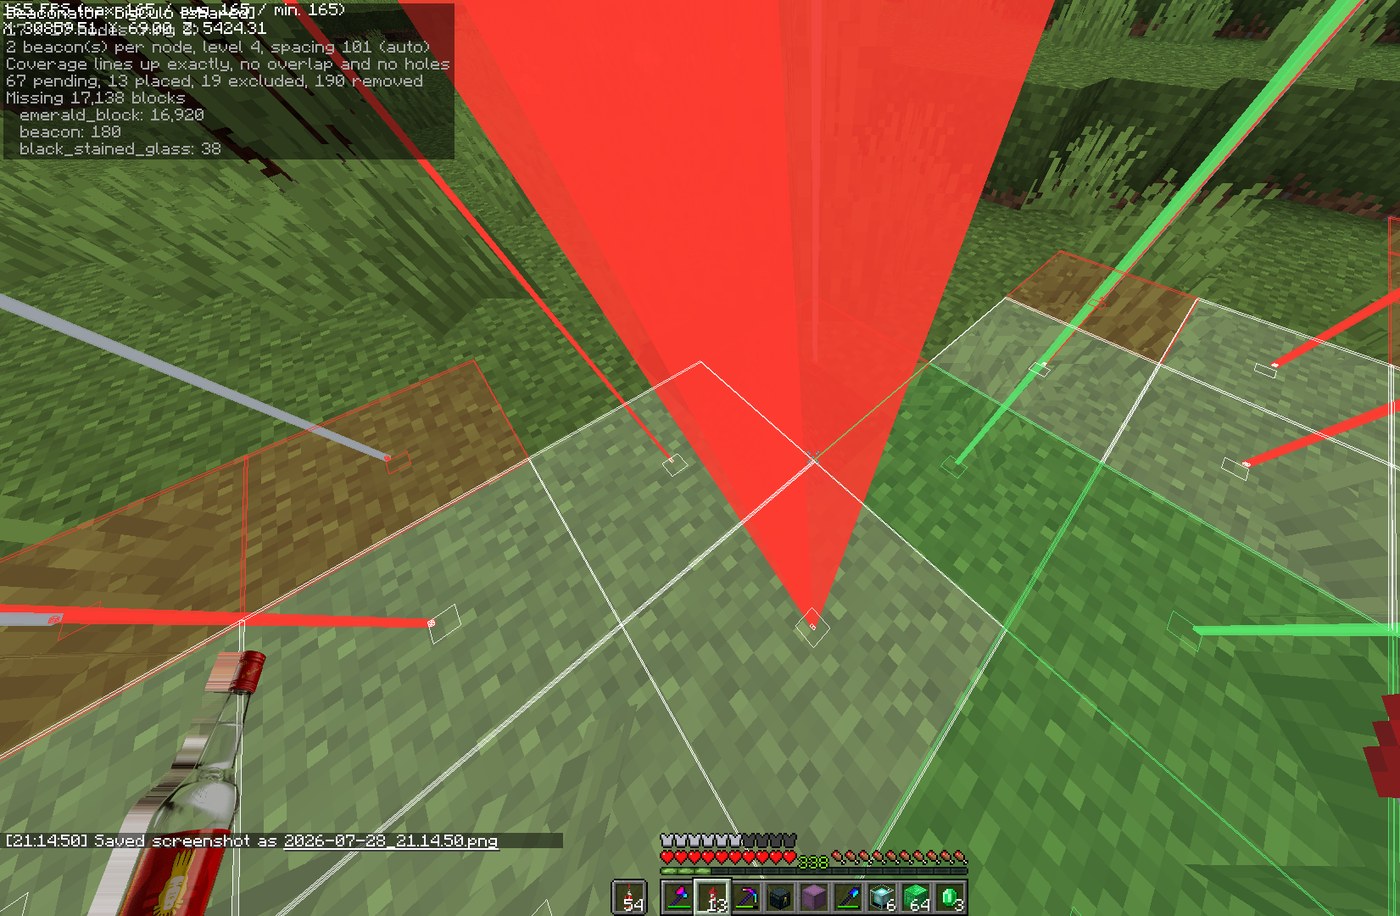
每个信标位置都有光束射向天空,就像真实的信标一样。红色表示尚未建造,黄色表示已开始但未完成(包括已建好金字塔但缺少信标的情况),绿色表示已完成,灰色表示被排除。按 G 键可以在光束碍事时将其隐藏。
-
每个信标实际提供的覆盖范围,以便发现理论之外的空洞。
-
HUD 中的材料列表以及 Materials 选项卡上的剩余材料清单。
-
随着你建造进度,节点会自动变绿。你无需向模组告知任何信息。
6. 团队协作。 如果服务器安装了该模组,会出现服务器选项卡。按分享我的计划将其上传;其他人只需点击名称即可打开。此后,任何人完成的节点都会实时显示给其他人。当你标记的内容正在发送给所有人时,HUD 会显示 [shared]。
水渠线路
仅在你建造分拣器(digsort)时有阅读价值。我们的做法是从信标向中间的分拣器铺设水流通道,这样在任何信标处投入的潜影盒最终都会自动进入分拣器。如果这不是你的建造需求,请跳过此节:模组的其余部分不需要它。首次打开该选项卡时会明确说明这一点。
- 瞄准水流离开分拣器的方块,打开界面,进入Water选项卡,按Drain: look at it(排水:注视)。这里没有合理的默认值:网格中心通常位于中心节点自身的金字塔内部。
- 按Generate(生成)。你会得到每行节点对应一根脊柱,以及一根通往排水口的干管,每条路径都确保不穿过任何金字塔底部。形状呈鱼骨状,因为优化的目标是物品进入的速度,而非网络成本:每个物品沿曼哈顿距离绕行单一拐角,没有任何无对角线的方案能优于这种设计。
- 修改你不满意的部分。Draw(绘制)模式下,拖拽可铺设路径(宽一格,自动吸附到轴向),右键点击可擦除一段。你所绘制的内容会替换计算结果,而不是叠加在上面,这也是为什么Generate会询问你是否丢弃已有绘制的原因。
- 查看Materials选项卡上的账单:渠道方块、冰、桶、压力板。其中冰是需要开采的资源,每块硬化冰需9个方块,每块蓝冰需81个方块,因此其数量比网络长度高出一个数量级。尽早了解这一点更好。
穿过金字塔底部的路径以红色绘制,从未到达的水渠节点会打上一个叉。这两种情况都不会被拒绝:系统会提示它会破坏什么,由你自己决定。
区块边界是例外。 流动的水流每秒推动一次物品;裸露的冰只能维持已有的速度,而区块卸载后重新加载时不会恢复这个速度。在周长外围,区块卸载是常态。因此,水源总是放置在边界前的最后一个方块上,间距从此处重新开始计算,且压力板永远不会放置在边界两侧。如果角落落在边界上,且不移动路径就无法调整,则在世界中显示为红色柱子,在地图上显示为一个叉。Cost 选项卡会统计边界数量,并在所有边界下方都有流动水时变为绿色。
在 Water > Look(水 > 查看)中开启 Sources and plates(水源与压力板),模组便会同时显示两者:每隔若干方块出现一个水源,所有水流均朝向排水口流动;在每个水源上游一个方块处设置一个压力板,即此处水流与后方水流交汇之处。一切计算均从河道死胡同开始,向排水口方向逐块遍历,因此任何水流都不会指向远离排水口的方向,且你已放置的水也会被计入:如果该方块已经按正确方向流动,则无需再在此处进行建议。从远处看,它们像是天空中可见的柱子。走近后,压力板会变成真正的压力板,包括模型和纹理,完美嵌入其所在的方格中,这样你就可以在你自己的位置放置它。水源则保持为半透明方块,位于水位高度:由于流体不由方块渲染器绘制,因此没有可供游戏查询的实体方块。在 26.x 版本中,它们仍然只是标记,因为该版本没有可用的单一方块调用接口。
水源和压力板仅被计数和显示,并不会实际放置,网络数据目前也不支持导出为 litematic 文件。这些部分只能在实际世界中验证。
按键
所有按键绑定均可重新设置,可通过游戏的控制屏幕或模组的 Keys(按键)选项卡进行更改。
绑定可以接受修饰键,因此 G、Shift + G 和 Ctrl + Shift + G 是三个不同的操作。
| 绑定 |
默认值 |
| 编辑模式 |
B |
| 打开界面 |
Shift + B |
| 信标显示开关 |
G |
| 将中心设置为你站立的位置 |
未绑定 |
| 渲染开关 |
未绑定 |
| 简易放置开关 |
未绑定 |
| 图层上移 · 图层下移 |
未绑定 |
| 扫描世界 |
未绑定 |
| 撤销 |
未绑定 |
在编辑模式下,于世界中:
| 输入 |
功能 |
| 滚轮滚动 |
扩大或缩小网格 |
| Shift + 滚轮滚动 |
每个节点的信标层数,1 到 6 |
| Ctrl + 滚轮滚动 |
微调间距 |
| 左键点击节点 |
从计划中移除,或恢复 |
| 右键点击节点 |
标记为排除,或恢复 |
命令
共有三条,因为其他所有内容都是按钮,并且会显示其当前值,而命令无法做到这一点。
| 命令 |
功能 |
/bea 或 /bea gui |
打开界面 |
/bea share |
将当前打开的计划发布到服务器 |
几何结构
具有 level 层金字塔层的信标可达 10 * level + 10 个方块的高度,因此完整的 4 级金字塔覆盖一个边长为 101 个方块的正方形。将间距设置为该值,覆盖范围即可精确对齐,无重叠也无空隙。任何更宽的间距都会留下无效的地面条带,Beaconator 会用红色标示出来,以便你在踩上去之前注意到。
共享同一座金字塔的信标会使第 k 层变为 (2k + a) 乘以 (2k + b),其中 a x b 是信标所在的矩形区域。形状至关重要:四个信标排成一行需要每节点 236 个方块,四个信标排成正方形则需要 216 个方块,对于数百个节点而言,这相差数千个方块。Beaconator 会计算所有适合你信标的矩形,并选择成本最低的方案。
由此得出的一个有趣现象:五个和六个信标所需的金字塔成本相同,因为它们都生活在 2x3 的区域内。只有五种主要效果,因此第六个是免费赠送的备用效果。
数学逻辑位于 xyz.w4ve.beaconator.model 包中,不包含任何 Minecraft 相关代码,并通过针对真实 208 节点周长的单元测试进行了覆盖。
构建
JAVA_HOME=/path/to/jdk-21 ./gradlew build
jar 文件位于 build/libs/ 目录下。
许可证
MIT。行为灵感来源于大家常用的示意图和信息 HUD 模组,但未复制任何代码。
A Fabric mod for planning and building beacon perimeters. Client side on its own; put the
same jar on the server and the whole team shares one plan.
Drop one beacon in the middle, scroll to grow the grid, and Beaconator works out where every
other beacon goes, draws exactly how much ground each one covers, and keeps track of which ones
you have already built.
Español
Why
Schematic mods do the job, but for this one task they get in the way:
- Every schematic block is highlighted, air and dirt included, which is noise you have to look past.
- Nothing shows the area a beacon actually covers, so you find the holes in your perimeter by walking into them.
- Telling apart what is built from what is not means comparing against the schematic by eye.
Beaconator only does perimeters, so it can do them properly.
What it does
- A map you can plan on. The mod draws its own map, one pixel per block, from the chunks you load as you play, and puts the whole grid on top of it. You decide which nodes are in, which are out and which get dropped by clicking on them. That is how a perimeter actually gets planned: looking down at the shape, not squinting at boxes from the ground a hundred blocks away. Tiles are cached on disk, so what you have flown over stays drawn.
- Grid from one point. Place the centre, scroll to step through concentric rings: 1 node, 9, 25, 49. Sides can be grown on their own when the perimeter is not square.
- Real coverage volumes. Each node is drawn as the volume vanilla actually applies effects in. That is
2r + 1 blocks wide, r blocks down, and unbounded upwards, not a cube.
- 1 to 5 beacons per node on one shared pyramid, so you can run every primary effect at once. The layer sizes and block counts are worked out for you.
- Node states. Left click drops a node from the plan, right click marks it as outside the perimeter, which puts a black stained glass on top so it reads as "not one of ours" from far away.
- Live scan. Nodes turn green on their own as you build them, and half built pyramids shade towards green as their blocks go in.
- Material list of what the plan needs and what is still missing.
- Assisted placement that picks the right block out of your hotbar and refuses to let you put plan blocks where the plan wants none.
- Layer filter to work one course at a time.
- Litematica import and export, so you can pick up a perimeter you already built and hand the schematic to people who do not run this mod. If Litematica is installed, easy place follows its toggle instead of fighting it.
- Water lines to the digsort. A perimeter is only half the build: the other half is the
channels that carry what you throw in at a beacon to the sorter in the middle. The Water tab
works the whole network out from the plan, on the one layer left free between the pyramid bases,
and costs it down to the shulkers of ice you actually have to mine. You can draw and erase runs
yourself, and what is on the map is what gets built.
- A plan shared by the server. Drop the jar on a Fabric server and one plan belongs to
everyone: it arrives when you join, and every node anyone places, excludes or drops shows up
live for the rest. Publishing it is an operator's call, marking nodes is anybody's. Without the
mod on the server nothing changes, and a vanilla client is never sent anything.
- English and Spanish, switched from the screen rather than from the game language.
- Every key rebindable from the mod's own Keys tab, and the screen opens from Mod Menu too.
Requirements
- Minecraft 1.21 through 1.21.8, 1.21.11, 26.1.2 and 26.3, one jar per version
- Fabric Loader 0.16 or newer for 1.21; 0.19.5 or newer for 26.3
- Fabric API
Drop the jar in mods/ and start the game. Use Java 21 for 1.21 and Java 25 for 26.x.
Updating preserves your saved plans, node states, water lines and material totals. Keep your
config/beaconator/ folder and config/beaconator.json settings and server world. On 26.x, pressure plates are shown as markers
rather than full ghost block models.
Display settings have two pages: use Colours / layers for the second page.
Optional, and only if you want the whole team on one plan: put the same jar on the Fabric
server as well. Without it the mod still works, you just keep your plan to yourself.
Getting started
Beaconator is for one job: covering a large area in beacons, evenly, without holes, and knowing
what you have left to build. If you are spawn proofing a perimeter, this is the mod.
1. Open the screen. Press Shift + B. That is the whole interface: tabs across the top,
Done at the bottom. B on its own turns edit mode on and off.
2. Make a plan. Stand roughly in the middle of the area and, on the Plan tab, press
New plan here. If the perimeter is already half built, press Detect from world instead
and the mod reads the beacons that are already there, with their real coordinates.
3. Shape it on the map. The Map tab is the mod's own map, drawn one pixel per block from
the chunks you have loaded, with your grid on top of it.
Getting around it:
| Input |
What it does |
| Drag |
Move the map |
| Scroll |
Zoom in and out |
| Fit button |
Zoom out until the whole plan is on screen |
| Centre on me button |
Jump to where you are standing |
| Left click a node |
Drop it from the plan (it is not built at all) |
| Right click a node |
Mark it excluded (built, but not part of the perimeter) |
| Shift + drag, left |
Drop everything in the rectangle |
| Shift + drag, right |
Exclude everything in the rectangle |
| Ctrl + drag |
Put the rectangle back to pending |
| Ctrl + Z, or Undo |
Undo the last change, one node or a whole rectangle |
| Arrow keys |
Nudge the whole grid a block (shift 5, ctrl 16) |
| Page up / down |
Move the grid in Y |
| Alt + drag a node, or Move button |
Move that one node off the grid |
Nothing is lost by closing the screen: the plan saves itself, and reopens on its own next time
you join that server.
Moving a single node
Sometimes a node lands where a beacon cannot go: in a ravine, on something worth keeping, or a
few blocks outside the shape you are digging. Nudging the whole grid to fix that one node moves
the other two hundred, so instead you move just that one, with Move on or by holding alt, and
every other node stays exactly where it was.
A dragged node snaps back onto its own row or column when it lands within four blocks of it. That
is usually what you want: a node still lined up with its row keeps that row's water channel
straight. Hold control while dragging to place it anywhere. With Move on, the arrow keys nudge
the node you last clicked instead of the grid, for the last block or two.
The map draws a line from a moved node back to the cell it belongs to, so a nudged perimeter still
reads as deliberate rather than as a grid that was measured badly. A node moved off its row is
left out of the water network: it keeps its beacons and its pyramid, but nothing routes a channel
to it.
4. Set it up. On the Grid tab: how many beacons per node, the pyramid level, the spacing,
and how far the grid reaches. Leave Spacing follows level on and the coverage lines up
exactly, with no overlap and no holes. The line under the buttons tells you if it does.
5. Build it. Now go dig. In the world you get:
-
A beam on every beacon position that runs to the sky like a real beacon. Red means it
is not built, yellow means it is started but not finished (including a pyramid that is up
but missing a beacon), green means done, grey means excluded. Press G to turn the beams
off when they are in the way.
-
The coverage each beacon actually gives, so holes are visible instead of theoretical.
-
A material list of what is left, in the HUD and on the Materials tab.
-
Nodes turn green on their own as you build them. You do not tell the mod anything.
6. Working as a team. If the server has the mod, a Server tab appears. Press
Share mine to put your plan up there; everyone else presses its name to open it. From then on
every node anyone finishes shows up for the rest, live. The HUD says [shared] when what you
mark is going out to everyone.
Water lines
Only worth reading if you are building a digsort. What we do is run water streams from the beacons
to a sorter in the middle, so a shulker thrown in at any beacon ends up in the sorter on its own.
If that is not your build, skip this: nothing else in the mod needs it. The tab says as much the
first time you open it.
- Aim at the block the water leaves the sorter by, open the screen, go to Water, press
Drain: look at it. There is no sensible default here: the middle of a grid is usually
inside the centre node's own pyramid.
- Press Generate. You get one spine per row of nodes and one trunk to the drain, every run a
block clear of every pyramid base. The shape is a fishbone because what is being optimised is
how fast items get in, not what the network costs: every item travels its exact Manhattan
distance around a single corner, and nothing without diagonals beats that.
- Fix what you do not like. Draw on, drag to lay a run (one block wide, snapped to the axis),
right click to erase one. What you draw replaces the calculation rather than sitting on top of
it, which is why Generate throws away what you drew and asks first.
- Read the bill on the Materials tab: channel, ice, buckets, pressure plates. The ice is what
has to be mined, nine blocks per packed ice and eighty one per blue, so it is an order of
magnitude bigger than the length of the network. Better to know now.
A run dug through a pyramid base is drawn in red and a node the channel never reaches gets a
cross. Neither is refused: it says what it would break and the call is yours.
Chunk borders are the exception. Flowing water pushes an item every tick; bare ice only keeps
the speed it already had, and a chunk that unloads and comes back does not give it back. Out at
the far end of a perimeter, unloaded is the normal state. So a source always sits on the last
block before a border, the spacing starts counting again there, and a pressure plate is never put
on either side of one. A corner that lands on a border cannot be moved without moving the run, so
it gets a red post in the world and a cross on the map instead. The Cost tab counts the borders
and turns green when every one of them is under moving water.
Turn Sources and plates on in Water > Look and the mod shows both: a source every so many
blocks, all pushing towards the drain, and a plate one block upstream of each one, where that
current meets the one behind it. Everything is worked out walking the channel from its dead ends
down to the drain, so no current ever points away from it, and water you have already poured
counts: if the block is already flowing the right way, there is nothing left to propose there. From a distance they are posts you can see against the sky. Walk up and a
plate becomes an actual pressure plate, model and texture and all, sitting in the square it goes
in, so you can put yours where it is. A source stays a translucent box at the height water sits
at: fluids are not drawn by the block renderer, so there is no block to ask the game for. On the
26.x jar both stay marks, because that version has no single block call to use.
The water sources and the pressure plates are counted and shown, not placed, and the network does
not export to a litematic yet. Those are the parts only a real world can check.
Keys
Every binding is rebindable, from the game's controls screen or from the mod's Keys tab.
Bindings can take modifiers, so G, Shift + G and Ctrl + Shift + G are three different
things.
| Binding |
Default |
| Edit mode |
B |
| Open the screen |
Shift + B |
| Beams on and off |
G |
| Set the centre where you stand |
unbound |
| Render on and off |
unbound |
| Easy place on and off |
unbound |
| Layer up · Layer down |
unbound |
| Scan the world |
unbound |
| Undo |
unbound |
With edit mode on, in the world:
| Input |
What it does |
| Scroll |
Grow or shrink the grid |
| Shift + scroll |
Beacons per node, 1 to 6 |
| Ctrl + scroll |
Nudge the spacing |
| Left click a node |
Drop it from the plan, or put it back |
| Right click a node |
Mark it excluded, or put it back |
Commands
Three, because everything else is a button that also shows you its current value, which a command
cannot do.
| Command |
What it does |
/bea or /bea gui |
Open the screen |
/bea share |
Put the open plan on the server |
The geometry
A beacon with level pyramid layers reaches 10 * level + 10 blocks, so a full level 4 pyramid
covers a square 101 blocks a side. Set the spacing to that and coverage lines up exactly with
no overlap and no holes. Anything wider leaves strips of ground with no effect, which Beaconator
paints red so you notice before you are standing in one.
Beacons on one shared pyramid make layer k into (2k + a) by (2k + b), where a x b is the
rectangle the beacons sit in. The shape matters: four beacons in a row need 236 blocks a node,
four in a square need 216, and across a few hundred nodes that is thousands of blocks. Beaconator
costs every rectangle that fits your beacons and uses the cheapest.
A curiosity that falls out of it: five and six beacons cost the same pyramid, since both live in
a 2x3. There are only five primary effects, so the sixth is a spare that comes free.
The maths lives in xyz.w4ve.beaconator.model, has no Minecraft in it, and is covered by unit
tests against a real 208 node perimeter.
Building
JAVA_HOME=/path/to/jdk-21 ./gradlew build
The jar lands in build/libs/.
Licence
MIT. Behaviour was taken as inspiration from the schematic and info HUD mods everyone uses, but
no code was copied from any of them.

 模组

 模组
 模组

 模组
 模组
 模组

评论 0
登录后参与评分
还没有评论,来抢沙发吧