CircuitSimCraft
一个 Fabric 模组,将 Minecraft 变成模拟电子实验室。你可以放置电阻、电容、电感和忆阻器作为方块,连接线路,使用电源和函数发生器驱动它们,并用手持示波器探测实时电压/电流——这一切都由一个真实的修正节点分析(MNA)电路求解器提供支持,该求解器属于与 SPICE 相同的算法家族,而非脚本化的近似计算。
这是一个教学工具:其目标是让游戏内的行为与实际在实验台上观察到的结果一致(RC 充电曲线、RL 瞬态响应、忆阻器的电阻随累积电荷漂移),只是时间尺度从现实世界变为 Minecraft 刻(tick)。
截图
示波器同时固定显示三个通道的波形——函数发生器、电容和电阻,每个通道都有各自的颜色编码轨迹和实时 V/I 读数:
| 方波 |
三角波 |
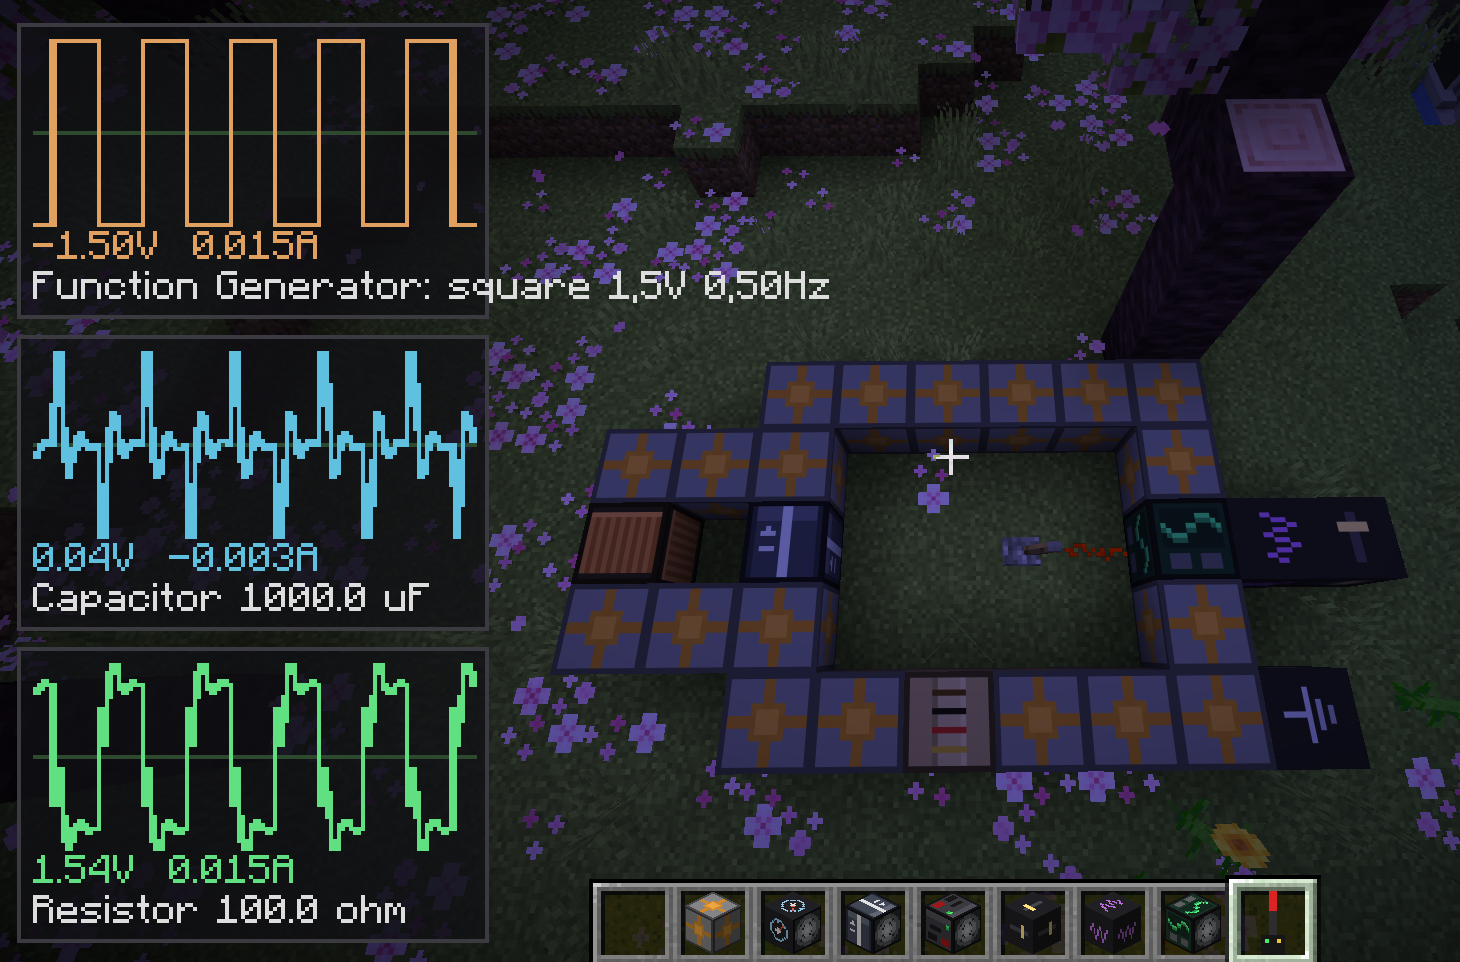 |
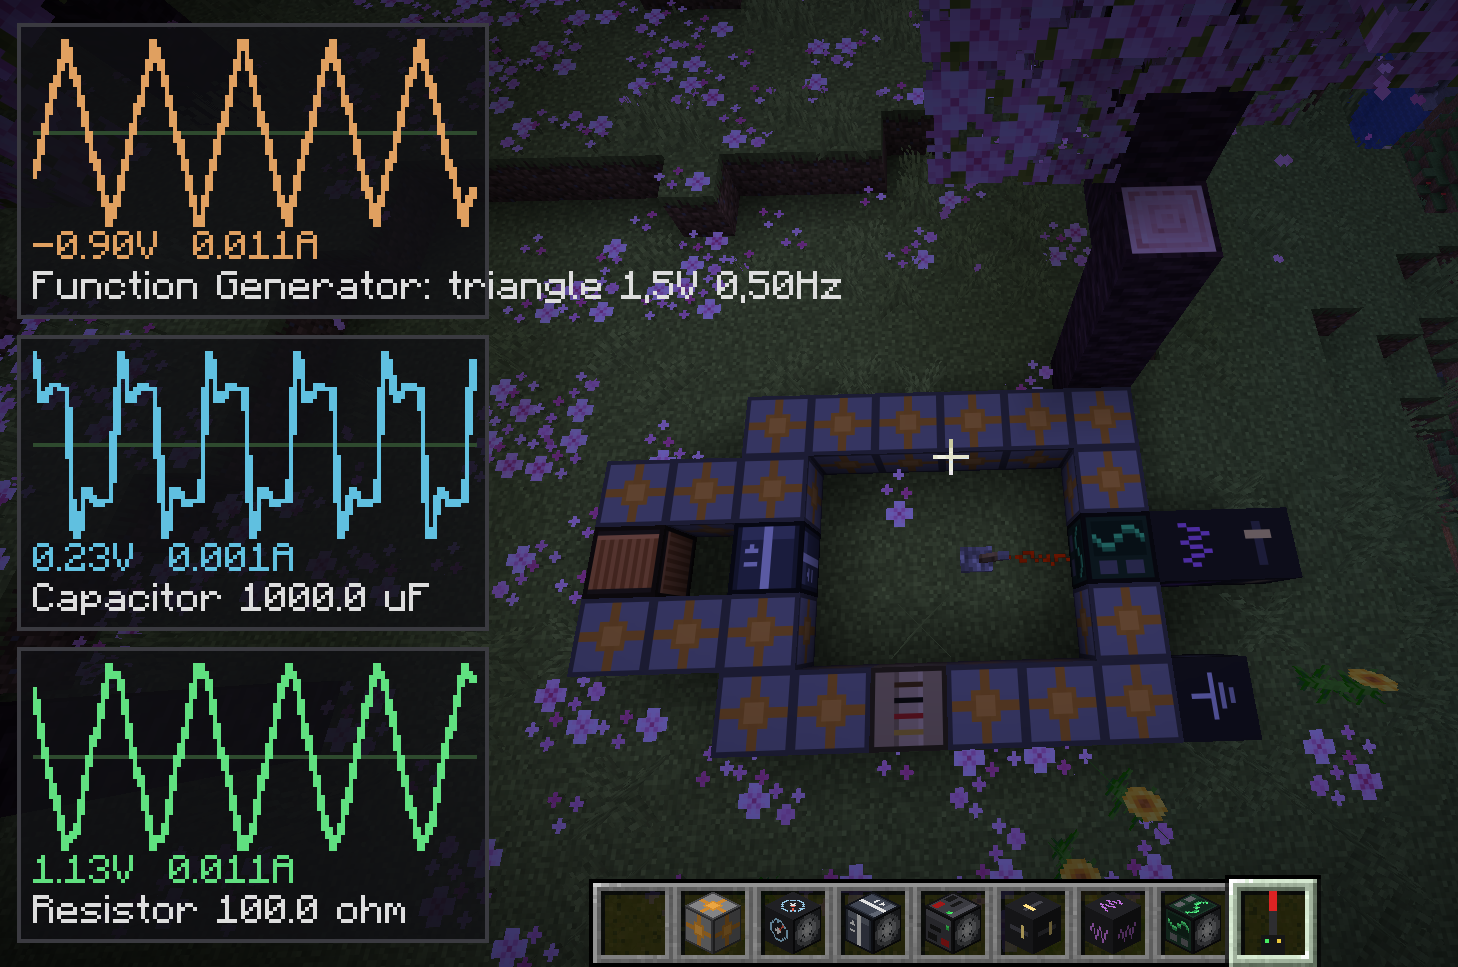 |
要求
- Minecraft 26.2 —— 注意这是 Mojang 新的
year.release 版本号体系,不是旧的 1.21.x 系列。该模组针对此特定版本,因为它是构建时“最新”版本的含义所在。
- Fabric Loader >= 0.19.3
- Fabric API 0.155.2+26.2(必须与 Minecraft 版本匹配)
- Java 25 —— 这是一般情况下 Minecraft 26.2 的要求(它未混淆且需要当前的 JDK),并非此模组特有的要求。
安装
选项 A — 预编译 jar
- 为 Minecraft 26.2 安装 Fabric Loader。
- 从 Modrinth 或 CurseForge 下载适用于 26.2 的 Fabric API jar 文件,并将其放入你的
mods 文件夹。
- 从此仓库的 Releases 页面获取
circuitsimcraft-<version>.jar,并将其放入同一个 mods 文件夹。
- 确保你启动用的配置使用的是 Java 25 或更高版本(最近的管理器会自动为每个 Minecraft 版本管理 JVM,一旦你选择 26.2,它们就会自动完成此操作)。
- 使用 Fabric 配置启动游戏。
选项 B — 从源代码构建
git clone https://github.com/rpicos-uib/circuitsimcraft.git
cd mine-memristors
./gradlew build
生成的模组 jar 位于 build/libs/circuitsimcraft-<version>.jar。你需要拥有可用的 JDK 25;要么将其设为默认的 java,要么显式指向 Gradle:
JAVA_HOME=/path/to/jdk-25 ./gradlew build
有用的开发任务:./gradlew runClient(启动加载了模组的开发客户端)和 ./gradlew runServer(无头专用服务器——方便检查模组在没有 GUI 的情况下能否正常加载)。
基础组件
对于任何值为单个数字而非类别的组件(电阻、电容、电感、电压、频率、忆阻器的参数),空手 Shift+右键点击 会打开一个文本输入屏幕——这与编辑告示牌的操作理念相同——预填充当前值及其预设循环已覆盖的相同最小/最大范围。普通空手右键点击仍像以前一样在固定预设之间循环;这两种交互方式共存。
这些是 电工 村民的库存商品(见下文)——基本电路所需的日常被动元件、电源和仪表。晶体管、受控源和二极管则位于 高级组件 中,由 电子工程师 出售。
| 方块/物品 |
说明 |
 Resistor |
欧姆电阻。空手右键可循环切换 10 / 100 / 1,000 / 10,000 Ω;Shift+右键打开数值编辑器以设置精确阻值。 |
 Capacitor |
理想电容器,采用梯形积分模型。循环切换 1 / 10 / 100 / 1,000 µF;Shift+右键打开数值编辑器以设置精确电容值。 |
 Inductor |
理想电感器,采用梯形积分模型。循环切换 0.01 / 0.1 / 1 / 5 H(已针对 Minecraft 的刻率进行缩放,而非真实世界的元件额定值);Shift+右键打开数值编辑器以设置精确电感值。 |
 Memristor |
电荷控制的线性漂移(HP)忆阻器模型。其阻值会在 $R_{on}$ 和 $R_{off}$ 之间漂移,具体取决于流经它的累积电荷——即使电路被重建,“记忆”效应仍会保留。空手右键循环切换“开关速度”($q_{max}$)预设,方式同上(默认值:$R_{on}=100,\Omega$,$R_{off}=10{,}000,\Omega$);Shift+右键可同时打开三个参数的数值编辑器——$R_{on}$(10–1,000 Ω)、$R_{off}$(1,000–100,000 Ω)以及 $q_{max}$(1e-4–1e-2 C)。 |
 Power Supply |
理想直流电压源。循环切换 1.5 / 5 / 9 / 12 / 24 V;Shift+右键打开数值编辑器以设置精确电压。在未收到红石信号前处于非激活状态(相当于开路)——请先连接电路,然后为其供电。 |
 Function Generator |
时变电压源。空手右键可循环切换正弦波/方波/三角波预设(仅波形形状——幅度和频率请参见下方的电压/频率模块,它们从相邻模块中继获取数据)。Shift+右键打开其专属的数值编辑器用于设置相位(0–360°,适用于所有三种波形形状,而不仅是正弦波)——这是唯一一个直接在发生器本身上设置、而非通过模块设置的参数。其红石激活行为与电源相同。未连接任何模块时,默认值为 5V/1Hz/0°。 |
 Wire |
零电阻导体方块。可在六个面进行连接。本身也可被探针探测(见下文探针部分)——它会给出该点在电路中的绝对电压,而不仅仅是两个引脚之间的压降。 |
 Ground |
将其所连接的任意网络绑定到真实的 0V 参考点,就像真实电路需要接地参考才能使“某节点的电压”具有意义一样。它在六个面上均可导电,像其他组件一样接入即可。对其使用探针始终读取恰好为 0V,从而确认实际连接到参考点的状态。 |
 Ammeter |
串联的 0V 电压源——电气上等效于一根理想导线,因此不会干扰电路,但能提供精确的电流读数。使用探针锁定它,即可在示波器上看到实时的电流轨迹,观察方式与查看电压相同。 |
 Ideal Op-Amp |
无限增益、无限输入阻抗、零输出阻抗——教科书式的理想运算放大器。求解器通过其专用支路电流未知数强制执行两个输入端之间的“虚短”(这与电压源使用的 MNA 技巧相同,只是引用的约束节点与电流注入节点不同)。这是唯一的三端子组件:输出端和反相输入端(V−)分别对应前后引脚;同相输入端(V+)对应方块顶面(若方块垂直放置,则为北面)。其行为固定且理想,没有任何可调参数,因此没有预设循环或数值编辑器;交流(波特图)求解器改用固定的双极点增益模型(直流增益 100dB,极点位于 20Hz 和 3MHz)——详见交流源和交流探针部分。 |
 AC Source |
交流(小信号)扫描的激励源。接线方式与其他任何两端组件相同,但在常规直流/瞬态仿真中,电气上它是一个 0V 源(即普通导线)——其真实行为仅通过交流探针显现。所有三个参数(幅度、最低频率、最高频率)只能通过 Shift+右键设置,因为频率范围并不适合用简短的预设列表来表示——此组件完全没有空手右键预设循环功能。 |
 Voltage Module |
无方向性实用方块(无朝向、无引脚),只要与 Function Generator 的任何一面接触即可设置其幅度。右键循环切换其自身预设(1.5/5/9/12/24 V);Shift+右键打开数值编辑器以设置精确电压。同类模块相互接触时,会沿整个链条传递一个共享值——最近一次被右键点击的模块获胜,并将值传播至链条触及的所有发生器,从而使一个控制源能同时驱动多个发生器。 |
|  频率模块 | 与电压模块类似,但用于设置函数发生器的频率(提供 0.5/1/2/5/10 Hz 预设值);Shift+右键点击可打开数值编辑器以输入精确的频率值。由电压和频率模块组成的混合链会透传两者的数值,无论它们在电路中的排列顺序如何。 |
|
 探针 | 右键点击某个组件、导线或接地端,将其固定为示波器 HUD 上同时显示的最多 3 个通道之一(若固定第 4 个通道,则会移除最旧的那个);Shift+右键点击取消固定。手持探针时即可看到 HUD——每个被固定的通道都有各自独立的滚动波形轨迹,并按颜色编码堆叠在角落。对于组件,显示其两端引脚间的电压降;对于导线或接地端,显示该单点的绝对电压。每个通道的轨迹会根据其自身历史自动缩放,并在图表顶部和底部以 SI 前缀形式(k/m/u/n/p,选择使数值最紧凑的前缀)打印满量程值。当所有 3 个槽位占满后,最旧的通道会以黄色边框高亮并标记为“(next)”,以便你在确认固定新通道前,查看哪一个旧通道会被移除。 |
|
 X-Y 示波器探针 | 第二个独立的探针:它不是按时间绘制通道,而是将一个固定通道的电压对另一个通道的电压进行绘图——这是真实台式示波器的 X-Y 模式,用于绘制利萨如图形以比较相位和频率。右键点击以固定——你刚刚点击的方块始终成为(或保持为)Y 通道,将之前的 Y 降级为 X,如果两个槽位都已满,则移除旧的 X;Shift+右键点击取消固定。每个轴都根据其对应通道的峰值幅度独立缩放,并在绘图上的每个轴两端直接以 SI 前缀形式(k/m/u/n/p)打印满量程值,这样即使两个信号大小差异巨大,也能充分利用绘图的全部范围,而不会被共享的刻度压缩——例如,具有 90° 相移且幅度相等的信号对仍能绘制出真正的圆形,因为当幅度实际匹配时,两个独立的刻度会重合。此探针独立于普通探针的固定点——同时手持两者可同时并排查看两个 HUD。 |
|
 交流示波器探针 | 与其他两种探针不同,这是一种真正的两步式探针:首先右键点击交流电源以将其固定为扫频激励源(会出现提示;此时尚未进行任何计算)。随后右键点击另一个不同的点——任意组件、导线或接地端——以运行扫频(在电源配置的范围 across 60 个对数间隔的频率点)并显示波特图:上方为分贝 (dB) 表示的幅值,下方为度表示的相位,横轴均为对数频率。之后电源仍保持固定状态,因此你可以对其探测更多点而无需每次重新点击它;Shift+右键点击取消固定。 |
|
 红石转电压转换器 | 红石到电压的接口:必须直接放置在接地方块之上(这既是放置要求,也是其 0V 电气参考点)。读取两个 0-15 的红石信号强度——北侧 = A,南侧 = B ——并在其顶面输出 V = A×16 + B(0-255V),像其他任何电源一样接入电路其余部分。没有数值编辑器;输出完全由红石驱动。 |
|
 电压转红石转换器 | 红石转电压转换器的反向操作:同样直接放置在接地上,读取接入其顶面的任意电压(相当于理想电压表——不汲取电流,不会对测量对象造成负载),并将其解码回两个 0-15 的红石输出,分别位于其北侧(A)和南侧(B)面,恰好是 V = A×16 + B 的逆运算。 |
|
 面包板 | 并非电路组件——它没有引脚,也不参与求解器运算。它是电工村民的工作站方块(见下文):放置一个,让无业村民认领它,它就会开始出售本表格中列出的其他物品。 |
布线规则
每个组件占据一个方块,其朝向由放置时你注视的方向决定。它的两个电气引脚分别位于该朝向轴的前面和后面——其余四个面是绝缘的。导线方块在所有六个面上都能导电。当两个位置各自有一个导电面相对时,它们会合并为同一个电气节点——因此组件可以通过导线连接,也可以将两个组件的引脚直接面对面放置(中间无需导线)。
未连接的引脚不会导致崩溃——它被视为浮动节点,因此你可以逐步构建电路,并在每一个中间阶段进行模拟(虽然无用,但安全)。
R2V/V2R 转换器和四种受控源(VCVS/VCCS/CCCS/CCVS,参见高级组件)是“引脚方向遵循放置时的注视方向”这一规则的例外:它们的朝向始终固定(上方 = 接线电气引脚,下方 = 所需的接地连接,南北方向 = 红石 I/O 或控制引脚),无论放置时你面向哪个方向。此外,它们在物理上必须在其正下方有**Ground(接地)**方块才能放置——破坏那个 Ground 方块,转换器或受控源也会随之被破坏。
晶体管(NPN/PNP/NMOS/PMOS)和理想运算放大器是三端组件:前面和后面是三个引脚中的两个(如常理),第三个引脚(基极/栅极,或运放的 V+)位于方块的顶面——如果方块本身垂直定向(朝上或朝下),则第三个引脚位于北面。
高级组件
晶体管、四种经典的依赖/受控源,以及完善真实工作台所需的一些仪表部件——由电子工程师村民出售(见下文),而非电工。以下所有“最简模型”参数(β、阈值电压、跨导、增益)均可通过 Shift + 右键点击编辑,这与基本组件的值编辑器约定相同。
此处的所有受控源都依赖于有意设置的一刻钟延迟:Circuit.step() 在求解之前先对每个元件进行标记(stamp),因此任何在构建自身标记时读取其他节点已求解电压(或其他源已求解电流)的元件,实际上读取的是上一刻钟收敛的值——这与二极管已经使用的“关于上一刻钟线性化”理念一致。正是这一点使得所有四种受控源、BJT 和 MOSFET 能够在不改变 Circuit 核心求解循环的情况下工作(除了一个新的标记辅助函数 stampTransconductance ——完整说明请参见 MOD_ARCHITECTURE.md)。
| 方块/物品 |
说明 |
 Diode |
放置时你注视方向的引脚为阳极,相反方向的引脚为阴极——电流在超过正向压降后易于从阳极流向阴极,而在反向时(几乎)被阻断。右键点击可循环切换硅(约0.7V)、锗(约0.3V)和红色LED(约2V)预设值;这是一个分类选择,因此二极管没有Shift+右键的值编辑器。它采用线性化的肖克利二极管方程建模,并每刻重新拟合,而非查找表。 |
 Current Source |
理想的独立直流电流源——是电源的对偶。支持0.1 / 0.5 / 1 / 2 A循环切换;Shift+右键打开值编辑器以设定精确电流。其红石激活行为与电源相同(未通电时相当于开路)。 |
 Voltmeter |
串联使用的理想电压表——具有无限输入阻抗,不消耗电流,不会对其读取的电路造成负载影响。它是安培表的电压对偶:使用探针将其固定即可看到实时电压轨迹,与其他组件的操作方式相同。 |
 NPN Transistor |
集电极是前方(朝向)引脚,发射极是后方引脚,基极是顶面(若垂直放置则为北面)。基极-发射极结复用二极管自身的线性化肖克利模型;集电极电流为β乘以基极电流,并通过 stampTransconductance 作为精确跨导项施加(无延迟)。Shift+右键可编辑β(电流增益),范围5–500。 |
 PNP Transistor |
模型与引脚同NPN晶体管,但所有电流方向均反转(底层 Bjt 模型中 polarity = -1)。Shift+右键可编辑β,范围5–500。 |
 NMOS Transistor |
漏极是前方引脚,源极是后方引脚,栅极是顶面(若垂直放置则为北面)。采用平方律、仅饱和区模型,每刻围绕前一时刻的漏极电流进行线性化。Shift+右键可编辑阈值电压(0.1–5 V)和跨导 k(1e-4–0.1 S)。 |
 PMOS Transistor |
模型与引脚同NMOS晶体管,但漏极电流方向相反。Shift+右键可编辑相同的两个参数。 |
 VCVS (电压控制电压源) |
必须直接放置在 Ground 方块上,类似于R2V/V2R转换器。北面感应控制电压(相对于地);输出(增益 × 控制电压)驱动至顶面。Shift+右键可编辑增益,范围0.1–100。 |
 VCCS (电压控制电流源) |
外形与VCVS相同,但其顶面输出的是电流(跨导 × 控制电压)而非电压——由于这是纯线性关系,它作为精确的跨导项施加,无延迟。Shift+右键可编辑跨导,范围1e-4–1 S。 |
 CCCS (电流控制电流源) |
一个四面组件:南北两面是控制电流感应引脚(内部是一个类似安培表方块的0V安培表),顶面将输出电流(电流增益 × 感测电流)驱动至下方所需的 Ground。Shift+右键可编辑电流增益,范围0.1–100。 |
 CCVS (电流控制电压源) |
外形与CCCS相同,但其输出的是电压(互阻 × 感测电流)而非电流。Shift+右键可编辑互阻,范围1–1,000 Ω。 |
 Workbench |
不是电路组件——它没有引脚,也不参与求解器计算。它是 Electronics Engineer 村民的工作站点方块(见下文):放置一个,让一个失业村民认领它,它就会开始出售本表格中的其余内容。 |
三相组件
一个完整的第二个电气“世界”,与上述单相世界并存——此处的每个组件都拥有一根集成引线,同时承载所有三个相位(A/B/C),而不是三个独立的物理连接。专用的集成线允许你将该集成布线到任何位置(它会与任何接触的集成线或集成引线合并,其行为完全类似于单相 Wire 对单个节点的处理方式),而当你需要在两个世界之间切换时,可以使用打包器/解包器对。这些由 Electrical Engineer 村民出售(见下文),而非电工或电子工程师。
| 方块/物品 |
说明 |
 三相导线 |
导线的束状等效物——可自由向任意方向布线,并与任何相邻的三相导线或捆绑电缆合并。将 A/B/C 三相作为单一连接共同传输;普通单根导线接触它时不会直接连通(需在两个世界之间使用打包器/解包器进行转换)——接地除外,接地可直接闭合任一世界的回路(详见下文)。 |
 三相电源 |
朝向面为束状三相输出(三个内部正弦波源,频率/振幅相同,相位互差 120°——标准 A/B/C 相序旋转);背面为普通单根中性线,以与其他电源“背面”接线相同的方式连接到接地方块。Shift+右键可编辑振幅(12–400 V)和频率(0.5–5 Hz)。支持红石门控,类似电源供应器。 |
 三相电流表 |
三个独立的理想电流表串联排列,每相一个——两端均为束状接口, inline 布局,类似于单相电流表。 |
 三相电阻 |
三个普通电阻并联排列,每相一个,共享一个可编辑的电阻值(10–10,000 Ω)——构成平衡负载/电阻组。 |
 三相电感 |
同理,三个电感共享一个可编辑的电感值(0.01–5 H)。 |
 三相电容 |
同理,三个电容共享一个可编辑的电容值(1–1,000 µF)。 |
 相位打包器 |
固定且不可旋转的面:束状接口始终朝上,A/B/C 相分别对应北/东/南。纯拓扑结构——不增加阻抗,与普通导线完全一致——接收三个独立的单相接法,并将其直接映射到对应的束状子节点。 |
 相位解包器 |
电气特性与打包器完全相同(相同的固定面、相同的零阻抗映射)——单独设置此方块仅是为了在搭建工作台时,“束状 → 三根导线”与“三根导线 → 束状”能清晰区分。 |
 三相示波器探头 |
右键点击束状组件可固定探针(Shift+右键取消固定)——最多同时接入 3 个通道,与普通探头相同,但每个通道现在会将三相叠加在同一张图表上,遵循标准的红/黄/蓝三色相序惯例,而非每个通道仅显示一条轨迹。 |
 配电盘 |
非电路元件——是电气工程师村民的工作站点方块(见下文)。 |
所有三相部件均由其对应的单相等效部件的三倍构成——3× 导线 → 1× 三相导线,
3× 电源供应器 → 1× 三相电源,3× 电流表 → 1× 三相电流表,3× 电阻/电感/ 电容 → 1× 对应的三相部件,3× 探头 → 1× 三相探头——均为无形状合成配方。
打包器/解包器各需 3× 导线 + 1 铁锭,同样为无形状合成配方。具体合成图示请参阅下方的
合成配方 表格。
接地适用于两个世界——circuitsimcraft:ground 方块既具备常规的单体导电性,也具备束状导电性,因此三相导线可以直接连接到接地方块,无需使用打包器/解包器,这与单根导线的行为完全一致。仅当你确实需要将三相分离至不同的单相目的地(如三个独立仪表、三个独立负载等)时,才需要使用解包器——而不仅仅是为了将回路闭合至 0V。
合成配方
所有原料均为原版物品,不依赖任何其他模组。无形状配方以松散的材料集合展示;有形状配方则展示实际的 3×3 网格布局。若某配方允许同一槽位使用两种材料之一,则分别列出两种完整的配方变体并指向相同结果,而非合并为一张图片。
| 合成配方 |
备注 |
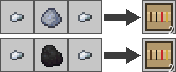 |
电阻 ×2 — 以铁粒、粘土球或煤作为导电主体,铁粒:置于主体两侧作为引脚,需塑形。 |
 |
电容 ×2 — 以铁粒和纸作为历史版电容器介质,铁粒:置于两侧作为引脚,需塑形。 |
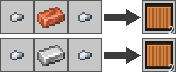 |
电感 ×2 — 以铁粒和铜锭或铁锭绕制线圈,铁粒:置于两侧作为引脚,需塑形。 |
 |
忆阻器 ×1 — 使用紫水晶碎片作为开关介质。 |
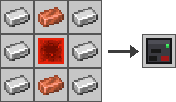 |
电源 ×1 — 红石块核心外围包裹 3×3 的铁/铜外壳。 |
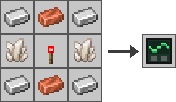 |
函数发生器 ×1 — 石英和红石火把核心外围包裹 3×3 的铁/铜外壳。 |
 |
导线 ×9 — 三个铜锭横向排列,需塑形,低成本/批量制作。 |
 |
接地端 ×4 — 铁粒 + 铜锭。 |
 |
电流表 ×2 — 铁粒、铜锭、红石粉。 |
 |
电压模块 ×1 — 金粒、红石粉、铁粒。 |
 |
频率模块 ×1 — 紫水晶碎片、红石粉、铁粒。 |
 |
二极管 ×2 — 铁粒、红石粉、石英。 |
 |
理想运算放大器 ×1 — 2 个金粒、红石粉、石英。 |
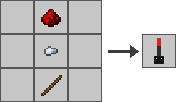 |
探针 ×1 — 红石粉、铁粒和木棍,垂直堆叠。 |
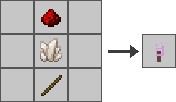 |
X-Y 示波器探针 ×1 — 红石粉、石英和木棍,垂直堆叠。 |
 |
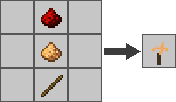
交流电源 ×1 — 红石粉、荧石粉、金粒(无需塑形)。 |
 |
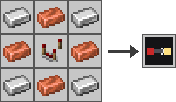
交流示波器探针 ×1 — 红石粉、荧石粉和木棍,垂直堆叠。 |
 |
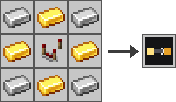
R2V 转换器 ×1 — 比较器核心外围包裹 3×3 的铁/铜外壳,用于读取原版红石信号强度。 |
 |
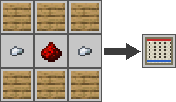
V2R 转换器 ×1 — 比较器核心外围包裹 3×3 的铁/金外壳。 |
 |
面包板 ×1 — 红石粉与铁粒核心外围包裹 3×3 的橡木木板框架。 |
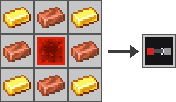 |
电流源 ×1 — 红石块核心外围包裹 3×3 的金/铜外壳(电源的对偶设备)。 |
 |
电压表 ×2 — 铁粒、金粒、红石粉。 |
 |
NPN 晶体管 ×2 — 2 个铁粒、石英、红石粉。 |
 |
PNP 晶体管 ×2 — 2 个铁粒、荧石粉、红石粉。 |
 |
NMOS 晶体管 ×2 — 2 个铁粒、纸(栅极绝缘层)、石英。 |
 |
PMOS 晶体管 ×2 — 2 个铁粒、纸、荧石粉。 |
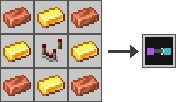 |
VCVS ×1 — 比较器核心外围包裹 3×3 的铜/金外壳。 |
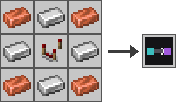 |
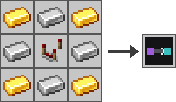
VCCS ×1 — 比较器核心外围包裹 3×3 的铜/铁外壳。 |
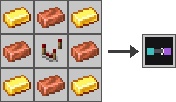 |
CCCS ×1 — 比较器核心外围包裹 3×3 的金/铜外壳。 |
 |
CCVS ×1 — 比较器核心外围包裹 3×3 的金/铁外壳。 |
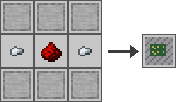 |
工作台 ×1 — 红石粉与铁粒核心外围包裹 3×3 的平滑石头框架(即面包板的专属工作站点图案,改用石材重制)。 |
 |
三相导线 ×1 — 3 × 导线(无需塑形)。 |
|  | 三相电源 ×1 — 3× 电源(无形状要求)。 |
|
 | 三相电流表 ×1 — 3× 电流表(无形状要求)。 |
|
 | 三相电阻器 ×1 — 3× 电阻器(无形状要求)。 |
|
 | 三相电感器 ×1 — 3× 电感器(无形状要求)。 |
|
 | 三相电容器 ×1 — 3× 电容器(无形状要求)。 |
|
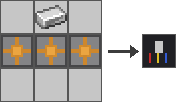 | 相位捆绑器 ×1 — 3× 导线 + 1 铁锭(无形状要求)。 |
|
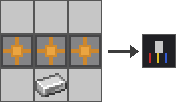 | 相位解绑器 ×1 — 3× 导线 + 1 铁锭(无形状要求)。 |
|
 | 三相示波器探头 ×1 — 3× 探头(无形状要求)。 |
目前这些物品都还没有配方书解锁进度,因此不会显示“新配方”的提示——
但它们现在完全可以通过手工制作。如果你想添加这些进度,请参阅 贡献指南。
所有物品也都可以在其专属的 CircuitSimCraft 创造模式物品栏标签页中找到。
电工村民
放置一块 面包板(按上述方式合成),并让一个无业村民将其认领为工作站点;它将变为一名 电工,专门以绿宝石为货币,出售模组自有的组件,并回收制作这些组件所需的原材料,而非原版交易。它拥有独特的外观,并非默认的缺失纹理占位符:身穿石板/钢制工具围裙,带有警示黄色的徽章点缀,与任何原版职业的外观均不相同。如同所有原版职业一样,它在成功交易后会升级(学徒 → 大师),从而解锁后续层级。每个层级提供 最多两种组件用于出售和最多两种原材料用于收购(绝不会更多,且始终同时存在),因此单个村民的交易界面永远不会过于冗长 —— 除了大师级,这是一个有意为之的特例(详见下文):
| 层级 |
出售 |
收购 |
| 1 — 学徒 |
电阻器、电容器 |
铁粒、黏土球 |
| 2 — 熟练工 |
电源、函数发生器 |
铁锭、铜锭 |
| 3 — 专家 |
交流电源 |
金粒、荧石粉 |
| 4 — 资深 |
探针、交流示波器探针 |
红石、木棍 |
| 5 — 大师 |
忆阻器 / R2V 转换器 / V2R 转换器中的任意两种 |
紫水晶碎片、红石(通常两者皆有) |
收购交易中,每次交易收取 8 个原材料(对于最稀有的紫水晶碎片则是 4 个 —— 这是一批你无需刷怪即可实际获取的材料);出售交易则保持各组件原有的单次交易数量(一次 1-2 个,与之前保持一致)。每笔交易 —— 无论是收购还是出售 —— 在使用 15 次后,该村民就需要通过更多交易来重新补货(max_uses: 15,这是一个固定数值,取代了之前按层级划分的 4-12 值)。同一层级的收购价格比出售价格更便宜,就像真实店铺的利润空间一样:原材料的价值低于其制成的成品组件。
并非所有可制作的物品都能以此方式出售了 —— 导线、接地端、电感器、电压模块、频率模块以及 X-Y 示波器探针已被移除,以符合每层级两项的限制(这六种物品的合成表依然简单且廉价,未受影响)。二极管并未被移除,只是位置变更 —— 它由 电子工程师 出售(见下文),而非电工。交易完全由数据驱动(位于 data/circuitsimcraft/{villager_trade,tags/villager_trade,trade_set}/electrician/),而非硬编码在 Java 中 —— 此 Minecraft 版本的 VillagerProfession 仅指向每个层级的 TradeSet 资源键,因此调整价格或添加交易只需编辑 JSON,无需重新编译。每个层级的 trade_set amount 设置为其交易池的大小,因此列出的所有交易总是一起提供,而不是随机子集(不同于原版职业,通常从更大的池中抽取少数几个) —— 这是保证上述“既有出售项又有收购项始终存在”承诺的唯一方式。
大师级是唯一的有意特例。 应用户要求,大师级的出售池包含三项物品(忆阻器、R2V 转换器、V2R 转换器)而非两项,且每位特定的电工会随机提供这三项中的两项 —— 这是为了这一特定层级而故意 reintroduced 的真实原版风格随机性。Minecraft 的交易系统只能在 每个层级 的一个合并池中随机化,无法在同一个层级内保持一个子集(两个收购交易)确定性同时另一个子集(三个出售交易)随机化 —— 因此大师级的完整池包含 5 个条目(3 个出售 + 2 个收购),且 amount: 4,意味着恰好有一个条目会被随机排除。大多数情况下被排除的是三个出售项之一(给出预期的“任意两种”),但偶尔也会被排除掉两个收购项之一 —— 大师级是唯一不绝对保证“两个收购项始终存在”的层级。
电工工坊
模组附带了一个现成的商店,作为数据包函数实现 —— 无需手动建造。站在你想放置的位置(任何地形均可:它会清理自己的占地并先铺设地基,因此不平坦的地面、斜坡或未生成的区块都没问题),然后运行:
/function circuitsimcraft:electrician_shop
这将构建一座小型橡木与铜制的工坊,配有石板屋顶和避雷针尖顶(这是最直观的“电工”象征符号),内部已放置了一块面包板,靠在后方墙壁旁的小货架边(货架上有导线、一个电阻器和一个电容器) —— 随时准备迎接村民进来接手这份工作:


函数的源代码(data/circuitsimcraft/function/electrician_shop.mcfunction)是纯粹的 /fill//setblock 命令,如果你想更换外观的话 —— 有关其构建和验证方式,请参阅
MOD_ARCHITECTURE.md。
电子工程师村民
放置一块 工作台(按上述方式合成),并让一个无业村民将其认领为工作站点;它将变为一名 电子工程师,以与电工处理基础组件相同的方式,出售/收购 高级组件 表格中的内容。它也有自己独特的外观 —— 基于电工纹理的白色实验服重着色,徽章点缀从警示黄改为二极管红的发光效果,以确保这两个职业在视觉上永不混淆。升级机制相同(学徒 → 大师),同样遵循“每层级最多两项出售和收购,绝不更多”的规则,大师级再次成为有意为之的特例:
| 等级 |
出售 |
收购 |
| 1 — 新手 |
二极管, 电压表 |
石英, 纸 |
| 2 — 学徒 |
电流源, NPN 晶体管 |
铁粒 |
| 3 — 专家 |
PNP 晶体管, NMOS 晶体管 |
萤石粉 |
| 4 — 大师 |
PMOS 晶体管, VCVS |
金锭 |
| 5 — 专家 |
VCCS / CCCS / CCVS 中的任意 2 种 |
红石块(通常会出现) |
交易条款与 Electrician 一致:每笔收购交易收取 8 份原材料(在 Expert 等级为 4 个红石块,这是最昂贵的物品),每次交易允许使用 15 次后才会补货,且售价随等级提升而增加(从新手的 2 绿宝石到专家的 8 绿宝石,这与 Electrician 对依赖源的 R2V/V2R 层级定价相符)。Expert 的出售池中有三个物品,但每次只提供其中两个 —— 这与 Electrician 自己的 Expert 等级中使用的“随机排除”技巧相同,只不过这里的完整池包含 4 个条目(3 个出售 + 1 个收购),且 amount: 3,因此偶尔被排除的是收购交易而非出售物品,而不仅仅是“三选二”的出售项。
Electronics Engineer's Workshop
理念与 Electrician's Workshop 相同,故意采用不同的配色方案,使两种职业的建筑一眼就能区分开来 —— 一个由石砖和抛光安山岩构成的“实验室”,配有铁栏杆和石英尖顶,而不是 Electrician 的橡木和铜小屋:
/function circuitsimcraft:engineer_workshop
这会在后墙放置一个工作台,旁边有一个小货架(放着一个二极管和一个 NPN 晶体管),正如 Electrician 的商店放置一块面包板和初始库存一样。该函数的源码位于
data/circuitsimcraft/function/engineer_workshop.mcfunction —— 普通的 /fill//setblock 命令,与 Electrician 的一样。
The Electrical Engineer villager
放置一个 Switchboard(制作方式与工作bench和Breadboard相同 —— 参见 Crafting recipes),让一个无业村民将其认领为工作站点;它将成为一名 Electrical Engineer,并出售/收购上述 Three-Phase Components 表中的物品 —— 这是一个第三职业,与 Electrician(基础单相组件)和 Electronics Engineer(高级单相组件)并列,这次是为了捆绑三相世界服务。升级流程相同(新手 → 专家),定价/补货惯例与其他两个相同:
| 等级 |
出售 |
收购 |
| 1 — 新手 |
3-Phase Wire, 3-Phase Ammeter |
Copper Ingot ×8 |
| 2 — 学徒 |
3-Phase Source, 3-Phase Probe |
Iron Nugget ×12 |
| 3 — 专家 |
Phase Bundler, Phase Unbundler |
Glowstone Dust ×4 |
| 4 — 大师 |
3-Phase Resistor, 3-Phase Inductor |
Gold Ingot ×4 |
| 5 — 专家 |
3-Phase Capacitor |
Redstone Block ×1 |
与其他两个村民的交易条款相同:每次交易允许使用 15 次后才会补货,且售价随等级提升而增加 —— 新手每个 2 绿宝石,直到专家/大师等级的最昂贵捆绑图部件(Bundler/Unbundler 为 8,Inductor/Capacitor 为 9)达到 8–9 绿宝石。
Electrical Engineer's Workshop
与其他两个工作室的理念相同,拥有自己独特的配色方案,以便所有三种职业的建筑一眼就能区分开来 —— 一个由深板岩砖和铜构成的“变电站”,带有避雷针尖顶,而不是 Electrician 的橡木小屋或 Electronics Engineer 的石制实验室:
/function circuitsimcraft:electrical_engineer_workshop
这会在后墙放置一个 Switchboard,准备好让村民走进来接手这份工作。该函数的源码位于
data/circuitsimcraft/function/electrical_engineer_workshop.mcfunction —— 普通的
/fill//setblock 命令,与其他两个一样。
Worked-example circuits
八个现成的电路,每个对应一个数据包函数,采用与前三个工作室相同的基于 /fill//setblock 的方法 —— 无需手动布线即可开始。站在你想放置工作台西南角的位置,然后运行其中一个:
/function circuitsimcraft:voltage_divider           # Experiment 1: basic voltage divider
/function circuitsimcraft:rc_lowpass                # Experiment 2: RC low-pass Bode plot
/function circuitsimcraft:rlc_resonance             # Experiment 3: RLC resonance Bode plot
/function circuitsimcraft:half_wave_rectifier       # Experiment 4: half-wave rectifier
/function circuitsimcraft:memristor_hysteresis      # Experiment 5: memristor pinched hysteresis loop
/function circuitsimcraft:opamp_bode                # Experiment 6: op-amp open-loop Bode plot
/function circuitsimcraft:three_phase_load          # Experiment 7: balanced three-phase resistive load
/function circuitsimcraft:three_phase_bundle_unbundle  # Experiment 8: bundle/unbundle round trip
每个组件都会清空其所在空间、铺设自己的基础,并将电路中的每个组件连接到其默认预设(本模组中的组件不会在保存/重新加载后保留右键选择的预设,因此新放置的组件始终从默认值开始,无论实验要求如何),并在信号源上方放置一个未翻转的杠杆,同时为你提供适用于该任务的示波器探头。函数自身的头注释说明了达到每个实验预期组件值所需的精确右键操作次数以及预期结果。前六个实验在模组的配套论文 latex_mod/sections/07_results_experiments.tex 中有完整描述(包括推导过程、预测数值和物理原理),这里以可构建的结构形式重现,而非仅作为图表展示——实验 7 和 8(三相工作台)晚于该文档的撰写时间,尚未包含在论文中。实验 8 也是捆绑器/解包器对的模组参考构建:一个三相电源驱动一个解包器,三个独立的单相电阻(每相一条腿),一个捆绑器将它们重新组合,接着是一个三相电阻,最后直接接地——在一个工作台中展示了双向的捆绑/单相交叉,并证明接地可以直接闭合捆绑线路,无需第二个解包器。它们的源文件位于 data/circuitsimcraft/function/,与模组中其他所有函数一样,均为纯文本格式。
架构说明,供扩展者参考
src/main/java/com/rpicos/circuitsimcraft/
  sim/            纯 Java 电路求解器 —— 零 Minecraft 依赖,可独立进行单元测试
  block/          方块类(放置、朝向、右键交互)
  blockentity/    方块实体类(实际的模拟状态 + 每个组件的电路连线)
  network/        世界端的导线连通图 + 客户端<->服务器探头的协议
  item/           探头物品
src/client/java/com/rpicos/circuitsimcraft/client/   HUD 渲染、客户端网络同步
求解器 (sim 包)
Circuit 是一个通用的修正节点分析引擎:节点 0 始终为接地,其他每个节点都是你通过 addNode() 分配的整数。Element 的实现类(Resistor、Capacitor、Inductor、Memristor、CurrentSource、Vccs、Bjt、Mosfet)每一步都会将自己写入电导矩阵;VoltageSource 拥有自己独立的支路电流未知数,这是理想源的标准 MNA 处理方式 —— Vcvs 和 Ccvs 都是简单的工厂方法,用于构建其中之一。反应性元件使用梯形积分伴随模型(与 SPICE 使用的技术相同),而不是后向欧拉法,因此 LC 型行为不会被人为阻尼掉;BJT 和 MOSFET 模型复用了相同的“关于上一刻线性化”的理念(BJT 的基极-发射结实际上复用了二极管的 DiodeMath 辅助工具)。每个受控/有源元件相对于无源互阻电阻的定义不对称性都封装在一个共享的写入辅助方法 stampTransconductance 中 —— 有关为何所有四种受控源和两种晶体管族都能在不触及此求解循环的情况下工作的单刻延迟推理,请参见上方的 高级组件。
另一个基于复数的求解器 AcCircuit 与之并列,用于交流(波特图)分析:Complex 是一个普通的不可变复数,AcElement 的实现类给定角频率后会直接写入频率相关的导纳(不涉及时间步长),而 AcVoltageSource/AcOpAmp 处理源和运算放大器的双极点增益模型时,与其瞬态对应物采用相同的“独立支路电流未知数”方式。CircuitNetworkManager 计算一次布线拓扑,并为两个求解器重用相同的节点编号,从而确保它们对哪个位置对应哪个节点绝不会有分歧。
由于这个包完全不导入 Minecraft 相关代码,你可以直接使用 javac/java 编写并运行纯 Java 测试 —— 无需 Gradle,无需反编译 Minecraft,迭代速度快。求解器在开发期间的验证正是如此进行的:针对 RC/RL 阶跃响应的解析解、忆阻器的解析电荷控制 ODE,以及对于交流求解器而言,针对解析波特图参考(电阻分压器的平坦响应、RC/RL 分压器的 -3dB/45° 截止点和 20dB/十倍频衰减斜率,以及运放模型的直流增益和极点频率)。
添加新组件类型
- 如果是新型元件,请将物理逻辑添加到
sim/ 中(如果只是现有元件的不同预设,则跳过此步)。
- 创建一个继承自
ComponentBlockEntity 的 blockentity/YourComponentBlockEntity.java,实现 addToCircuit、probeCurrent、probeSummary 和 cyclePreset。
- 创建一个继承自
ComponentBlock 的 block/YourComponentBlock.java(复制现有的例如 ResistorBlock.java —— 它大约只有 25 行,是一个模板)。
- 在
ModBlocks、ModBlockEntities、ModItems 中注册它,并将其添加到 ModCreativeTab。
- 添加纹理(
textures/block/your_component.png,16×16 —— 前后会自动获得共享的 terminal.png 引脚纹理,因此你只需要为其余四个面提供主体纹理)、一个 blockstates/your_component.json 和一个 models/block/your_component.json(复制现有的成对文件 —— 除了纹理路径外它们是通用的),以及语言条目。
- 可选:添加一个
data/circuitsimcraft/recipe/your_component.json。
如果你的组件拥有 3 个或更多端子,请直接继承 NetworkBlockEntity 而不是 ComponentBlockEntity(参见 OpAmpBlockEntity、NpnBlockEntity 或 Vcvs/Vccs/Cccs/Ccvs 系列作为先例),并在 CircuitNetworkManager.rebuild() 中添加你自己的分发分支。如果它应该始终放置在接地方块上且具有固定朝向(例如 R2V/V2R 转换器和四个受控源),请继承 GroundedComponentBlock 而不是直接继承 ComponentBlock。请参阅 COMPONENT_ADD.md 和 MOD_ARCHITECTURE.md 获取完整指南,包括如果你的组件应由新职业而非现有职业出售时使用的“第二村民职业”模式。
已知限制
- 电路重建时组件状态会重置。 每当该网络中的任何接线发生变化时,
CircuitNetworkManager 都会从头开始重建整个 Circuit,因此电容的电荷或电感的电流在此时会重置为零。忆阻器是例外——它的状态分数在重建过程中被明确保留,因为持久状态是忆阻器的核心意义所在。让其他组件也保持持久化是一个很好的初次贡献机会。
- 没有配方书解锁进度 —— 配方可以工作,但在首次可用时不会以高亮或提示的形式显示。
- 交流分析仅适用于小信号,且目前完全未涵盖高级组件和三相组件。 在扫描期间,除了固定的交流电源外,所有独立源始终标记为 0V,无论其自身的红石激活状态如何;运算放大器的双极点增益(100dB 直流增益,极点位于 20Hz/3MHz)是一个固定常数,尚未通过值编辑器暴露;而忆阻器的交流情况仅仅是一个冻结的电阻,尚未对其自身的频率依赖性进行建模。晶体管、四个受控源以及每个三相组件完全没有实现
AcStampable,因此在博德图扫描期间它们表现为开路,这是由于缺失而非任何刻意的小信号模型所致——这是一个真正的后续贡献点,而非设计选择。
- 垂直放置的晶体管上的基极/栅极徽章纹理未经验证。 Java 电气模型的方向是正确的(根据上述接线规则,当朝上/下放置时,基极/栅极始终是方块的北面)——未经测试的仅是当方块侧放时,绘制在该实际北面上的 纹理 对玩家来说是否读取正确。已确认所有四种水平方向正确;尚未视觉检查朝上/下的情况。
- 三相示波器的实际屏幕渲染内容,以及电气工程师的交易报价,尚未在真实连接的客户端中进行视觉确认 —— 两者都仅通过服务器端无头测试进行了验证(通过日志检查的实际求解电路值),而不是通过查看渲染后的游戏画面。
贡献
欢迎提交 Issue 和 PR。如果你要添加一个组件,请包含你所使用的物理模型的说明(提供方程链接即可)—— 本模组的目标是确保游戏内的行为实际上是正确的,而不仅仅是看起来合理。
引用
如果你在课堂、论文、演示、衍生模组等任何地方使用 CircuitSimCraft,请注明作者:Rodrigo Picos, Stavros G. Stavrinides, George Stavrinides, Ariadna Picos, 和 Gerard Picos。非正式使用只需链接回此仓库即可;对于学术工作,请按以下格式引用:
Rodrigo Picos, Stavros G. Stavrinides, George Stavrinides, Ariadna Picos, and Gerard Picos.
CircuitSimCraft: a Fabric mod for teaching analog electronics in Minecraft.
https://github.com/rpicos-uib/circuitsimcraft, 2026.
BibTeX:
@software{picos_mine_memristors,
  author = {Picos, Rodrigo and Stavrinides, Stavros G. and Stavrinides, George and Picos, Ariadna and Picos, Gerard},
  title  = {CircuitSimCraft: a Fabric mod for teaching analog electronics in Minecraft},
  url    = {https://github.com/rpicos-uib/circuitsimcraft},
  year   = {2026}
}
另见 CITATION.cff,GitHub 会自动读取它以支持其“引用此仓库”按钮。
许可证
CC BY 4.0 — 详见 LICENSE。与宽松的软件许可证(MIT、Apache 等)不同,CC BY 将署名作为重复使用的法律条件,而不仅仅是一种礼貌——上述引用正是满足学术使用要求的方式;非正式使用只需链接回此仓库即可。
CircuitSimCraft
A Fabric mod that turns Minecraft into an analog electronics lab. Place resistors, capacitors,
inductors and memristors as blocks, wire them up, drive them with power supplies and function
generators, and probe the live voltage/current with a handheld oscilloscope — all backed by a
real modified-nodal-analysis (MNA) circuit solver, the same family of algorithm SPICE uses, not a
scripted approximation.
This is a teaching tool: the goal is for the in-game behavior to actually match what you'd see on
a real bench (RC charge curves, RL transients, a memristor's resistance drifting with accumulated
charge), just at Minecraft-tick timescales instead of real-world ones.
Screenshots
The oscilloscope pinning three channels at once — a Function Generator, a Capacitor, and a
Resistor, each with their own color-coded trace and live V/I readout:
| Square wave |
Triangle wave |
|
|
Requirements
- Minecraft 26.2 — note this is Mojang's new
year.release versioning, not the old 1.21.x
line. The mod targets this specific version because it's what "latest" means as of build time.
- Fabric Loader >= 0.19.3
- Fabric API 0.155.2+26.2 (must match the Minecraft version)
- Java 25 — this is a Minecraft 26.2 requirement in general (it ships unobfuscated and needs a
current JDK), not something specific to this mod.
Installation
Option A — prebuilt jar
- Install Fabric Loader for Minecraft 26.2.
- Download the Fabric API jar for 26.2 from Modrinth or
CurseForge and drop it in your
mods folder.
- Grab
circuitsimcraft-<version>.jar from this repo's Releases page and drop
it in the same mods folder.
- Make sure the profile you launch with is on Java 25+ (recent launchers that auto-manage a JVM
per Minecraft version will already do this once you select 26.2).
- Launch with the Fabric profile.
Option B — build from source
git clone https://github.com/rpicos-uib/circuitsimcraft.git
cd mine-memristors
./gradlew build
The mod jar comes out at build/libs/circuitsimcraft-<version>.jar. You need a JDK 25 available;
either make it your default java, or point Gradle at it explicitly:
JAVA_HOME=/path/to/jdk-25 ./gradlew build
Useful dev tasks: ./gradlew runClient (launches a dev client with the mod loaded) and
./gradlew runServer (headless dedicated server — handy for checking the mod loads without a GUI).
Basic Components
For any component whose value is a single number rather than a category (resistance,
capacitance, inductance, voltage, frequency, the memristor's parameters), an empty-hand
shift+right-click opens a text-entry screen — the same interaction spirit as editing a
sign — pre-filled with the current value(s) and the same min/max range its preset cycle
already covers. A plain empty-hand right-click still cycles through the fixed presets exactly
as before; the two interactions coexist.
These are the Electrician villager's stock-in-trade (see below) — the everyday passive
components, sources, and instrumentation you need for a basic circuit. Transistors, controlled
sources, and the diode live in Advanced Components instead, sold by the
Electronics Engineer.
| Block/Item |
What it is |
| Resistor |
Ohmic resistor. Right-click (empty hand) to cycle 10 / 100 / 1,000 / 10,000 Ω; shift+right-click opens the value editor for an exact resistance. |
| Capacitor |
Ideal capacitor, trapezoidal-integration model. Cycles 1 / 10 / 100 / 1,000 µF; shift+right-click opens the value editor for an exact capacitance. |
| Inductor |
Ideal inductor, trapezoidal-integration model. Cycles 0.01 / 0.1 / 1 / 5 H (scaled for Minecraft's tick rate, not real-world component ratings); shift+right-click opens the value editor for an exact inductance. |
| Memristor |
Charge-controlled linear-drift (HP) memristor model. Resistance drifts between $R_{on}$ and $R_{off}$ based on accumulated charge through it — the "memory" persists even when the circuit is rebuilt. Empty-hand right-click cycles a "switching speed" ($q_{max}$) preset as before (defaults: $R_{on}=100,\Omega$, $R_{off}=10{,}000,\Omega$); shift+right-click opens the value editor for all three parameters at once — $R_{on}$ (10–1,000 Ω), $R_{off}$ (1,000–100,000 Ω), and $q_{max}$ (1e-4–1e-2 C). |
| Power Supply |
Ideal DC voltage source. Cycles 1.5 / 5 / 9 / 12 / 24 V; shift+right-click opens the value editor for an exact voltage. Inactive (open-circuit) until it receives a redstone signal - wire up the circuit first, then power it on. |
| Function Generator |
Time-varying voltage source. Empty-hand right-click cycles sine/square/triangle presets (waveform shape only - see Voltage/Frequency Module below for amplitude and frequency, both relayed in from a neighboring module). Shift+right-click opens its own value editor for Phase (0–360°, applies to all three waveform shapes, not just sine) - the one parameter set directly on the generator itself rather than through a module. Same redstone-activation behavior as the Power Supply. Defaults to 5V/1Hz/0° with no modules attached. |
| Wire |
Zero-resistance conductor block. Connects on all six faces. Probeable in its own right (see Probe below) - gives the absolute voltage at that point in the circuit, not just a drop across two leads. |
| Ground |
Ties whatever network it's wired into to a real 0V reference point, the same way a real circuit needs a ground reference before "voltage at this node" means anything. Conductive on all six faces, wire it in like any other participant. Probing it always reads exactly 0V, confirming what's actually tied to reference. |
| Ammeter |
A 0V voltage source in series - electrically an ideal wire, so it doesn't disturb the circuit, but gives an exact current reading. Pin it with the Probe to see a live current trace on the oscilloscope, the same way you'd watch a voltage. |
| Ideal Op-Amp |
Infinite gain, infinite input impedance, zero output impedance - the textbook ideal op-amp, enforcing a "virtual short" between its two inputs via its own dedicated branch-current unknown in the solver (the same MNA trick used for voltage sources, just referencing different nodes for the constraint than for the current injection). The only 3-terminal component: output and the inverting input (V−) are the front/back leads as usual; the non-inverting input (V+) is the block's top face (or its north face, if the block itself is oriented vertically). Fixed, ideal behavior with no adjustable parameter at all, so there's no preset cycle and no value editor; the AC (Bode-plot) solver instead uses a fixed two-pole gain model (100dB DC gain, poles at 20Hz and 3MHz) - see AC Source/AC Probe below. |
| AC Source |
The excitation for an AC (small-signal) sweep. Wired like any other two-terminal component, but electrically a 0V source (a plain wire) in the regular DC/transient simulation - its real behavior only appears through the AC Probe. All three parameters (amplitude, min frequency, max frequency) are set through shift+right-click only, since a frequency range isn't the kind of thing a short preset list represents well - there's no plain-right-click preset cycle at all for this one. |
| Voltage Module |
Undirected utility cube (no facing, no leads) that touches a Function Generator on any face and sets its amplitude. Right-click cycles its own preset (1.5/5/9/12/24 V); shift+right-click opens the value editor for an exact voltage. Same-kind modules touching each other relay one shared value along the whole chain - whichever module was right-clicked most recently wins and propagates to every generator the chain reaches, so one control can drive several generators at once. |
| Frequency Module |
Same idea as the Voltage Module, but sets a Function Generator's frequency (0.5/1/2/5/10 Hz presets); shift+right-click opens the value editor for an exact frequency. A mixed chain of Voltage and Frequency modules relays both values through, regardless of which order they're arranged in. |
| Probe |
Right-click a component, Wire, or Ground to pin it as one of up to 3 channels shown simultaneously on the oscilloscope HUD (pinning a 4th evicts the oldest); shift+right-click unpins it. Hold the probe in either hand to see the HUD - each pinned channel gets its own scrolling trace, color-coded, stacked in the corner. A component shows the voltage drop across its two leads; a Wire or Ground shows the absolute voltage at that single point. Each channel's trace is auto-scaled to its own history, with the full-scale value printed at the top and bottom of its graph in SI-prefixed form (k/m/u/n/p, whichever keeps the number compact). Once all 3 slots are full, the oldest channel is outlined in yellow and labeled "(next)" so you can see which one a new pin would evict before you commit to it. |
| X-Y Oscilloscope Probe |
A second, independent probe: instead of plotting channels against time, it plots one pinned channel's voltage against another's - a real bench oscilloscope's X-Y mode, tracing Lissajous figures for phase/frequency comparisons. Right-click to pin - whichever block you just clicked always becomes (or stays) the Y channel, demoting the previous Y to X and evicting the old X if both slots were already full; shift+right-click unpins. Each axis is scaled independently to its own channel's peak magnitude, with the full-scale value printed at both ends of each axis directly on the plot in SI-prefixed form (k/m/u/n/p), so two very differently sized signals both use the plot's full range instead of one being squashed by a shared scale - a 90°-phase-shifted, equal-amplitude pair still traces an actual circle, since the two independent scales coincide whenever the amplitudes actually match. Independent of the regular Probe's own pins - hold both at once to see both HUDs side by side. |
| AC Oscilloscope Probe |
A genuine two-step probe, unlike the other two: right-click an AC Source first to pin it as the sweep's excitation (a hint appears; nothing is computed yet). Right-click a second, different point afterward - any component, wire, or ground - to run the sweep (60 log-spaced frequencies across the source's configured range) and show a Bode plot: magnitude in dB on top, phase in degrees below, both against log-frequency. The source stays pinned afterward, so you can probe more points against it without re-clicking it each time; shift+right-click unpins. |
| R2V Converter |
Redstone-to-voltage interface: must be placed directly on top of a Ground block (both a placement requirement and its 0V electrical reference). Reads two 0-15 redstone signal strengths - North = A, South = B - and outputs V = A×16 + B (0-255V) on its top face, wired into the rest of the circuit like any other source. No value editor; the output is entirely redstone-driven. |
| V2R Converter |
The inverse of the R2V Converter: also placed directly on Ground, reads whatever voltage is wired into its top face (an ideal voltmeter - draws no current, never loads down what it's measuring), and decodes it back into two 0-15 redstone outputs on its North (A) and South (B) faces, the exact inverse of V = A×16 + B. |
| Breadboard |
Not a circuit component - it has no leads and takes no part in the solver. It's the Electrician villager's job site block (see below): place one, let an unemployed villager claim it, and it starts selling the rest of this table. |
Wiring rules
Every component occupies one block, oriented by the direction you were looking when you placed
it. Its two electrical leads are its front and back faces (along that facing axis) — the other
four faces are insulated. Wire blocks conduct on all six faces. Two positions merge into the same
electrical node whenever each one presents a conductive face toward the other — so components
"connect" either through wire, or by placing two components lead-to-lead directly against each
other, no wire needed in between.
An unconnected lead doesn't crash anything — it's treated as a floating node, so you can build a
circuit incrementally and it'll simulate (uselessly, but safely) at every intermediate stage.
The R2V/V2R Converters and the four controlled sources (VCVS/VCCS/CCCS/CCVS, see
Advanced Components) are the exception to "leads follow the direction
you were looking when placed": their orientation is always fixed (up = the wired electrical
lead(s), down = the required Ground connection, north/south = redstone I/O or control leads),
regardless of which way you were facing when you placed them. They also physically require a
Ground block directly beneath them to place at all — break that Ground and the converter
or controlled source breaks with it.
The transistors (NPN/PNP/NMOS/PMOS) and the Ideal Op-Amp are 3-terminal components: front
and back are two of the three leads as usual, and the third (base/gate, or the op-amp's V+) is
the block's top face — or its north face, if the block itself is oriented vertically (facing
up or down).
Advanced Components
Transistors, the four classic dependent/controlled sources, and a couple of instrumentation
pieces that round out a real bench — sold by the Electronics Engineer villager (see below),
not the Electrician. All the "simplest model" parameters below (β, threshold voltage,
transconductance, gain) are editable via shift+right-click, the same value-editor convention as
the basic components.
Every dependent source here relies on a deliberate one-tick lag: Circuit.step() stamps every
element before solving, so any element that reads another node's already-solved voltage (or
another source's already-solved current) while building its own stamp is necessarily reading the
previous tick's converged value — the same "linearize about last tick" philosophy the Diode
already used. This is what lets all four controlled sources, the BJTs, and the MOSFETs work
without any change to Circuit's core solve loop (aside from one new stamping helper,
stampTransconductance — see MOD_ARCHITECTURE.md for the full writeup).
| Block/Item |
What it is |
| Diode |
The lead facing the direction you were looking when you placed it is the anode, the opposite lead is the cathode - current flows readily anode→cathode past the forward voltage, and is (almost) blocked in reverse. Right-click cycles silicon (~0.7V) / germanium (~0.3V) / red LED (~2V) presets - a categorical choice, so there's no shift+right-click value editor for the diode. Modeled with a linearized Shockley diode equation re-fit every tick, not a lookup table. |
| Current Source |
Ideal independent DC current source - the dual of the Power Supply. Cycles 0.1 / 0.5 / 1 / 2 A; shift+right-click opens the value editor for an exact current. Same redstone-activation behavior as the Power Supply (inactive = open circuit until powered). |
| Voltmeter |
An ideal voltmeter in series - infinite input impedance, draws no current, never loads down the circuit it's reading. The voltage dual of the Ammeter: pin it with the Probe to see a live voltage trace, same as any other component. |
| NPN Transistor |
Collector is the front (facing) lead, emitter the back, base the top face (or north, if placed vertically). Base-emitter junction reuses the Diode's own linearized Shockley model; collector current is β × base current, stamped as an exact transconductance term (no lag) via stampTransconductance. Shift+right-click edits β (current gain), 5–500. |
| PNP Transistor |
Same model and leads as the NPN, with every current direction reversed (polarity = -1 in the underlying Bjt model). Shift+right-click edits β, 5–500. |
| NMOS Transistor |
Drain is the front lead, source the back, gate the top face (or north, if placed vertically). Square-law, saturation-only model, linearized each tick around the previous drain current. Shift+right-click edits threshold voltage (0.1–5 V) and transconductance k (1e-4–0.1 S). |
| PMOS Transistor |
Same model and leads as the NMOS, with drain current direction reversed. Shift+right-click edits the same two parameters. |
| VCVS (voltage-controlled voltage source) |
Must be placed directly on a Ground block, like the R2V/V2R Converters. North face senses a control voltage (against Ground); the output (gain × control voltage) is driven onto the top face. Shift+right-click edits the gain, 0.1–100. |
| VCCS (voltage-controlled current source) |
Same shape as the VCVS, but drives a current (transconductance × control voltage) out its top face instead of a voltage - stamped as an exact transconductance term, no lag, since it's a purely linear relation. Shift+right-click edits the transconductance, 1e-4–1 S. |
| CCCS (current-controlled current source) |
A 4-face component: north/south are the control-current sense leads (an internal 0V ammeter, like the Ammeter block), top drives the output current (current gain × sensed current) against the required Ground below. Shift+right-click edits the current gain, 0.1–100. |
| CCVS (current-controlled voltage source) |
Same 4-face shape as the CCCS, driving a voltage (transresistance × sensed current) instead of a current. Shift+right-click edits the transresistance, 1–1,000 Ω. |
| Workbench |
Not a circuit component - it has no leads and takes no part in the solver. It's the Electronics Engineer villager's job site block (see below): place one, let an unemployed villager claim it, and it starts selling the rest of this table. |
Three-Phase Components
A whole second electrical "world" living alongside the mono one above — every component here has
a single bundled lead carrying all three phases (A/B/C) at once, rather than three separate
physical connections. A dedicated bundle wire lets you route that bundle anywhere (it merges with
any touching bundle wire or bundled lead, exactly like the mono Wire does for a single node), and
a Bundler/Unbundler pair crosses between the two worlds when you need to. Sold by the Electrical
Engineer villager (see below), not the Electrician or Electronics Engineer.
| Block/Item |
What it is |
| 3-Phase Wire |
The bundle equivalent of Wire — paints freely in any direction, merges with any touching 3-phase wire or bundled lead. Carries phase A/B/C together as one connection; a plain mono Wire touching it simply doesn't connect (you need a Bundler/Unbundler to cross between the two worlds) — except Ground, which closes either world directly (see below). |
| 3-Phase Source |
The facing direction is the bundled 3-phase output (three internal sinusoidal sources at the same frequency/amplitude, 120° apart — standard A/B/C phase rotation); the opposite face is an ordinary single neutral lead, wired to a Ground block the same way every other source's "back" lead works. Shift+right-click edits amplitude (12–400 V) and frequency (0.5–5 Hz). Redstone-gated like the Power Supply. |
| 3-Phase Ammeter |
Three independent ideal ammeters in series, one per phase — both leads bundled, in-line like the mono Ammeter. |
| 3-Phase Resistor |
Three ordinary resistors in parallel, one per phase, sharing one editable resistance (10–10,000 Ω) — a balanced resistive load/bank. |
| 3-Phase Inductor |
Same idea, three inductors sharing one editable inductance (0.01–5 H). |
| 3-Phase Capacitor |
Same idea, three capacitors sharing one editable capacitance (1–1,000 µF). |
| Phase Bundler |
Fixed, non-rotatable faces: the bundled lead is always Up, phase A/B/C are always North/East/South. Purely topological — no impedance added, exactly like a plain wire itself — takes three separate mono connections and aliases them directly onto the matching bundle sub-node. |
| Phase Unbundler |
Electrically identical to the Bundler (same fixed faces, same zero-impedance aliasing) — a separate block purely so "bundle → three wires" and "three wires → bundle" read as distinct pieces when you're wiring a bench. |
| 3-Phase Oscilloscope Probe |
Right-click a bundled component to pin it (shift+right-click unpins) — up to 3 channels at once, same as the regular Probe, except each channel now overlays all three phases on one graph in the standard red/yellow/blue phase-color convention, instead of one trace per channel. |
| Switchboard |
Not a circuit component — the Electrical Engineer villager's job site block (see below). |
Every 3-phase part is built from three of its mono equivalent — 3× Wire → 1× 3-Phase Wire,
3× Power Supply → 1× 3-Phase Source, 3× Ammeter → 1× 3-Phase Ammeter, 3× Resistor/Inductor/ Capacitor → 1× the matching 3-phase part, 3× Probe → 1× 3-Phase Probe — all shapeless. The
Bundler/Unbundler are each 3× Wire + 1 iron ingot, also shapeless. See the
Crafting recipes table below for the recipe diagrams.
Ground works in both worlds — a circuitsimcraft:ground block is bundle-conductive as well as
its usual mono conductivity, so a 3-Phase Wire run can end directly at a Ground with no Bundler/
Unbundler needed, exactly like a mono Wire run already could. You only need an Unbundler when you
actually want the three phases split out to separate mono destinations (three individual gauges,
three individual loads, etc.) — not just to close a loop back to 0V.
Crafting recipes
All vanilla ingredients, no dependency on any other mod. Shapeless recipes are shown as a loose set
of ingredients; shaped ones show the actual 3×3 grid layout. Where a recipe accepts either of two
materials in the same slot, both variants are shown stacked as two complete recipes leading to the
same result, rather than merged into one image.
| Recipe |
Notes |
|
Resistor ×2 — iron nugget, clay ball or coal as the resistive body, iron nugget: leads on both sides of the body, shaped. |
|
Capacitor ×2 — iron nugget, paper as the historical capacitor dielectric, iron nugget: leads on both sides, shaped. |
|
Inductor ×2 — iron nugget, copper or iron ingot for the coil, iron nugget: leads on both sides, shaped. |
|
Memristor ×1 — amethyst shard for the switching medium. |
|
Power Supply ×1 — 3×3 iron/copper shell around a redstone block core. |
|
Function Generator ×1 — 3×3 iron/copper shell, quartz + redstone torch core. |
|
Wire ×9 — three copper ingots in a row, shaped, cheap/bulk. |
|
Ground ×4 — iron nugget + copper ingot. |
|
Ammeter ×2 — iron nugget, copper ingot, redstone. |
|
Voltage Module ×1 — gold nugget, redstone, iron nugget. |
|
Frequency Module ×1 — amethyst shard, redstone, iron nugget. |
|
Diode ×2 — iron nugget, redstone, quartz. |
|
Ideal Op-Amp ×1 — 2 gold nuggets, redstone, quartz. |
|
Probe ×1 — redstone, iron nugget, and a stick, stacked vertically. |
|
X-Y Oscilloscope Probe ×1 — redstone, quartz, and a stick, stacked vertically. |
|
AC Source ×1 — redstone, glowstone dust, gold nugget (shapeless). |
|
AC Oscilloscope Probe ×1 — redstone, glowstone dust, and a stick, stacked vertically. |
|
R2V Converter ×1 — 3×3 iron/copper shell around a Comparator core, the vanilla device for reading redstone strength. |
|
V2R Converter ×1 — 3×3 iron/gold shell around a Comparator core. |
|
Breadboard ×1 — 3×3, oak planks frame around a redstone-and-iron-nugget core. |
|
Current Source ×1 — 3×3 gold/copper shell around a redstone block core (the Power Supply's dual). |
|
Voltmeter ×2 — iron nugget, gold nugget, redstone. |
|
NPN Transistor ×2 — 2 iron nuggets, quartz, redstone. |
|
PNP Transistor ×2 — 2 iron nuggets, glowstone dust, redstone. |
|
NMOS Transistor ×2 — 2 iron nuggets, paper (gate insulation), quartz. |
|
PMOS Transistor ×2 — 2 iron nuggets, paper, glowstone dust. |
|
VCVS ×1 — 3×3 copper/gold shell around a Comparator core. |
|
VCCS ×1 — 3×3 copper/iron shell around a Comparator core. |
|
CCCS ×1 — 3×3 gold/copper shell around a Comparator core. |
|
CCVS ×1 — 3×3 gold/iron shell around a Comparator core. |
|
Workbench ×1 — 3×3, smooth stone frame around a redstone-and-iron-nugget core (the Breadboard's own job-site pattern, restyled in stone). |
|
3-Phase Wire ×1 — 3× Wire (shapeless). |
|
3-Phase Source ×1 — 3× Power Supply (shapeless). |
|
3-Phase Ammeter ×1 — 3× Ammeter (shapeless). |
|
3-Phase Resistor ×1 — 3× Resistor (shapeless). |
|
3-Phase Inductor ×1 — 3× Inductor (shapeless). |
|
3-Phase Capacitor ×1 — 3× Capacitor (shapeless). |
|
Phase Bundler ×1 — 3× Wire + 1 iron ingot (shapeless). |
|
Phase Unbundler ×1 — 3× Wire + 1 iron ingot (shapeless). |
|
3-Phase Oscilloscope Probe ×1 — 3× Probe (shapeless). |
None of these have recipe-book unlock advancements yet, so they won't show a "new recipe" toast —
but they're fully craftable by hand right now. See Contributing if you want to add
those.
All items are also available in their own CircuitSimCraft creative-inventory tab.
The Electrician villager
Place a Breadboard (crafted as shown above) and let an unemployed villager claim it as a job
site; it becomes an Electrician and both sells the mod's own components and buys back
the raw materials needed to craft them, all for emeralds, instead of vanilla trades. It has its
own look, not the default missing-texture placeholder: a slate/steel tool apron with
warning-yellow badge accents, distinct from any vanilla profession's outfit. Like every vanilla
profession, it levels up (Novice → Master) as it successfully trades, unlocking later tiers. Each
level offers at most two components to sell and at most two raw materials to buy (never more,
always both), so no single villager is ever a wall of trades - except Master, which is a
deliberate exception (see below):
| Level |
Sells |
Buys |
| 1 — Novice |
Resistor, Capacitor |
Iron Nugget, Clay Ball |
| 2 — Apprentice |
Power Supply, Function Generator |
Iron Ingot, Copper Ingot |
| 3 — Journeyman |
AC Source |
Gold Nugget, Glowstone Dust |
| 4 — Expert |
Probe, AC Oscilloscope Probe |
Redstone, Stick |
| 5 — Master |
any 2 of Memristor / R2V Converter / V2R Converter |
Amethyst Shard, Redstone (usually both) |
Buy trades collect 8 of the raw material per trade (4 for Amethyst Shard, the rarest
one - a batch you can actually gather without grinding); sell trades keep each component's
original per-trade quantity (1-2 at a time, unchanged from before). Every trade - buy and sell
alike - can now be used 15 times before that villager needs to restock via more trading
(max_uses: 15, a flat number replacing the previous per-tier values of 4-12). Buy prices are
cheaper than sell prices for the same tier, same as a real shop margin: raw materials are worth
less than the finished component they go into.
Not every craftable item is sellable this way anymore - Wire, Ground, Inductor, Voltage Module,
Frequency Module, and the X-Y Oscilloscope Probe were trimmed out to keep to the two-per-level
cap (all six are still simple, cheap crafting-table recipes, unaffected). The Diode isn't trimmed,
just relocated - it's sold by the Electronics Engineer instead (see below), not the
Electrician. Trades are entirely
data-driven (data/circuitsimcraft/{villager_trade,tags/villager_trade,trade_set}/electrician/)
rather than hardcoded in Java - this Minecraft version's VillagerProfession only points at
TradeSet resource keys per level, so rebalancing prices or adding trades is a JSON edit, no
rebuild required. Each level's trade_set amount is set equal to its trade pool's size, so
every listed trade is always offered together rather than a random subset (unlike vanilla
professions, which usually roll a handful from a larger pool) - the only way to guarantee the
"both sell items and both buy items are always present" promise above.
Master is the one deliberate exception. At the user's request, Master's sell pool has three
items (Memristor, R2V Converter, V2R Converter) instead of two, and any given Electrician
randomly offers only two of the three - real vanilla-style randomness, reintroduced on purpose
for this one tier. Minecraft's trade-set system can only randomize across one combined
pool per level, with no way to keep a subset (the two buy trades) deterministic while
randomizing another subset (the three sell trades) within that same level - so Master's full
pool is 5 entries (3 sell + 2 buy) with amount: 4, meaning exactly one entry gets excluded at
random. Most of the time that's one of the three sell items (giving the intended "any two of
three"), but occasionally it's one of the two buy items instead - Master is the only tier where
the "both buy items always present" guarantee isn't absolute.
Electrician's Workshop
The mod ships a ready-made shop as a datapack function - no manual building required. Stand
where you want it (any terrain: it clears its own footprint and pours its own foundation first,
so uneven ground, slopes, or ungenerated chunks are all fine) and run:
/function circuitsimcraft:electrician_shop
This builds a small oak-and-copper workshop with a slab roof, a lightning rod finial (the most
literal "electrician" symbol available), and a Breadboard already placed inside against the back
wall next to a small shelf of stock (wire, a resistor, a capacitor) - ready for a villager to
walk in and take the job:
The function's source (data/circuitsimcraft/function/electrician_shop.mcfunction) is plain
/fill//setblock commands if you want to reskin it - see
MOD_ARCHITECTURE.md for how it was built and verified.
The Electronics Engineer villager
Place a Workbench (crafted as shown above) and let an unemployed villager claim it as a job
site; it becomes an Electronics Engineer and sells/buys the Advanced Components
table above, the same way the Electrician handles the basic one. It has its own distinct look
too — a white lab-coat recolor of the Electrician's own texture, with the badge accents shifted
from warning-yellow to a diode-red glow, so the two professions are never visually confused.
Same leveling (Novice → Master), same "at most two sells and buys per level, never more" rule,
with Master again the deliberate exception:
| Level |
Sells |
Buys |
| 1 — Novice |
Diode, Voltmeter |
Quartz, Paper |
| 2 — Apprentice |
Current Source, NPN Transistor |
Iron Nugget |
| 3 — Journeyman |
PNP Transistor, NMOS Transistor |
Glowstone Dust |
| 4 — Expert |
PMOS Transistor, VCVS |
Gold Ingot |
| 5 — Master |
any 2 of VCCS / CCCS / CCVS |
Redstone Block (usually present) |
Same trading terms as the Electrician throughout: buy trades collect 8 of the raw material
per trade (4 redstone blocks at Master, the priciest one), every trade allows 15 uses
before restocking, and sell prices scale up with tier (2 emeralds at Novice up to 8 at Master,
matching the Electrician's own R2V/V2R-tier pricing for the dependent sources). Master's sell
pool has three items with only two ever offered at once — the same reused "random exclusion"
trick as the Electrician's own Master tier, except here the full pool is 4 entries (3 sell + 1
buy) with amount: 3, so occasionally the excluded entry is the buy trade instead of a sell
item, not just "any two of three" sells.
Electronics Engineer's Workshop
Same idea as the Electrician's Workshop, deliberately built in a different palette so the two
professions' buildings read as distinct at a glance — a stone-brick-and-polished-andesite "lab"
with iron bars and a quartz finial, instead of the Electrician's oak-and-copper cabin:
/function circuitsimcraft:engineer_workshop
This places a Workbench against the back wall with a small stock shelf (a Diode and an NPN
Transistor) next to it, exactly like the Electrician's own shop places a Breadboard and starter
stock. The function's source is
data/circuitsimcraft/function/engineer_workshop.mcfunction — plain /fill//setblock commands,
same as the Electrician's.
The Electrical Engineer villager
Place a Switchboard (crafted the same way as the Workbench and Breadboard — see
Crafting recipes) and let an unemployed villager claim it as a job site; it
becomes an Electrical Engineer and sells/buys the Three-Phase Components
table above — a third profession, alongside the Electrician (basic mono components) and the
Electronics Engineer (advanced mono components), this time for the bundled 3-phase world. Same
leveling (Novice → Master), same pricing/restock conventions as the other two:
| Level |
Sells |
Buys |
| 1 — Novice |
3-Phase Wire, 3-Phase Ammeter |
Copper Ingot ×8 |
| 2 — Apprentice |
3-Phase Source, 3-Phase Probe |
Iron Nugget ×12 |
| 3 — Journeyman |
Phase Bundler, Phase Unbundler |
Glowstone Dust ×4 |
| 4 — Expert |
3-Phase Resistor, 3-Phase Inductor |
Gold Ingot ×4 |
| 5 — Master |
3-Phase Capacitor |
Redstone Block ×1 |
Same trading terms as the other two villagers: every trade allows 15 uses before restocking,
and sell prices scale up with tier — 2 emeralds each at Novice, up to 8–9 emeralds at Expert/
Master for the priciest bundle-graph parts (Bundler/Unbundler at 8, Inductor/Capacitor at 9).
Electrical Engineer's Workshop
Same idea as the other two workshops, in its own distinct palette so all three professions'
buildings read apart at a glance — a deepslate-brick-and-copper "substation" with a lightning
rod finial, instead of the Electrician's oak cabin or the Electronics Engineer's stone lab:
/function circuitsimcraft:electrical_engineer_workshop
This places a Switchboard against the back wall, ready for a villager to walk in and take the
job. The function's source is
data/circuitsimcraft/function/electrical_engineer_workshop.mcfunction — plain
/fill//setblock commands, same as the other two.
Worked-example circuits
Eight ready-made circuits, one datapack function each, the same /fill//setblock-based
approach as the three workshops above — no manual wiring required to get started. Stand where
you want the bench's southwest corner and run one:
/function circuitsimcraft:voltage_divider           # Experiment 1: basic voltage divider
/function circuitsimcraft:rc_lowpass                # Experiment 2: RC low-pass Bode plot
/function circuitsimcraft:rlc_resonance             # Experiment 3: RLC resonance Bode plot
/function circuitsimcraft:half_wave_rectifier       # Experiment 4: half-wave rectifier
/function circuitsimcraft:memristor_hysteresis      # Experiment 5: memristor pinched hysteresis loop
/function circuitsimcraft:opamp_bode                # Experiment 6: op-amp open-loop Bode plot
/function circuitsimcraft:three_phase_load          # Experiment 7: balanced three-phase resistive load
/function circuitsimcraft:three_phase_bundle_unbundle  # Experiment 8: bundle/unbundle round trip
Each clears its own space, pours its own foundation, wires up the circuit at every
component's default preset (no component in this mod persists a right-click-selected preset
across a save/reload, so a freshly-placed one always starts at its default regardless of what
an experiment calls for), places an unflipped lever on top of the source, and gives you the
right oscilloscope probe for the job. The function's own header comment states the exact
right-clicks needed to reach each experiment's intended component values and the expected
result. The first six are described in full (derivations, predicted numbers, and the physics
behind each) in the mod's companion paper, latex_mod/sections/07_results_experiments.tex,
reproduced here as buildable structures rather than left as a diagram — Experiments 7 and 8 (the
three-phase benches) postdate that writeup and aren't in the paper yet. Experiment 8 is also the
mod's reference build for the Bundler/Unbundler pair: a 3-Phase Source feeds an Unbundler, three
separate mono Resistors (one per phase leg), a Bundler recombining them, a 3-Phase Resistor, and
straight into Ground — demonstrating both directions of the bundle/mono crossing in one bench,
and that Ground closes a bundle run directly with no second Unbundler needed. Their sources live
in data/circuitsimcraft/function/, plain text like every other function in the mod.
Architecture, for anyone extending this
src/main/java/com/rpicos/circuitsimcraft/
  sim/            Pure-Java circuit solver — zero Minecraft dependency, unit-testable standalone
  block/          Block classes (placement, orientation, right-click interactions)
  blockentity/    BlockEntity classes (the actual sim state + circuit wiring per component)
  network/        World-side wire connectivity graph + the client<->server probe protocol
  item/           The probe item
src/client/java/com/rpicos/circuitsimcraft/client/   HUD rendering, client-side networking
The solver (sim package)
Circuit is a general modified-nodal-analysis engine: node 0 is always ground, every other node
is an integer you allocate with addNode(). Element implementations (Resistor, Capacitor,
Inductor, Memristor, CurrentSource, Vccs, Bjt, Mosfet) stamp themselves into the
conductance matrix each step; VoltageSource gets its own branch-current unknown, the standard
MNA treatment for ideal sources — Vcvs and Ccvs are both thin factories that just build one.
Reactive elements use trapezoidal-integration companion models (the same technique SPICE uses)
rather than backward Euler, so LC-type behavior doesn't get artificially damped out; the BJT and
MOSFET models reuse that same "linearize about last tick" spirit (the BJT's base-emitter junction
literally reuses the Diode's own DiodeMath helper). Every dependent/active element's defining
asymmetry versus a passive, reciprocal resistor is captured in one shared stamping helper,
stampTransconductance — see Advanced Components above for the one-tick-lag
reasoning that lets all four controlled sources and both transistor families work without touching
this solve loop at all.
A second, complex-valued solver, AcCircuit, sits alongside it for AC (Bode-plot) analysis:
Complex is a plain immutable complex number, AcElement implementations stamp a frequency-dependent
admittance given an angular frequency directly (no timestep involved), and AcVoltageSource/AcOpAmp
handle sources and the op-amp's two-pole gain model the same "own branch-current unknown" way their
transient counterparts do. CircuitNetworkManager computes the wiring topology once and reuses the
identical node numbering for both solvers, so they can never disagree on which position is which node.
Because this package has no Minecraft imports at all, you can write and run plain-Java tests
against it directly with javac/java — no Gradle, no decompiling Minecraft, fast iteration.
That's how the solver was validated during development: against closed-form RC/RL step responses,
the memristor's analytic charge-controlled ODE, and — for the AC solver — closed-form Bode-plot
references (a resistive divider's flat response, an RC/RL divider's -3dB/45° cutoff point and
20dB/decade rolloff, and the op-amp model's DC gain and pole frequency).
Adding a new component type
- Add the physics to
sim/ if it's a new kind of element (skip this if it's just a different
preset of an existing one).
- Create a
blockentity/YourComponentBlockEntity.java extending ComponentBlockEntity,
implementing addToCircuit, probeCurrent, probeSummary, and cyclePreset.
- Create a
block/YourComponentBlock.java extending ComponentBlock (copy an existing one, e.g.
ResistorBlock.java — it's a ~25-line template).
- Register it in
ModBlocks, ModBlockEntities, ModItems, and add it to ModCreativeTab.
- Add a texture (
textures/block/your_component.png, 16×16 — front/back automatically get the
shared terminal.png lead texture, so you only need the body texture for the other four
faces), a blockstates/your_component.json and models/block/your_component.json (copy an
existing pair — they're generic besides the texture path), and a lang entry.
- Optionally add a
data/circuitsimcraft/recipe/your_component.json.
If your component has 3+ terminals, extend NetworkBlockEntity directly instead of
ComponentBlockEntity (see OpAmpBlockEntity, NpnBlockEntity, or the Vcvs/Vccs/Cccs/Ccvs
family for precedent) and add your own dispatch branch in CircuitNetworkManager.rebuild(). If it
should always sit on a Ground block with a fixed orientation (like the R2V/V2R converters and the
four controlled sources), extend GroundedComponentBlock rather than ComponentBlock directly.
See COMPONENT_ADD.md and MOD_ARCHITECTURE.md for
the full walkthrough, including the second-villager-profession pattern if your component should be
sold by a new profession rather than an existing one.
Known limitations
- Component state resets on circuit rebuild.
CircuitNetworkManager rebuilds the whole
Circuit from scratch whenever wiring changes anywhere in that network, so a capacitor's charge
or an inductor's current resets to zero at that point. The memristor is the exception — its
state fraction is explicitly carried across rebuilds, since persistent state is the entire point
of a memristor. Making the others persist too is a good first contribution.
- No recipe-book unlock advancements — recipes work but won't appear highlighted/toast when
first available.
- AC analysis is small-signal only, and doesn't cover the Advanced Components or the
Three-Phase Components at all yet. Every independent source other than the pinned AC Source
is always stamped at 0V during a sweep, regardless of its own redstone-activated state; the
op-amp's two-pole gain (100dB DC gain, poles at 20Hz/3MHz) is a fixed constant, not yet exposed
through the value editor; and the memristor's AC case is simply a frozen resistor with no
frequency dependence of its own modeled yet. The transistors, the four controlled sources, and
every three-phase component simply have no
AcStampable implementation at all, so they behave
as an open circuit during a Bode-plot sweep by omission rather than by any deliberate
small-signal model — a real next contribution, not a design choice.
- The base/gate badge texture on a vertically-placed transistor is unverified. The Java
electrical model is orientation-correct regardless (base/gate is always the block's north face
when placed facing up/down, per the wiring rules above) — what's untested is only whether the
texture painted on that literal north face reads correctly to the player when the block itself
is lying on its side. Confirmed correct for all four horizontal orientations; not yet visually
checked for facing up/down.
- The 3-Phase Oscilloscope's actual on-screen rendering, and the Electrical Engineer's trade
offers, haven't been visually confirmed in a real connected client — both were only verified
via server-side headless testing (real solved circuit values, checked by log) rather than by
looking at the rendered game.
Contributing
Issues and PRs welcome. If you're adding a component, please include a note on the physical model
you used (a link to the equations is enough) — the goal of this mod is that in-game behavior is
actually correct, not just plausible-looking.
Citation
If you use CircuitSimCraft — in a classroom, a paper, a demo, a derivative mod, anywhere — please
credit the authors: Rodrigo Picos, Stavros G. Stavrinides, George Stavrinides, Ariadna Picos,
and Gerard Picos. A link back to this repository is enough for informal use; for academic
work, please cite it as:
Rodrigo Picos, Stavros G. Stavrinides, George Stavrinides, Ariadna Picos, and Gerard Picos.
CircuitSimCraft: a Fabric mod for teaching analog electronics in Minecraft.
https://github.com/rpicos-uib/circuitsimcraft, 2026.
BibTeX:
@software{picos_mine_memristors,
  author = {Picos, Rodrigo and Stavrinides, Stavros G. and Stavrinides, George and Picos, Ariadna and Picos, Gerard},
  title  = {CircuitSimCraft: a Fabric mod for teaching analog electronics in Minecraft},
  url    = {https://github.com/rpicos-uib/circuitsimcraft},
  year   = {2026}
}
See also CITATION.cff, which GitHub reads automatically for its "Cite this
repository" button.
License
CC BY 4.0 — see LICENSE. Unlike a
permissive software license (MIT, Apache, etc.), CC BY requires attribution as a legal
condition of reuse, not just a courtesy — the citation above is exactly what satisfies that
requirement for academic use; a link back to this repository is enough for informal use.


 模组

 模组
 模组

 模组

 模组
 模组

评论 0
登录后参与评分
还没有评论,来抢沙发吧