Minecraft Client Updater
后面有中文
亮点
- 用于从特定的 Minecraft 服务器更新模组并显示更新日志。
- 为玩家提供一种不显眼的更新体验,更贴近原版风格。
- 提供网页以查看更新日志的历史记录。
演示
接近原版的无感更新
启动时自动在可用时显示更新。
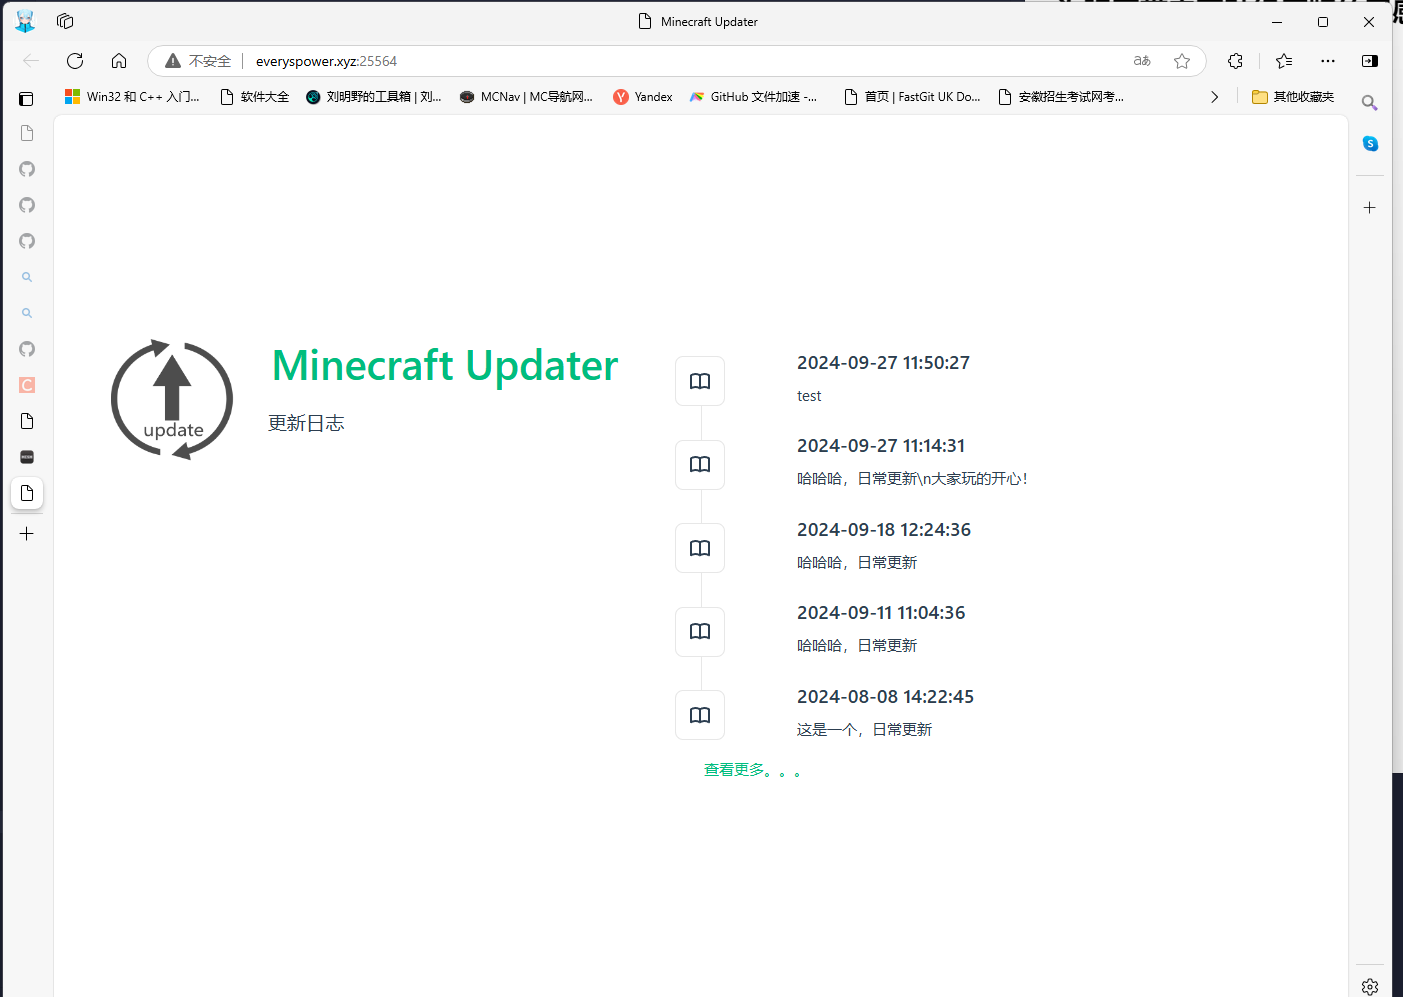
用于查看更新日志历史记录的网页
使用方法
客户端
- 将模组放入 mods 文件夹,并启动游戏一次,以便在
game changer/clientupdater-client.toml 中生成配置文件。
- 编辑配置文件
# 同步服务器 URL
server_address = “http://服务器IP或主机名:25564/”
# last_update_time(自动生成,请勿更改)
last_update_time = “”
- 启动游戏(如果有更新或缺少模组,将会显示新页面)
服务端
此模组的服务端部分由 Python 编写,因此无需将 clientupdater-x.x.x.jar 放入服务端模组文件夹中。
- 安装 Python 运行环境,并安装
Flask 和 Flask_Cors 库。
pip install Flask
pip install Flask_Cors
-
将服务器端的 server.zip 解压至服务器根目录
-
打开端口 25564,或修改 ClientUpdaterServer.py 中的 PORT 变量
-
在服务器根目录中创建 clientmods 和 clientconfig 文件夹
-
将 Clientupdater-x.x.x.jar 模组放入 clientmods
游戏更改目录结构
|-mods(使用镜像模式)
|-clientmods(仅客户端模组,使用镜像模式)
| |-Clientupdater-x.x.x.jar(必须放置此模组)
|
|-clientconfig(客户端配置文件,结构与客户端相同,使用覆盖模式)
|
|
-
运行脚本 ClientUpdaterServer.py。
-
输入 commit single line update description 或使用 commit -f text file with update information.txt 提交更新,提交更改后,客户端在重启时将接收更新推送。
-
每次模组更改后,使用上述命令更新模组列表。
-
使用 status 查看已提交的模组列表。
服务端命令
| 命令 |
用法 |
| commit |
commit <单行更新日志> 仅提交单行日志
commit -t <包含多行更新日志的 .txt 文件> 提交多行日志 |
| status |
您可以检查当前更新的状况。 |
由 DeepL.com(免费版)翻译
简体中文
亮点
- 用于从指定的 Minecraft 服务器上更新模组并显示更新日志
- 为玩家带来更贴近原版的无感更新体验
- 提供了网页可供查看历史更新日志
效果演示
贴近原版风格的无感更新
启动时如获取到更新自动显示


网页查看历史更新日志

使用方法
客户端
- 将模组放入模组文件夹,启动一次游戏以生成配置文件,位于
游戏更目录/clientupdater-client.toml
- 编辑配置文件
#同步服务器url
server_address = "http://服务器的ip或者域名:25564/"
#最后更新时间(自动生成请勿更改)
last_update_time = ""
- 启动游戏(如果有更新或模组有缺失都会显示更行页面)
服务端
此模组的服务器端使用python编写,因此不需要将clientupdater-x.x.x.jar放进服务端的模组文件夹
- 安装python运行环境,并安装
Flask和Flask_Cors库
pip install Flask~~~~
pip install Flask_Cors
- 解压服务端
server.zip到服务端根目录
- 开放25564端口,或者修改
ClientUpdaterServer.py中的PORT
- 在服务器根目录下创建文件夹
clientmods和clientconfig
- 将
Clientupdater-x.x.x.jar模组放入clientmods
游戏更目录
|-mods(使用镜像模式)
|-clientmods(仅客户端侧模组,使用镜像模式)
| |-Clientupdater-x.x.x.jar(必须将此模组放入)
|
|-clientconfig(客户端配置文件,文件结构同客户端,使用覆盖模式)
|
- 运行脚本
ClientUpdaterServer.py
- 输入
commit 单行更新说明或者使用commit -f 写有更新信息的文本文件.txt来提交更新,提交完更行后客户端重启时就会收到更新推送
- 每次改变模组后用上方命令即可更新模组列表
- 使用
status可以查看已提交的模组列表
服务端指令
| 指令 |
用法 |
| commit |
commit <单行的更新日志>仅可提交单行日志 commit -t <多行更新日志所在.txt>可提交多行日志 |
| status |
可查看当前的更新的内容状态 |
The project has been rewritten. Please visit SakuraUpdater
Minecraft Client Updater
后面有中文
Highlights
- Used to update mods from a specific Minecraft server and display update logs.
- Provides players with an unobtrusive update experience that is more closely aligned with the original version.
- Provides a web page to view the history of update logs.
Demo
Senseless updates close to the original
Automatically displays the update when it's available at startup.
Webpage to view history of update logs

Usage
Client
- Place the mod in the mod folder and start the game once to generate a config file in
game changer/clientupdater-client.toml.
- Edit the configuration file
# Synchronize the server url
server_address = “http://server‘s ip or hostname:25564/”
#last_update_time (automatically generated, do not change)
last_update_time = “”
- Start the game (if there are any updates or mods missing, it will show a new line page)
Server
The server side of this mod is written in python, so there is no need to put clientupdater-x.x.x.jar into the server side mod folder.
- Install the python runtime environment, and install the
Flask and Flask_Cors libraries.
pip install Flask
pip install Flask_Cors
- Unzip the server
server.zip into the server root directory
- Open port
25564, or modify the PORT in ClientUpdaterServer.py
- create the folders
clientmods and clientconfig in the server root directory
- Put the
Clientupdater-x.x.x.jar mod into clientmods
Game change directory
|-mods(use mirror mode)
|-clientmods(client side mods only, use mirror mode)
| |-Clientupdater-x.x.x.jar(must put this mod in)
|
|-clientconfig(client config file, same structure as client, use override mode)
|
|
- Run the script
ClientUpdaterServer.py.
- Type
commit single line update description or use commit -f text file with update information.txt to submit the update, after submitting the change line the client will receive the update push when restarting.
- Use the above command to update the mod list after each mod change.
- Use
status to view the list of mods that have been submitted.
Server-side commands
| Commands |
Usage |
| commit |
commit <single line update log> Commit single line log only commit -t <multi-line update log in .txt> Commit multi-line log |
| status |
You can check the status of the current update |
Translated with DeepL.com (free version)
chinese
亮点
- 用于从指定的我的世界服务器上更新mod和显示更新日志
- 为玩家带来更贴经原版的无感更新体验
- 提供了网页可供查看历史更新日志
效果演示
贴近原版风格的无感更新
启动时如获取到更新自动显示
网页查看历史更新日志

使用方法
客户端
- 将mod放入mod文件夹,启动一次游戏生成配置文件,在
游戏更目录/clientupdater-client.toml
- 编辑配置文件
#同步服务器url
server_address = "http://服务器的ip或者域名:25564/"
#最后更新时间(自动生成请勿更改)
last_update_time = ""
- 启动游戏(如果有更新或mod有缺失都会显示更行页面)
服务端
此mod的服务端使用python编写,因此不需要将clientupdater-x.x.x.jar放进服务端的mod文件夹
- 安装python运行环境,并安装
Flask和Flask_Cors库
pip install Flask~~~~
pip install Flask_Cors
- 解压服务端
server.zip到服务端根目录
- 开放25564端口,或者修改
ClientUpdaterServer.py中的PORT
- 在服务器根目录下创建文件夹
clientmods和clientconfig
- 将
Clientupdater-x.x.x.jarmod放入clientmods
游戏更目录
|-mods(使用镜像模式)
|-clientmods(仅客户端侧mod,使用镜像模式)
| |-Clientupdater-x.x.x.jar(必须将此mod放入)
|
|-clientconfig(客户端配置文件,文件结构同客户端,使用覆盖模式)
|
- 运行脚本
ClientUpdaterServer.py
- 输入
commit 单行更新说明或者使用commit -f 写有更新信息的文本文件.txt来提交更新,提交完更行后客户端重启时就会收到更新推送
- 每次改变mod后用上方命令即可更新mod列表
- 使用
status可以查看已提交的mod列表
服务端指令
| 指令 |
用法 |
| commit |
commit <单行的更新日志>仅可提交单行日志 commit -t <多行更新日志所在.txt>可提交多行日志 |
| status |
可查看当前的更新的内容状态 |
评论 0
登录后参与评分
还没有评论,来抢沙发吧