
Geodesy
一款用于计算紫水晶农场飞行机器布局的小型 Fabric 模组。灵感来源于 ilmango 的原版视频以及 neffty87 制作的基于飞行机器的农场。
使用方法
你仅应在可丢弃的世界中运行此模组,无论是在单人游戏中还是在拥有 OP(管理员权限)的服务器上。命令方块也必须处于启用状态。
该模组 会 破坏地质晶洞周围的区域!
ilmango 的视频教程
步骤 1:寻找地质晶洞 (Geode)
运行 /geodesy(不带任何参数)以获取《神圣地质学之书》(The Unholy Book of Geodesy),
以及建造农场所需的方块组。
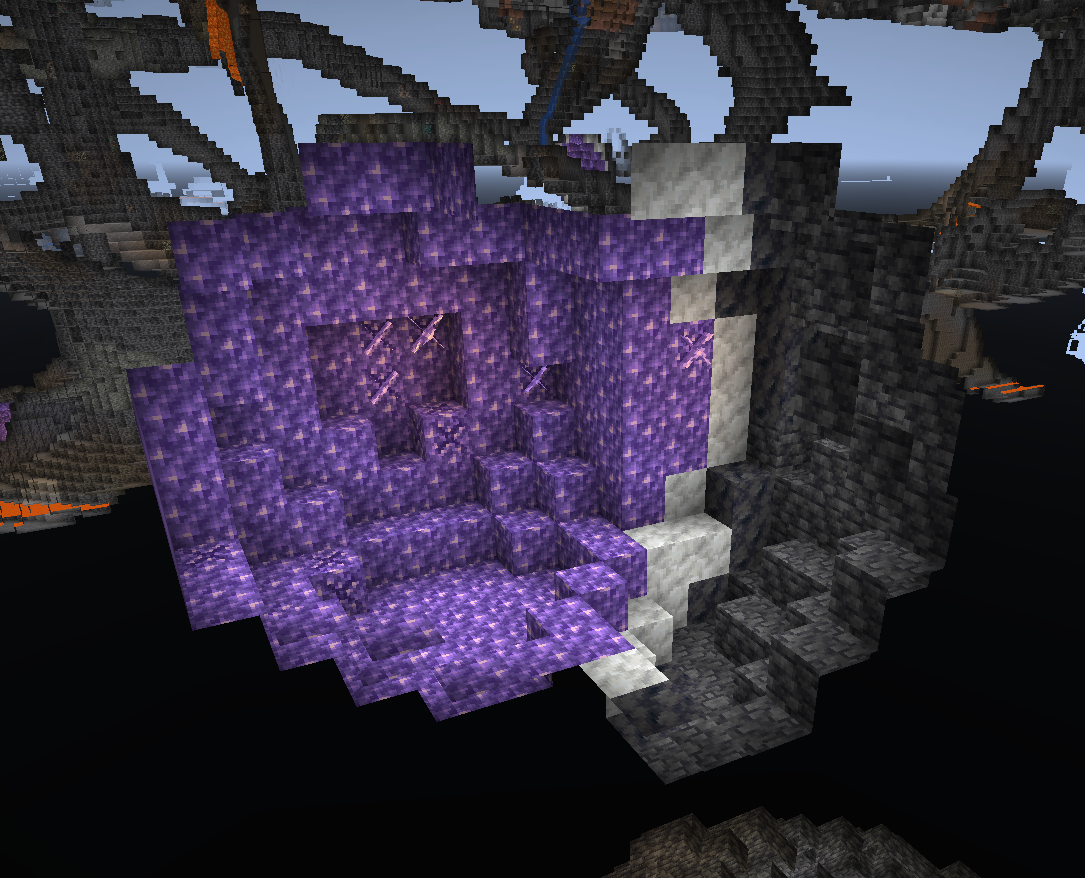
寻找一个合适的地质晶洞。在我们的教程中,这个小型晶洞就足够了。
注意:这种紫水晶 farming 方法在处理非常大的地质晶洞时往往效果不佳, 因为它们通常会导致大量的碰撞。中小型晶洞的效果最好。
步骤 2:划定区域 (Area)
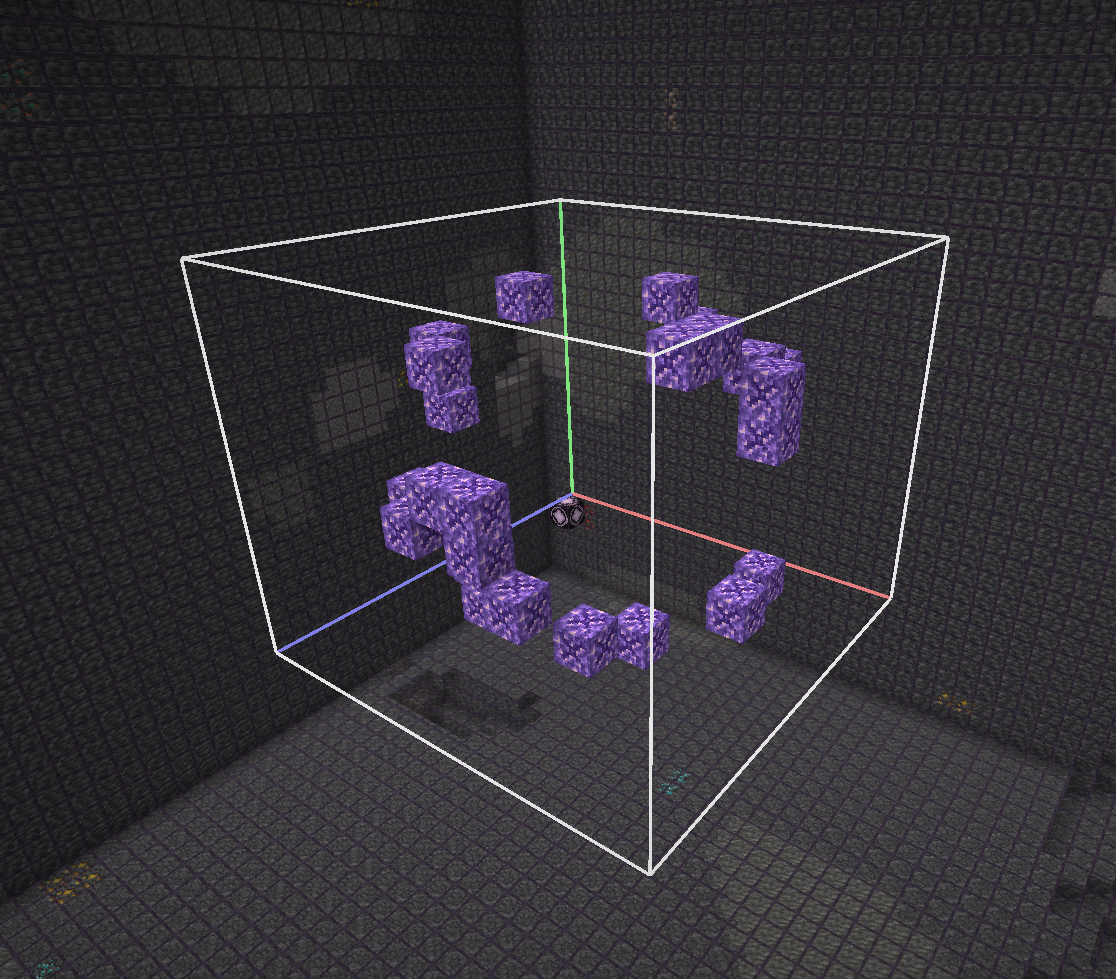
运行 /geodesy area (第一个角点坐标) (第二个角点坐标) 以清除周围区域的杂物并计算地质晶洞区域。地质晶洞将被高亮显示,以便你验证输入的坐标是否正确。
你不需要精确输入角点坐标——你可以选择一个更大的体积范围,模组仍会找到地质晶洞。唯一需要小心的情况是你有两个非常靠近彼此的地质晶洞(这也是我们没有自动检测功能的原因——当附近有多个地质晶洞时,它很容易混淆)。
这里我运行了 /geodesy area 701 -24 -945 712 -15 -934:
步骤 3:分析 (Analyze)
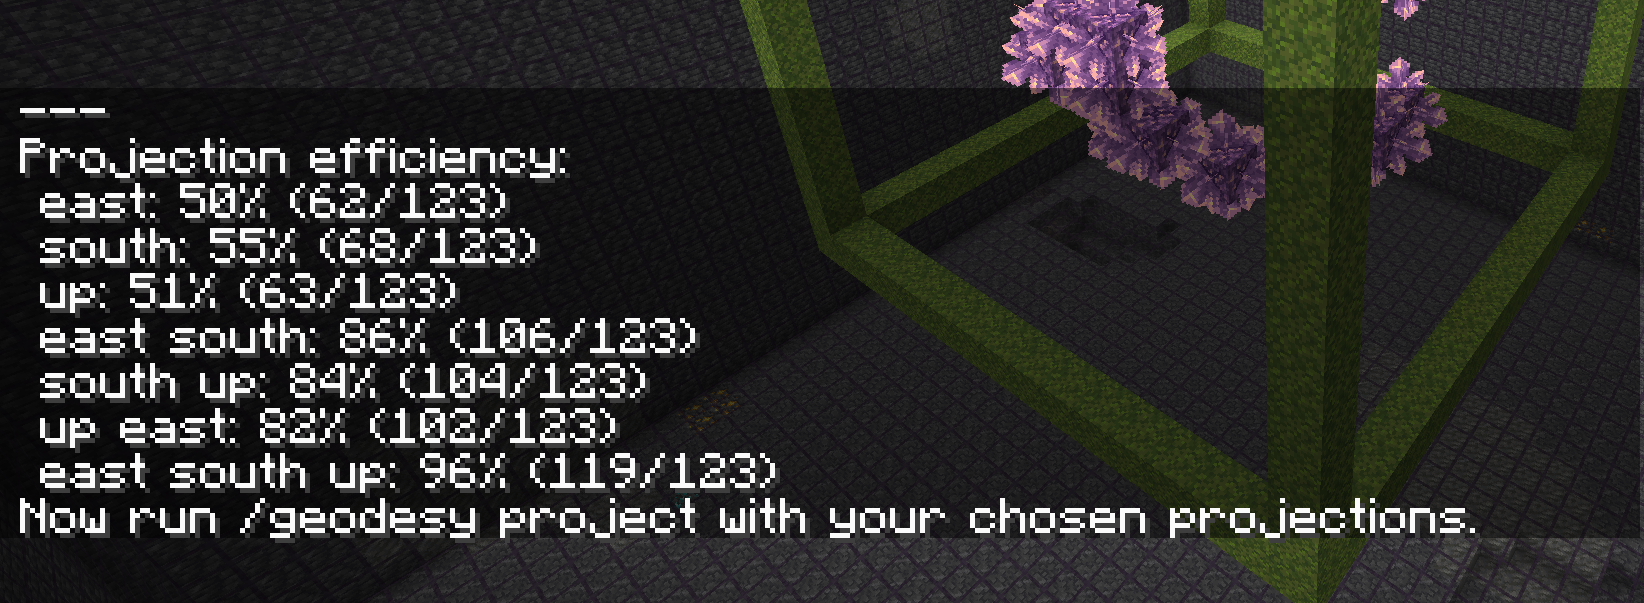
运行 /geodesy analyze 以对各个轴进行组合投影并计算其效率。虽然通过在三个轴上都运行飞行机器可以达到最佳效率,但有时两个轴就足够了。具体数值因特定的地质晶洞布局而异。
这里我运行了 /geodesy analyze:
步骤 4:投影 (Project)
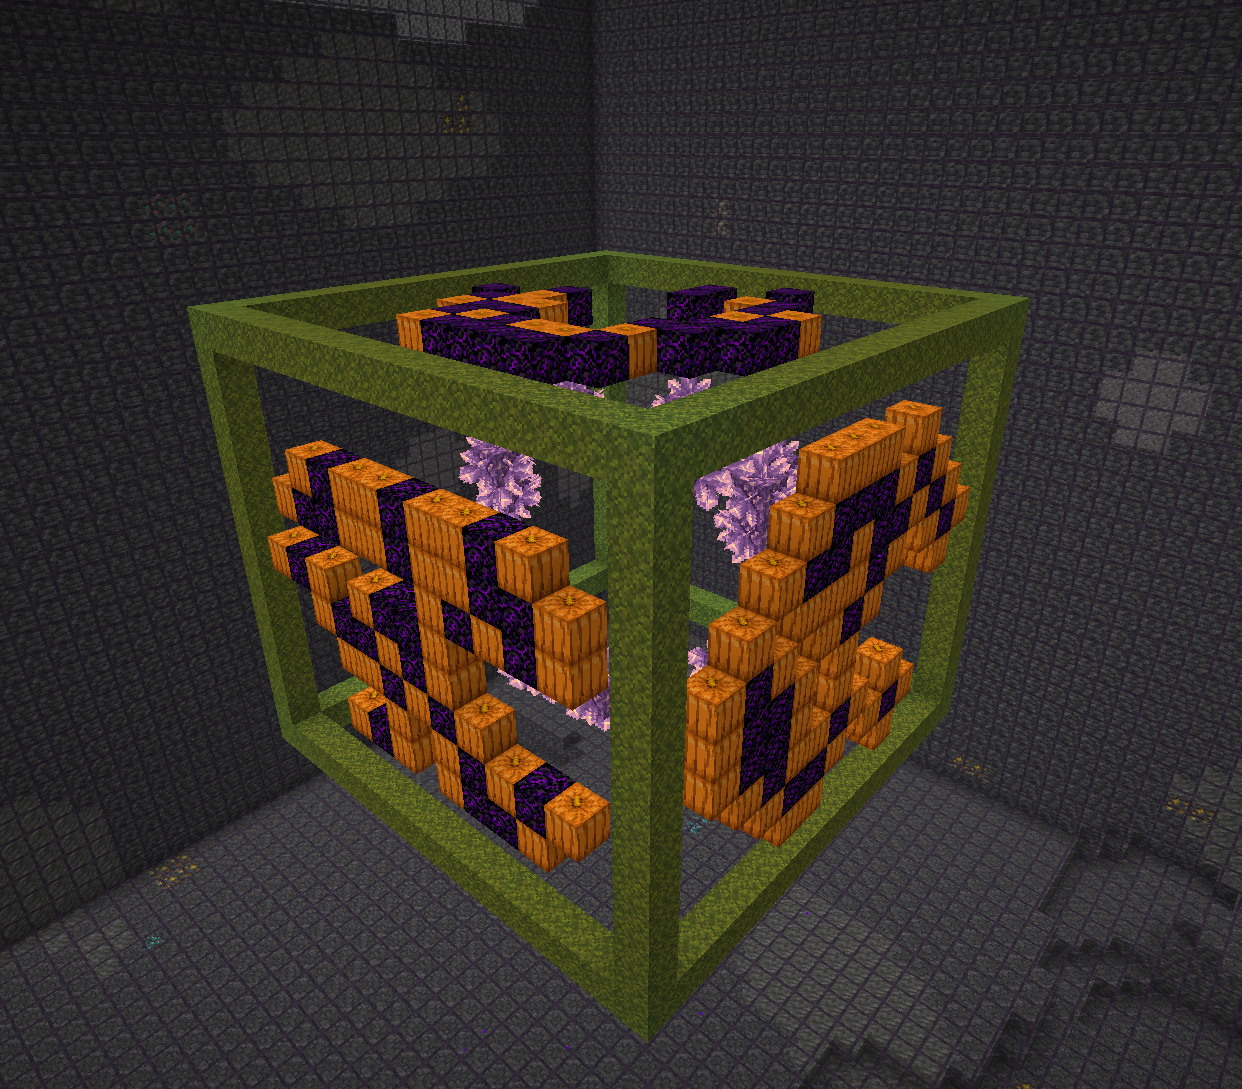
运行 /geodesy project (方向) 将地质晶洞投影到三个平面上并创建农场结构:
- 南瓜意味着该位置包含需要被推动和摧毁的紫水晶簇。
- 哭泣的黑曜石方块意味着该位置包含萌芽中的紫水晶块,因此飞行机器必须不能飞过该位置。
- 苔藓标记机器的外框。
- 农场内的按钮标记无法收获的位置;你应该在农场中放置这些按钮,以防止物品落在未收获的紫水晶簇上。
你可以在三个不同的方面更改方向,而不会影响农场的效率:
- 你可以改变东西方向和南北方向来改变方向——当你附近有其他的地质晶洞且不想与它们发生碰撞时,这很有用。技术上你也可以改变上下方向,但这会使物品收集变得很奇怪。
- 你可以选择只包含一个或两个方向,而不是通常的三个。这会降低农场的效率,但也意味着更少的工作量。
- 你可以改变方向的顺序来影响南瓜形成的形状。有些形状比其他的更容易用粘性方块覆盖。请尝试找出最佳方案。
这里我运行了 /geodesy project east south up:
步骤 5-6:求解(自动替代方案)
运行 /geodesy solve 以自动计算粘液方块和蜂蜜方块的最佳放置位置,以及飞行机器的生物头颅标记。此步骤是可选的——你仍然可以按照步骤 6 和 7 中的描述手动放置它们。
求解器使用回溯算法来查找“岛屿”(粘性方块的连通组),这些岛屿在尊重约束条件的同时最大化对南瓜方块的覆盖:
- 每个岛屿的大小必须在 4-12 个方块之间
- 每个岛屿必须包含一个 L 形(飞行机器机械所必需)
- 相邻岛屿使用交替的材料(粘液 vs 蜂蜜)以防止粘连
- 岛屿不能重叠或覆盖哭泣黑曜石(阻塞)单元格
该命令接受可选参数:
/geodesy solve- 使用默认设置(成本为 1.0,超时时间为 5 秒)/geodesy solve (成本值)- 设置成本阈值(1.0-12.0)/geodesy solve (成本值) (超时时间)- 设置成本阈值和超时时间(秒,1-300)
成本参数控制覆盖范围和飞行机器数量之间的权衡:
- 较低的成本(例如 1.0):更多的岛屿/机器,更高的收获覆盖率
- 较高的成本(例如 4.0):更少的岛屿/机器,可能会牺牲一些覆盖率
求解器对解决方案的评分公式为:被覆盖的收获单元格数 - (岛屿数量 × 成本)
求解完成后,粘液/蜂蜜方块放置在墙壁外侧的一层,并且为每个岛屿放置生物头颅标记(3 个僵尸头颅 + 1 个凋灵骷髅头颅,呈 L 形排列)。
你可以使用不同的参数重新运行 /geodesy solve——之前的解决方案将被自动清除。
步骤 5:粘性方块(手动替代方案)
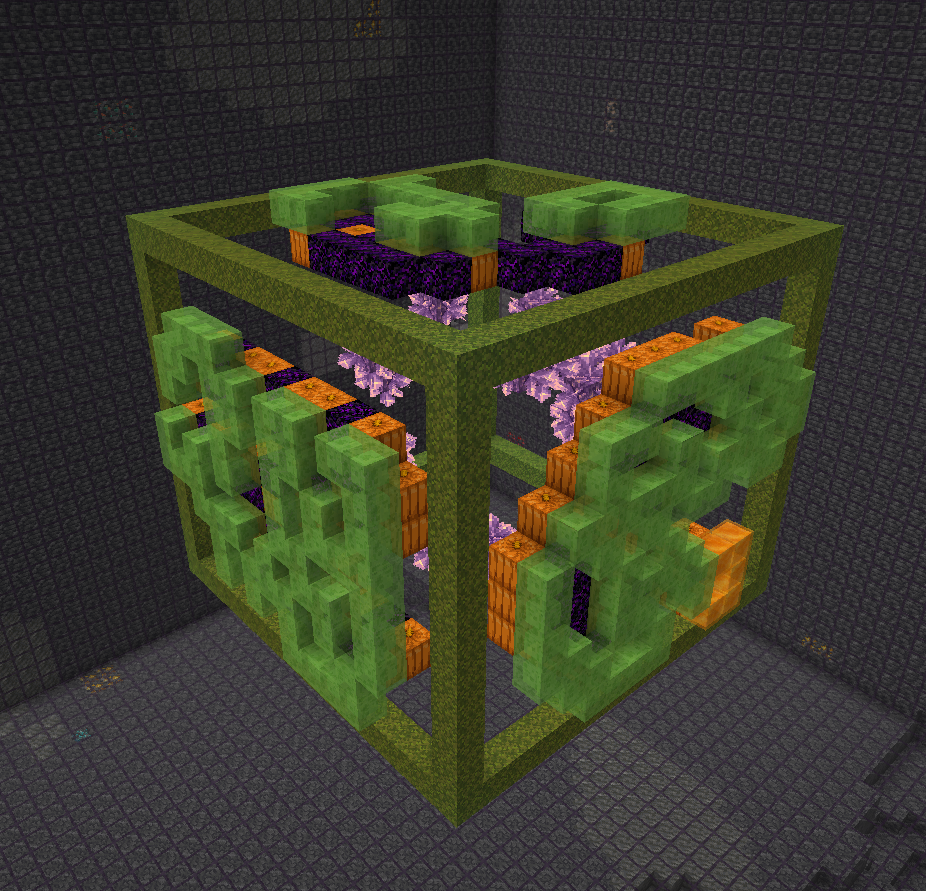
如果你更喜欢手动放置,或者想要调整求解器的输出,请在结构外部放置粘液方块和蜂蜜方块,如视频中 ilmango 所示。所有南瓜方块都应被覆盖;不应覆盖任何哭泣黑曜石方块。如果你无法覆盖所有南瓜方块,农场的效率将会略有降低。
步骤 6:标记方块(手动替代方案)
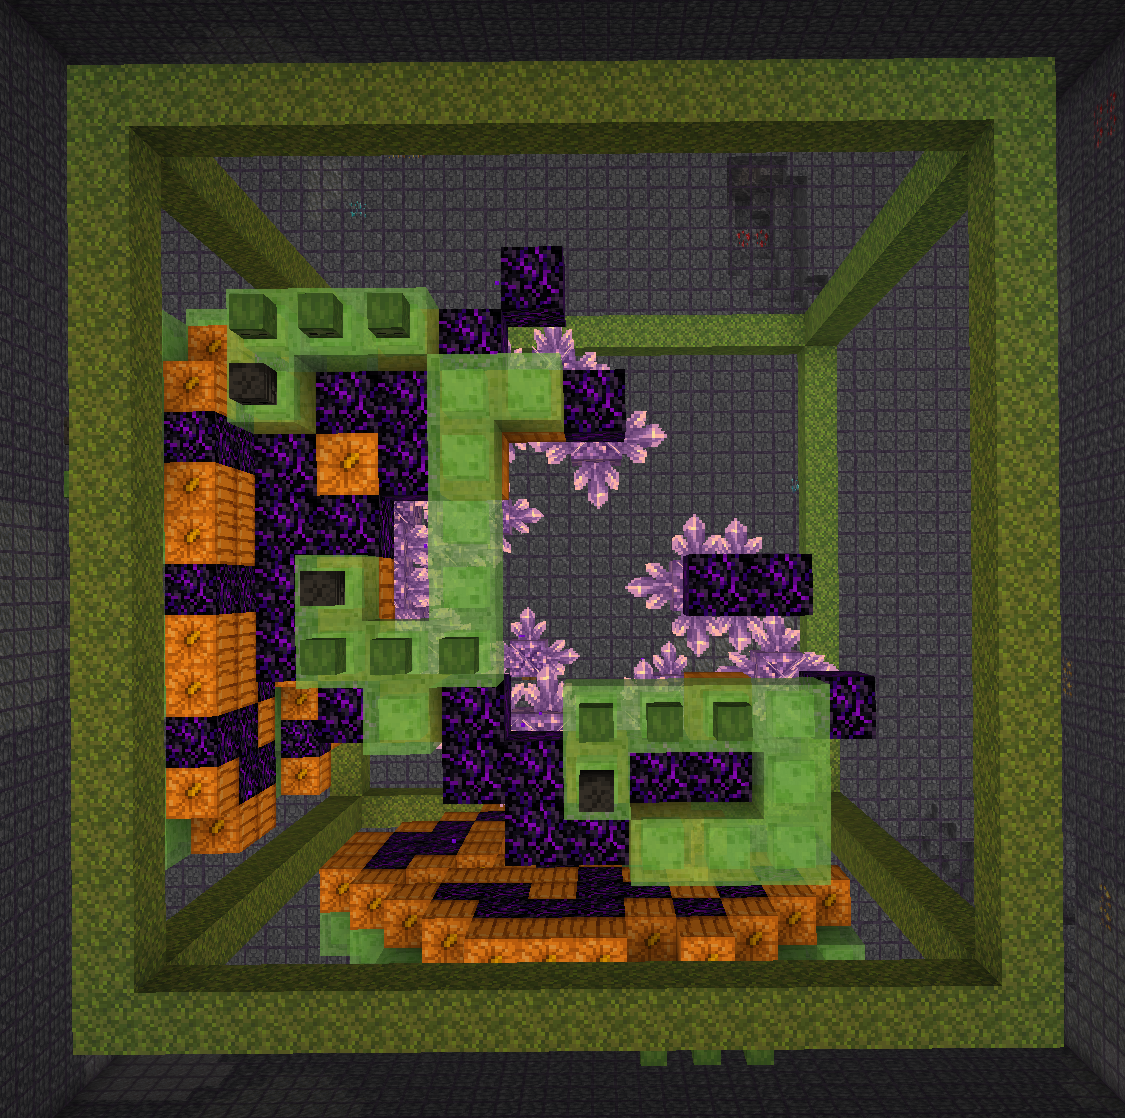
如果你跳过了求解步骤,或者想要调整标记,可以使用生物头颅来指示飞行机器应该前往的位置。黑色生物头颅(凋灵骷髅头颅)标记一个阻挡用的黑曜石方块,三个绿色生物头颅(僵尸头颅)表示一架飞行机器。
步骤 7:组装
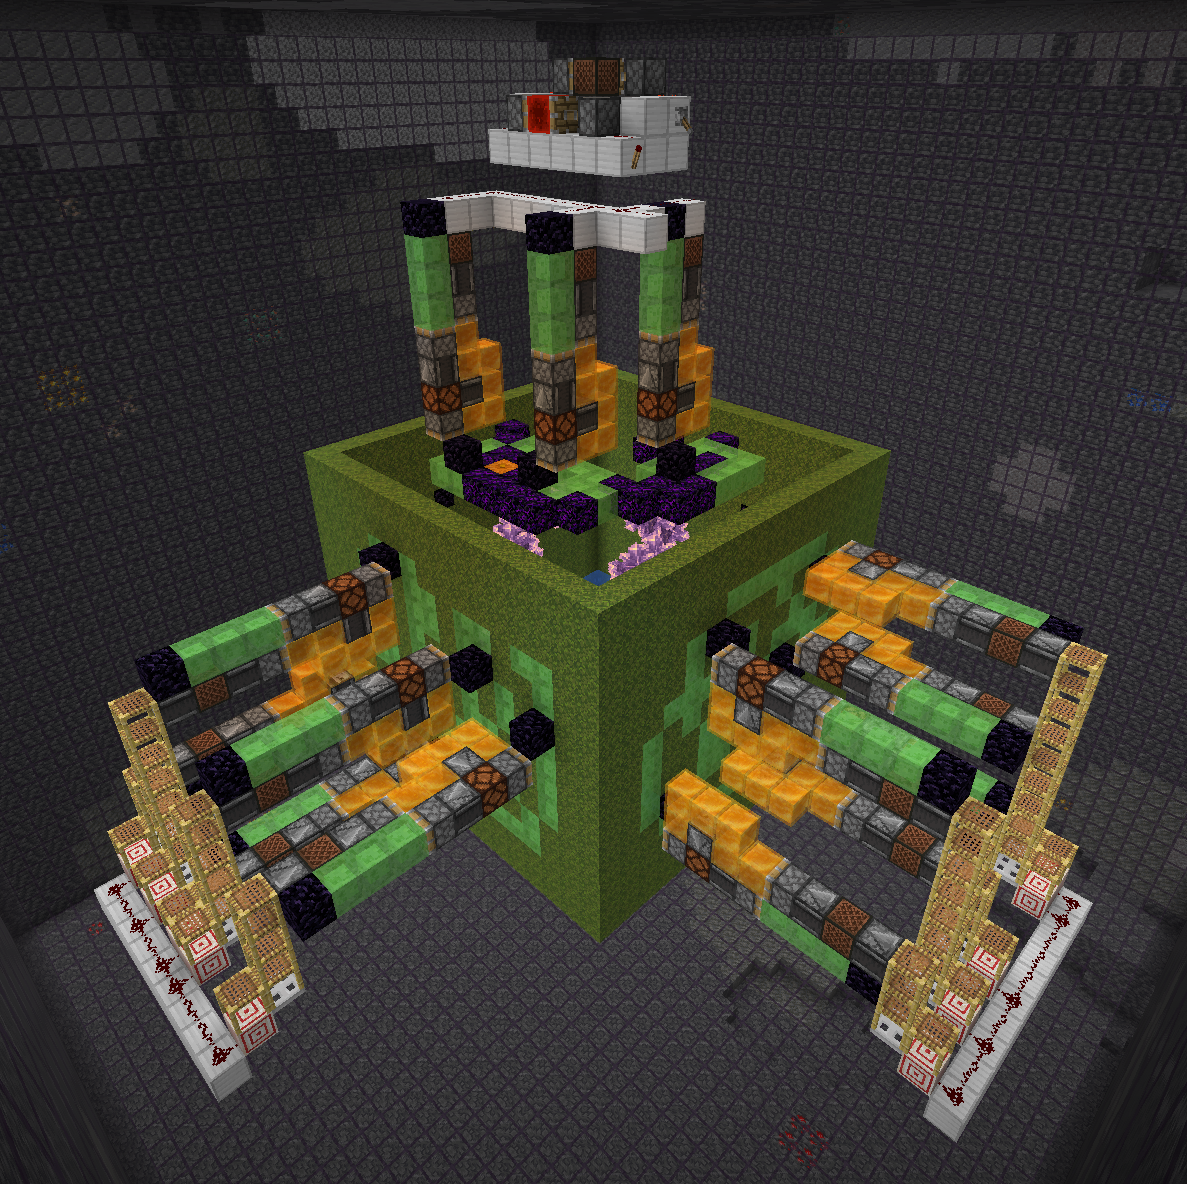
运行 /geodesy assemble 命令,将粘性方块结构“推”入黑曜石框架内,并在你标记的位置生成飞行机器。红时钟也已为你自动生成——只需将其连接即可。
步骤 8:布线
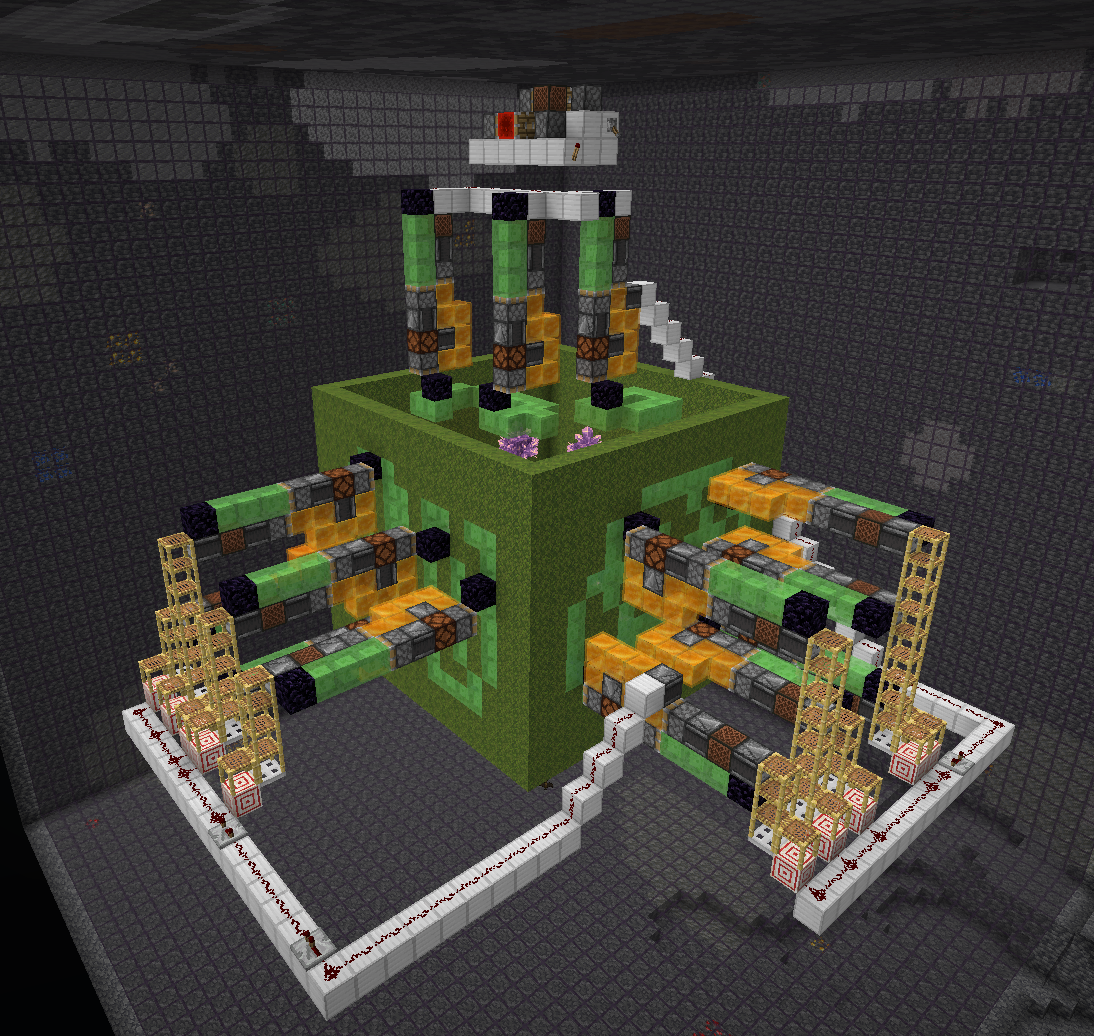
剩下的就交给你了!添加触发布线和收集系统。在触发布线中添加中继器时,请确保将它们设置为最大延迟。更多信息,请再次观看 ilmango 的视频。
致谢
- Kosma Moczek - 模组概念与代码
- ilmango - 农场设计与两部精彩视频
- neffty87 - 农场概念
可能的改进?
有关待办事项列表,请参阅 TODO.md。
Geodesy
Small Fabric mod for calculating amethyst farm flying machine layout. Inspired by the original ilmango's video and the flying machine based farm made by neffty87.
Usage
You should only run this in disposable worlds, either in single player or on servers where you have op. Command blocks must also be enabled.
The mod will destroy the immediate surroundings of the geode!
Video Tutorial by ilmango
Step 1: Geode
Run /geodesy without any arguments to acquire The Unholy Book of Geodesy,
as well as the set of blocks you will need to build the farm.
Scout out a nice geode. For our tutorial this small one will do.
Note: this method of amethyst farming tends to struggle with very large geodes, because of how many collisions they usually cause. Small to medium sized ones work best.
Step 2: Area
Run /geodesy area (first corner) (second corner) to clear out the surrounding
area of any junk and calculate the geode area. The geode will be highlighted for you
to verify you've entered correct coordinates.
You don't have to be exact with the corner coordinates - you can select a larger volume and the mod will find the geode anyway. The only time you have to be careful is when you have two geodes very close to each other (this is also the reason we don't have autodetection - it easily got confused with multiple geodes nearby).
Here I run /geodesy area 701 -24 -945 712 -15 -934:
Step 3: Analyze
Run /geodesy analyze to perform combinations of projections on all axes and calculate
their efficiency. While the best possible efficiency is achieved by running the flying
machines on all three axes, sometimes just two are good enough. The exact numbers vary
depending on the specific geode layout.
Here I run /geodesy analyze:
Step 4: Project
Run /geodesy project (directions) to project the geode onto three planes and create
the farm structure:
- Pumpkin means this location contains amethyst clusters to be pushed and destroyed.
- Crying obsidian block means this location contains budding amethyst blocks, so the flying machine must not fly through that location.
- Moss marks the outer frame of the machine.
- Buttons inside the farm mark spots that can't be harvested; you should have those buttons in the farm to prevent items from landing on unharvested amethyst clusters.
You can change the directions in three different aspects, without influencing the efficiency of the farm:
- You can change east/west and north/south to change the direction - this is useful when you have other geodes nearby and you don't want to collide with them. Technically you can also change up/down but that will make item collection pretty weird.
- You can choose to only include one or two directions instead of the usual three. This will lower the farm's efficiency but can also mean much less work to do.
- You can change the order of the directions to influence the shapes of the pumpkin formations. Some formations are easier to cover with sticky blocks than other. Experiment to find out.
Here I run /geodesy project east south up:
Steps 5-6: Solve (Automatic Alternative)
Run /geodesy solve to automatically calculate optimal placement of slime and honey
blocks, as well as the mob head markers for flying machines. This step is optional -
you can still place them manually as described in Steps 6 and 7.
The solver uses a backtracking algorithm to find "islands" (connected groups of sticky blocks) that maximize coverage of pumpkin blocks while respecting constraints:
- Each island must be 4-12 blocks in size
- Each island must contain an L-shape (required for flying machine mechanics)
- Adjacent islands use alternating materials (slime vs honey) to prevent sticking
- Islands cannot overlap or cover crying obsidian (blocked) cells
The command accepts optional parameters:
/geodesy solve- Use default settings (cost of 1.0, 5 second timeout)/geodesy solve (cost)- Set cost threshold (1.0-12.0)/geodesy solve (cost) (timeout)- Set cost threshold and timeout in seconds (1-300)
The cost parameter controls the tradeoff between coverage and number of flying machines:
- Lower cost (e.g. 1.0): More islands/machines, higher harvest coverage
- Higher cost (e.g. 4.0): Fewer islands/machines, may sacrifice some coverage
The solver scores solutions as: harvest_cells_covered - (island_count × cost)
After solving, slime/honey blocks are placed one layer outside the wall, and mob head markers (3 zombie heads + 1 wither skeleton skull in an L-shape) are placed for each island.
You can re-run /geodesy solve with different parameters - the previous solution will
be cleared automatically.
Step 5: Sticky blocks (Manual Alternative)
If you prefer manual placement or want to adjust the solver's output, place slime and honey blocks outside the structure, as shown by ilmango in the video. All pumpkin blocks should be covered; no crying obsidian blocks should be covered. If you can't cover all pumpkin blocks, the efficiency of the farm will be slightly reduced.
Step 6: Marker blocks (Manual Alternative)
If you skipped the solve step or want to adjust markers, use mob heads to indicate where the flying machines should go. Black mob head (wither skeleton skull) marks a blocker obsidian block, three green mob heads (zombie heads) indicate a flying machine.
Step 7: Assemble
Run /geodesy assemble to "push" the sticky block structures inside the obsidian frame
and generate flying machines at locations that you marked. The redstone clock is also
generated for your convenience - just connect it.
Step 8: Wiring
The rest is up to you! Add trigger wiring and collection system. When adding repeaters to the trigger wiring, make sure to set them to maximum delay. Again, watch ilmango's video for more information.
Credits
- Kosma Moczek - mod concept + code
- ilmango - farm design + two great videos
- neffty87 - farm concept
Possible improvements?
For a list of things to do, see TODO.md.

下载 Geodesy
下载 Geodesy
下载 Geodesy
下载 Geodesy
下载 Geodesy
下载 Geodesy
需要联机服务器吗?
稳定流畅、一键部署,几分钟即可和朋友联机开服
最低仅需 8 元/月 即可畅快联机
下载 Geodesy
下载 Geodesy
下载 Geodesy
下载 Geodesy
Geodesy 3.3 for 26.2
更新至 26.2
Geodesy 3.2 for 26.1
更新至 26.1
Geodesy 3.1 for 1.21.11
改进飞行机器求解器
Geodesy 3.0 for 1.21.11
添加飞行机器求解器和 /geodesy solve
支持更多飞行机器形状
Geodesy 2.7 for 1.21.11
更新至 1.21.11
Geodesy 2.6 for 1.21.5
更新至 1.21.5
关于这个资源的讨论、问题反馈与使用心得
还没有讨论,来发第一帖吧
你是这个资源的作者?登录后可认领此资源。
相似资源
 模组

显示你正在注视的方块的信息。(适用于 Minecraft 1.16+ 的 Hwyla/Waila 分支)
 模组
使用 JavaScript 编辑配方、添加自定义物品、编写世界事件!
 模组

查看物品与配方
 模组
在游戏画面角落显示附近世界地形、玩家、生物和实体的地图。可创建路径点,帮助你找到标记过的位置。
 模组
AE2:一款流行的自动化与存储模组
 模组
那是什么?一个 Waila/Hwyla 的分支。
评论 0
登录后参与评分
还没有评论,来抢沙发吧