
Packed Inventory
一款 Minecraft 模组,旨在通过允许你直接从物品栏管理潜影盒、末影箱等物品的内容,来缓解日益严重的“物品栏空间不足”问题。
此外,我们还为潜影盒、末影箱、地图等物品提供了精美的工具提示!
功能
- 无需放置即可管理潜影盒的物品栏。
- 无需放置即可管理你的末影箱的物品栏。
- 快速将物品放入或取出潜影盒、末影箱及其他提供物品栏功能的物品中。
- 直接从物品栏访问工作台、切石机和其他工作站。
- 潜影盒的原版风格工具提示。
- 末影箱的原版风格工具提示。
- 已填充地图的原版风格工具提示。
- 在创造模式下通过
Ctrl + 鼠标中键 获取的包含 NBT 数据的物品(如箱子、 barrels、熔炉、漏斗、发射器、投掷器等)的原版风格工具提示。
- 一个广泛且简单的 API,帮助其他模组开发者为其方块和物品实现这些功能。
类似收纳袋的功能
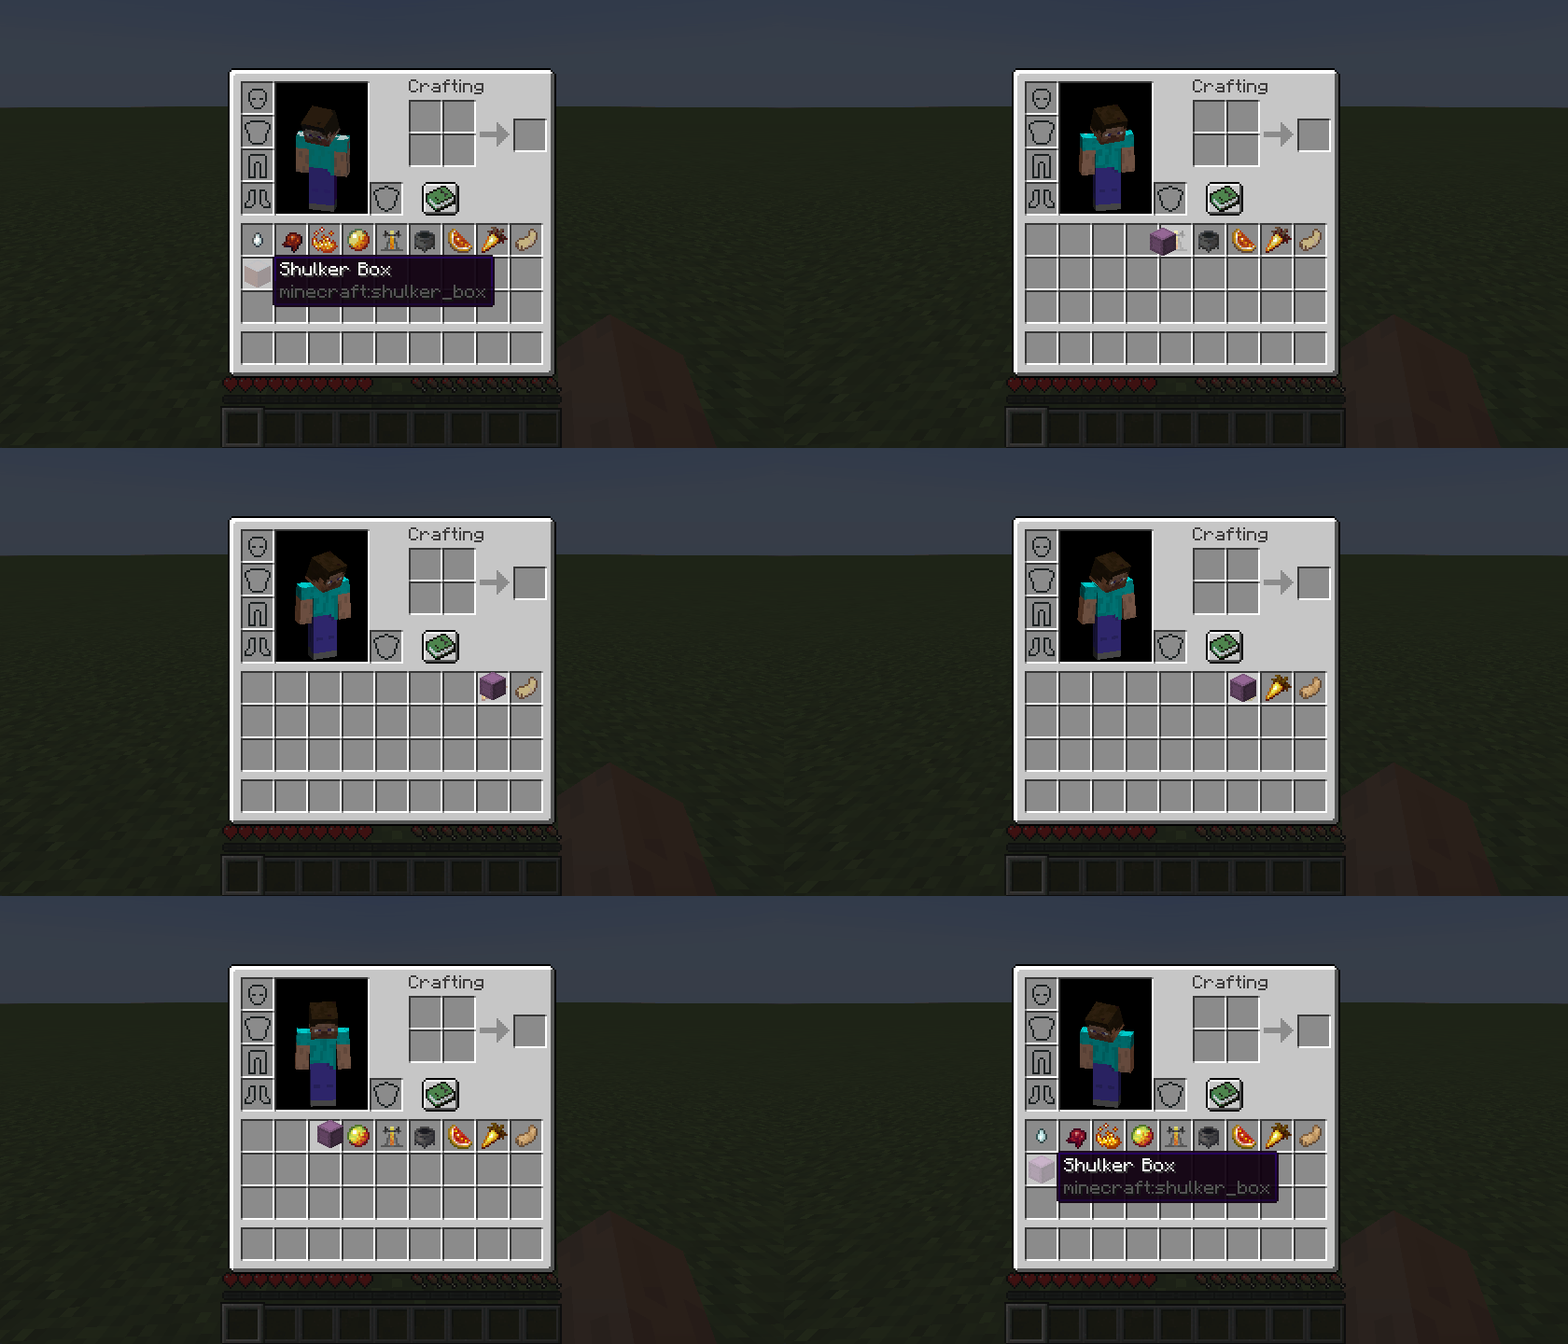
正如前面提到的,提供物品栏功能的物品 (例如潜影盒、末影箱以及任何通过 Packed Inventory API 注册的物品) 会自动获得类似收纳袋的功能,允许你快速将物品放入或取出它们。
要将物品存入提供物品栏功能的物品中,你可以:
- 拿起该提供物品栏功能的物品,然后对要存入的物品按下
k 键;或者
- 拿起该提供物品栏功能的物品,然后对其他提供物品栏功能的物品按下
k 键;或者
- 拿起要存入的物品,然后对该提供物品栏功能的物品按下
k 键。
要从提供物品栏功能的物品中取出物品:
- 拿起该提供物品栏功能的物品,然后对要提取到的空槽位按下
k 键;或者
- 拿起该提供物品栏功能的物品,然后对要提取到的槽位按下
l 键或 Ctrl + k;或者
- 直接对提供物品栏功能的物品按下
l 键或 Ctrl + k 以从中提取物品。
要将所有物品从提供物品栏功能的物品中倾倒到世界中:
- 拿起该提供物品栏功能的物品,将其移出物品栏界面范围,然后按下
k 键。
工具提示
以下是一些工具提示示例:
- 容器工具提示
- 彩色容器工具提示
- 紧凑容器工具提示
- 已填充地图工具提示
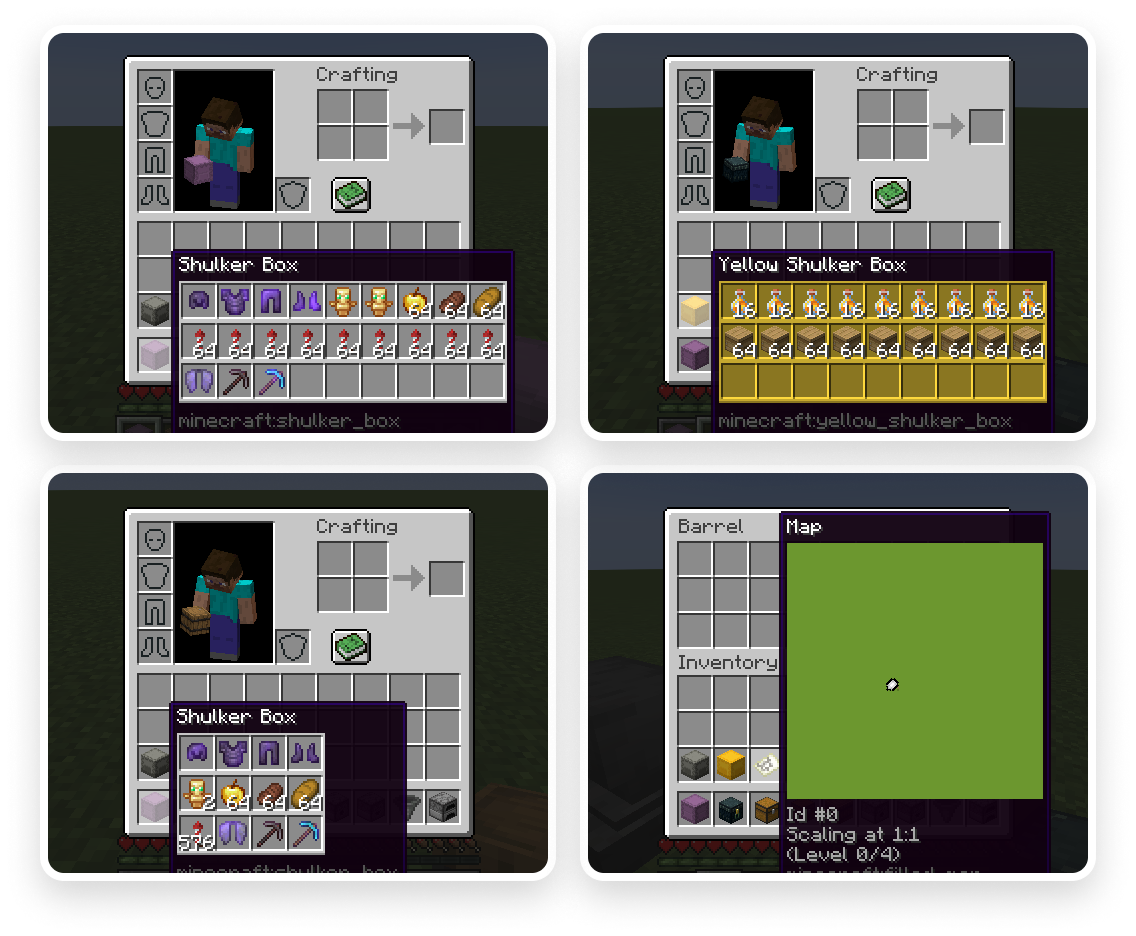
更多截图可以在 这里 找到。
按键绑定
按键绑定可以像原版一样进行配置:
- 进入
选项。
- 选择
控制。
- 然后选择
按键绑定。
- 向下滚动到
Packed Inventory 部分。
- 配置可用的按键绑定。
| 名称 |
描述 |
默认值 |
Interact with item |
与当前快捷栏选中槽位的物品进行交互。另外,如果打开了物品栏界面,则与鼠标悬停的物品进行交互。根据上下文,此操作可以:- 打开与该选定物品关联的界面,
- 将物品存入选定的提供物品栏功能的物品中,
- 从选定的提供物品栏功能的物品中取出物品,或
- 将选定的提供物品栏功能的物品中存储的所有物品倾倒到世界中
|
k |
Toggle interaction mode (hold) |
使 Interact with item 按键绑定的行为类似于 Extract from item |
Left Control |
Extract from item |
从选定的提供物品栏功能的物品中取出物品 |
l |
Invert tooltip visibility (hold) |
按住时反转工具提示的可见性 |
Left Shift |
Invert tooltip compact mode (hold) |
按住时反转工具提示的紧凑模式 |
c |
请注意,这些按键绑定与其他绑定发生冲突是完全没问题的,因为它们仅在打开你的物品栏界面时生效,而其他按键绑定通常在此时无效。
配置
如果你安装了 Cloth Config,你可以自定义模组的行为。配置文件通常位于 ./config/packed-inventory.json,默认内容如下所示:
{
  "defaultTooltipConfig": {
    "showWhenEmpty": false,
    "rows": -1,
    "columns": -1,
    "usePredefinedColor": false,
    "enable": true,
    "compact": false
  },
  "tooltips": {
    "minecraft:shulker_box": {
      "showWhenEmpty": false,
      "rows": -1,
      "columns": -1,
      "usePredefinedColor": false,
      "enable": true,
      "compact": false
    },
    "minecraft:ender_chest": {
      "syncInterval": 5000,
      "showWhenEmpty": false,
      "rows": -1,
      "columns": -1,
      "usePredefinedColor": false,
      "enable": true,
      "compact": false
    },
    "minecraft:filled_map": {
      "size": 128,
      "enable": false,
      "compact": false
    }
  },
  "defaultValidationConfig": {
    "suppressValidationInCreative": true,
    "requiresPlayerOnGround": true,
    "enable": true
  },
  "validation": {
    "minecraft:shulker_box": {
      "suppressValidationInCreative": true,
      "requiresPlayerOnGround": true,
      "enable": true
    },
    "minecraft:ender_chest": {
      "requiresSilkTouch": true,
      "suppressValidationInCreative": true,
      "requiresPlayerOnGround": true,
      "enable": true
    }
  }
}
| 名称 |
描述 |
端 |
默认值 |
tooltip.enable |
指示此工具提示是否应默认启用 |
client |
true |
tooltip.compact |
指示此工具提示是否应默认启用紧凑模式 |
client |
false |
tooltip.showWhenEmpty |
指示当内容为空时是否应显示此工具提示 |
client |
false |
tooltip.rows |
指定用于显示工具提示内容的行数 |
client |
-1 |
tooltip.columns |
指定用于显示工具提示内容的列数 |
client |
-1 |
tooltip.usePredefinedColor |
指示此工具提示是否应使用物品颜色 |
client |
false |
tooltip.color |
指定在 usePredefinedColor 设置为 false 或无法自动确定物品颜色时的默认工具提示颜色 |
client |
NONE |
tooltip.syncInterval |
指定同步发生的频率 |
client |
5000 |
tooltip.size |
指定此工具提示的大小(如果适用) |
client |
128 |
| |
|
|
|
validation.enable |
指示与此验证规则关联的操作是否被允许 |
server |
true |
validation.suppressValidationInCreative |
指示是否应对创造模式玩家抑制此验证规则 |
server |
true |
validation.requiresPlayerOnGround |
指示玩家是否需要站在地面上才能满足此验证规则 |
server |
true |
validation.requiresSilkTouch |
指示玩家是否需要拥有附魔了精准采集的工具才能满足此验证规则 |
server |
true |
您可以直接在配置文件中或通过 ModMenu 编辑这些值。
开发
依赖安装
要在构建脚本中将 Packed Inventory 添加为依赖项,请使用以下 API:
build.gradle:
repositories {
  maven {
    name = "Modrinth"
    url = "https://api.modrinth.com/maven"
    content {
      includeGroup "maven.modrinth"
    }
  }
}

dependencies {
  modImplementation "maven.modrinth:packed-inventory:${project.packed_inventory_version}"
}
gradle.properties:
packed_inventory_version=/* version (e.g., 0.3.0+1.20.3) */
入口点
该 API 引入了两个新的入口点,您可以在模组元数据中指定它们:
| 名称 |
描述 |
接口 |
端 |
packed-inventory |
将首先在任何环境中运行 |
PackedInventoryInitializer |
* |
packed-inventory-client |
将在客户端侧随后运行 |
PackedInventoryClientInitializer |
client |
fabric.mod.json:
{
  "entrypoints": {
    "packed-inventory": [
      "a.b.c.MyMod"
    ],
    "packed-inventory-client": [
      "a.b.c.MyClientMod"
    ]
  }
}
库存视图
认识一下库存视图!这是本模组的核心概念,使我们能够编辑由相应物品提供的库存,而无需与其方块形式进行交互。
让我们为末影箱物品注册一个简单的库存查看器 (提供库存视图的组件):
public class MyMod implements PackedInventoryInitializer {
    @Override
    public void registerInventoryViewers(InventoryViewerRegistry registry, PackedInventoryApiConfig config) {
        registry.register(
            // 我们需要从给定的上下文中“提取”一个库存。
            // 在这种情况下很简单,因为末影箱拥有
            // 可以从玩家处获取的共享库存。
            (inventory, slot, player) -> player.getEnderChestInventory(),

            // 虽然这完全可以是一个谓词 -
            // `(inventory, slot, player) -> inventory.getStack(slot).isOf(Items.ENDER_CHEST)`,
            // 但更推荐这种形式。
            Items.ENDER_CHEST
        );
    }
}
就是这样!您应该能够打开游戏,将鼠标悬停在库存中的末影箱上,按 k,这将弹出库存编辑屏幕。
至于下一步,让我们建立一些规则以确保我们的库存查看器以公平且不作弊的方式运行。要编辑末影箱库存,玩家必须:
- 站在地面上,并且
- 拥有一把附魔了精准采集镐子,或者
- 处于创造模式。
为此,我们将使用 InventoryValidators 类,其中包含一些有用的预定义库存验证器。请记住,你始终可以从头开始创建一个新的。
public class MyMod implements PackedInventoryInitializer {
    @Override
    public void registerInventoryViewers(InventoryViewerRegistry registry, PackedInventoryApiConfig config) {
        registry.register(
            (inventory, slot, player) -> player.getEnderChestInventory(),

            // isInCreative || isOnGround && hasSilkTouch
            InventoryValidators.IS_IN_CREATIVE.or(
                InventoryValidators.IS_ON_GROUND.and(InventoryValidators.HAS_PICKAXE_WITH_SILK_TOUCH)
            ),

            Items.ENDER_CHEST
        );
    }
}
我们快完成了!现在,当你尝试在半空中打开末影箱且/或没有附魔了“精准采集”的镐子时,将会看到一条友好的错误消息。然而,一旦切换到创造模式,所有限制都会消失。
最后一步是让我们的库存查看器可配置。毕竟,我们有了 config 参数是有原因的 ;)
public class MyMod implements PackedInventoryInitializer {
    @Override
    public void registerInventoryViewers(InventoryViewerRegistry registry, PackedInventoryApiConfig config) {
        // 让我们为末影箱物品注册一个验证配置项。
        // API 提供了这些预定义的配置(尽管你也可以创建新的):
        // - ValidationConfig: 可以启用/禁用。
        // - GenericValidationConfig: 继承自 ValidationConfig,定义了处于地面状态以及对创造模式玩家抑制验证的规则。
        // - SilkTouchableGenericValidationConfig: 继承自 GenericValidationConfig,定义了拥有精准采集工具在背包中的规则。
        config.registerValidationConfig(Items.ENDER_CHEST, SilkTouchableGenericValidationConfig::new);

        // 用户可以在配置中完全禁用库存查看器。
        var isEnabled = InventoryValidators.config(Items.ENDER_CHEST, config, ValidationConfig.DEFAULT, ValidationConfig::isEnabled);

        // 仅当配置允许时才对创造模式玩家抑制验证。
        var isInCreative = InventoryValidators.config(Items.ENDER_CHEST, config, GenericValidationConfig.DEFAULT, GenericValidationConfig::isSuppressedInCreative).and(InventoryValidators.IS_IN_CREATIVE);

        // 仅当配置要求时才要求玩家站在地面上。
        var isOnGround = InventoryValidators.config(Items.ENDER_CHEST, config, GenericValidationConfig.DEFAULT, x -> !x.requiresPlayerOnGround()).or(InventoryValidators.IS_ON_GROUND);

        // 仅当配置要求时才要求玩家的背包中有精准采集工具。
        var hasSilkTouch = InventoryValidators.config(Items.ENDER_CHEST, config, SilkTouchableGenericValidationConfig.DEFAULT, x -> !x.requiresSilkTouch()).or(InventoryValidators.HAS_PICKAXE_WITH_SILK_TOUCH);

        registry.register(
            (inventory, slot, player) -> player.getEnderChestInventory(),

            isEnabled.and(isInCreative.or(isOnGround.and(hasSilkTouch))),

            Items.ENDER_CHEST
        );
    }
}
这样,所有限制都可以通过 ModMenu 或直接通过配置文件进行配置。
之后,你就成功将物品与 Packed Inventory 集成完毕了。恭喜!
库存查看处理器
那么,我们已经了解了库存查看,那个库存编辑屏幕是从哪里来的呢?这就是 InventoryViewHandler 发挥作用的地方。
大多数情况下,如果你的库存满足以下条件之一,则无需注册自定义处理器:
- 实现了
NamedScreenHandlerFactory,或者
- 实现了
ScreenHandlerFactory,或者
- 具有常规大小 (即 9、18、27、36、45 或 54),可以由
GenericContainerScreenHandler 处理。
但是,和往常一样,你可以注册自己的 InventoryViewHandler:
public class MyMod implements PackedInventoryInitializer {
    @Override
    public void registerInventoryViewHandlers(InventoryViewHandlerRegistry registry, PackedInventoryApiConfig config) {
        registry.register(
            (inventoryView, parentInventory, slot, player) -> {
                var name = parentInventory.getStack(slot).getName();
                var playerInventory = player.getInventory();
                var namedFactory = new SimpleNamedScreenHandlerFactory((sId, inv, p) -> new GenericContainerScreenHandler(ScreenHandlerType.GENERIC_9X3, sId, playerInventory, inventoryView, 3), name);

                player.openHandledScreen(namedFactory);
            },

            Items.ENDER_CHEST
        );
    }
}
请注意,你不仅限于打开一个受控屏幕;你可以对提供的库存查看执行任何操作。
库存验证失败处理器
那么,我们可以自定义库存查看处理,但失败处理呢?当然,你也可以调整它。
默认情况下,错误会发送到对应玩家的操作栏,但你可以更改此行为:
public class MyMod implements PackedInventoryInitializer {
    @Override
    public void registerInventoryValidationFailureHandlers(InventoryValidationFailureHandlerRegistry registry, PackedInventoryApiConfig config) {
        registry.register(
            (failureReason, inventory, slot, player) -> {
                var text = failureReason.toText();
                if (text != null) {
                    player.sendMessage(text, false);
                }
            },

            Items.ENDER_CHEST
        );
    }
}
提示框
没有描述性提示框的良好库存管理是不完整的。让我们使用 TooltipProvider 为末影箱创建一个吧!
// 注意:工具提示完全在客户端运行,因此我们在此处使用
// `PackedInventoryClientInitializer` 而不是 `PackedInventoryInitializer`。
public class MyClientMod implements PackedInventoryClientInitializer {
    @Override
    public void registerTooltipProviders(TooltipProviderRegistry registry, PackedInventoryApiConfig config) {
        registry.register(
            TooltipProvider.builder()
                .tooltipText((stack, context) -> List.of(Text.of("这是一个末影箱")))
                .build()

            Items.ENDER_CHEST
        );
    }
}
这样,末影箱的工具提示将被替换为文本“这是一个末影箱”。但这并不实用,对吧?末影箱的问题在于,客户端没有任何关于其内容的信息。那么,这是否意味着无路可走?当然不是。我们将使用一些魔法:
public class MyClientMod implements PackedInventoryClientInitializer {
    @Override
    public void registerTooltipProviders(TooltipProviderRegistry registry, PackedInventoryApiConfig config) {
        registry.register(
            TooltipProvider.builder()
                .useSyncData(GenericContainerTooltipSyncData::of)
                .tooltipData((stack, context, syncData) -> GenericContainerTooltipData.of(syncData.getInventory()))
                .build()

            Items.ENDER_CHEST
        );
    }
}
通过指定我们的 TooltipProvider 需要 TooltipSyncData(在这种情况下,我使用了预定义的 GenericContainerTooltipSyncData,因为我们只关心末影箱的库存),我们就可以在后续的 tooltipData、tooltipText 等调用中使用它。稍后我们会深入探讨 TooltipSyncData;目前,让我们假设一切都能正常工作。
请注意,我们用 GenericContainerTooltipData 覆盖了末影箱的 TooltipData。如果你不熟悉原版对此类事物的处理方式,当物品提供 TooltipData 时,Minecraft 会查找对应的 TooltipComponent。此组件允许你在工具提示中渲染任何你想要的东西。GenericContainerTooltipData 由 API 提供,因此你无需担心向游戏提供用于它的工具提示组件。但是,如果你想使用自定义的工具提示数据,则需要通过 Fabric API 手动注册一个工具提示组件,如下所示:
TooltipComponentCallback.EVENT.register(tooltipData -> {
    if (tooltipData instanceof MyTooltipData) {
        return new MyTooltipComponent((MyTooltipData)tooltipData);
    }
    return null;
});
好了,现在我们有了一个显示末影箱内容的炫酷工具提示。再次是时候让所有内容都可配置了:
public class MyClientMod implements PackedInventoryClientInitializer {
    @Override
    public void registerTooltipProviders(TooltipProviderRegistry registry, PackedInventoryApiConfig config) {
        // 让我们为末影箱物品注册一个工具提示配置项。
        // API 提供了这些预定义的配置(尽管你可以创建新的配置):
        // - TooltipConfig:可以启用/禁用;可以开启或关闭紧凑模式。
        // - GenericTooltipConfig:扩展自 TooltipConfig,定义了容器常用的属性。
        // - GenericSyncedTooltipConfig:扩展自 GenericTooltipConfig,定义了需要同步数据的工具提示提供者使用的 `syncInterval` 属性。
        config.registerTooltipConfig(Items.ENDER_CHEST, GenericSyncedTooltipConfig::new);

        registry.register(
            TooltipProvider.builder()
                // 工具提示可以在配置中或通过按键绑定(默认为 `左Shift`)启用/禁用
                .when((stack, context) -> config.getTooltipConfigOrDefault(stack.getItem()).isEnabled())
                .useSyncData(GenericContainerTooltipSyncData::of)
                .tooltipData((stack, context, syncData) -> {
                    var cfg = config.getTooltipConfigOrDefault(stack.getItem());
                    var inventory = syncData.getInventory();
                    if (!cfg.shouldShowWhenEmpty() && inventory.isEmpty()) {
                        return null;
                    }

                    var color = cfg.usePredefinedColor() ? DyeColor.GRAY : cfg.color();
                    if (cfg.isCompact()) {
                        return GenericContainerTooltipData.ofZipped(inventory, cfg.rows(), cfg.columns(), color);
                    } else {
                        return GenericContainerTooltipData.of(inventory, cfg.rows(), cfg.columns(), color);
                    }
                })
                // 使此 TooltipProvider 的同步间隔可配置
                .syncInterval(stack -> config.getTooltipConfigOrDefault(stack.getItem(), GenericSyncedTooltipConfig.DEFAULT).syncInterval())
                .build(),

            Items.ENDER_CHEST
        );
    }
}
工具提示同步数据提供者
如前所述,为了使上面的示例工作,我们需要来自服务器的一些信息。这就是 TooltipSyncData 和 TooltipSyncDataProviders 发挥作用的地方。
我们已经在末影箱的工具提示提供者中使用了 GenericContainerTooltipSyncData,所以让我们回到服务器端,教它如何处理:
public class MyMod implements PackedInventoryInitializer {
    @Override
    public void registerTooltipSyncDataProviders(TooltipSyncDataProviderRegistry registry, PackedInventoryApiConfig config) {
        registry.register(
            // 在服务器端,我们需要创建相同的 TooltipSyncData
            // 并用客户端不存在的内容填充它。
            // 其余所有事情都将由 Packed Inventory 自动处理。
            (stack, player) -> GenericContainerTooltipSyncData.of(player.getEnderChestInventory()),

            Items.ENDER_CHEST
        );
    }
}
只需几行代码,一切即可正常运行。
安装
要求:
- Minecraft
1.20.x
- Fabric Loader
>=0.15.0
- Fabric API
>=0.83.0
你可以从以下位置下载模组:
从源码构建
要求:
Linux/MacOS
git clone https://github.com/Kir-Antipov/packed-inventory.git
cd packed-inventory

chmod +x ./gradlew
./gradlew build
cd build/libs
Windows
git clone https://github.com/Kir-Antipov/packed-inventory.git
cd packed-inventory

gradlew build
cd build/libs
Packed Inventory
A Minecraft mod that attempts to mitigate the ever-growing Inventory Problem by making it possible to manage the contents of shulker boxes, ender chests, and more directly from your inventory.
Oh, we also have fancy tooltips for shulker boxes, ender chests, maps, and beyond!
Features
- Manage the inventory of shulker boxes without ever placing them.
- Manage the inventory of your ender chest without ever placing it.
- Quickly move items into or out of shulker boxes, ender chests, and other inventory-providing items.
- Access crafting tables, stonecutters, and other workstations directly from your inventory.
- Vanilla-like tooltips for shulker boxes.
- Vanilla-like tooltips for ender chests.
- Vanilla-like tooltips for filled maps.
- Vanilla-like tooltips for NBT-containing items acquired in Creative mode via
Ctrl + MMB, such as chests, barrels, furnaces, hoppers, dispensers, droppers, and more.
- An extensive and simple API that helps other modders implement these features for their blocks and items.
Bundle-Like Functionality
As mentioned earlier, inventory-providing items (e.g., shulker boxes, ender chests, and any items registered via the Packed Inventory API) automatically gain bundle-like functionality, allowing you to quickly move items into or out of them.
To store items inside an inventory-providing item, you can either:
- Pick up the inventory-providing item and press
k on the item(s) to be stored, or
- Pick up the inventory-providing item and press
k on the inventory-providing item(s) to be stored, or
- Pick up the item(s) to be stored and press
k on the inventory-providing item.
To retrieve items from an inventory-providing item:
- Pick up the inventory-providing item and press
k on the empty slot(s) to extract the item(s) to, or
- Pick up the inventory-providing item and press
l or ctrl + k on the slot(s) to extract the item(s) to, or
- Press
l or ctrl + k on the inventory-providing item(s) to extract the items from.
To dump all items from an inventory-providing item out into the world:
- Pick up the inventory-providing item, move it outside of the inventory frame, and press
k.
Tooltips
Here are some tooltip examples for you:
- Container tooltip
- Colored container tooltip
- Compact container tooltip
- Filled map tooltip
More screenshots can be found here.
Key Binds
Key binds can be configured just like vanilla ones:
- Go to
Options.
- Select
Controls.
- Then choose
Key Binds.
- Scroll down to the
Packed Inventory section.
- Configure the available key binds.
| Name |
Description |
Default |
Interact with item |
Interacts with the item in the active hotbar slot. Alternatively, if the inventory screen is open, interacts with the item the mouse is hovering over. Depending on the context, this action can either: - Open a screen associated with the selected item,
- Store an item inside the selected inventory-providing item,
- Retrieve an item from the selected inventory-providing item, or
- Dump all the items stored in the selected inventory-providing item out into the world
|
k |
Toggle interaction mode (hold) |
Makes the Interact with item key bind behave like Extract from item |
Left Control |
Extract from item |
Extracts an item from the selected inventory-providing item |
l |
Invert tooltip visibility (hold) |
Inverts tooltip visibility while pressed |
Left Shift |
Invert tooltip compact mode (hold) |
Inverts tooltip compact mode while pressed |
c |
Note that it's totally fine for these key binds to interfere with others since they are applied only when your inventory screen is open, where other key binds usually do not work.
Config
If you have Cloth Config installed, you can customize the behavior of the mod. A config is usually located at ./config/packed-inventory.json and by default looks like this:
{
  "defaultTooltipConfig": {
    "showWhenEmpty": false,
    "rows": -1,
    "columns": -1,
    "usePredefinedColor": false,
    "enable": true,
    "compact": false
  },
  "tooltips": {
    "minecraft:shulker_box": {
      "showWhenEmpty": false,
      "rows": -1,
      "columns": -1,
      "usePredefinedColor": false,
      "enable": true,
      "compact": false
    },
    "minecraft:ender_chest": {
      "syncInterval": 5000,
      "showWhenEmpty": false,
      "rows": -1,
      "columns": -1,
      "usePredefinedColor": false,
      "enable": true,
      "compact": false
    },
    "minecraft:filled_map": {
      "size": 128,
      "enable": false,
      "compact": false
    }
  },
  "defaultValidationConfig": {
    "suppressValidationInCreative": true,
    "requiresPlayerOnGround": true,
    "enable": true
  },
  "validation": {
    "minecraft:shulker_box": {
      "suppressValidationInCreative": true,
      "requiresPlayerOnGround": true,
      "enable": true
    },
    "minecraft:ender_chest": {
      "requiresSilkTouch": true,
      "suppressValidationInCreative": true,
      "requiresPlayerOnGround": true,
      "enable": true
    }
  }
}
| Name |
Description |
Side |
Default value |
tooltip.enable |
Indicates whether this tooltip should be enabled by default |
client |
true |
tooltip.compact |
Indicates whether the compact mode should be enabled for this tooltip by default |
client |
false |
tooltip.showWhenEmpty |
Indicates whether this tooltip should be shown when its content is empty |
client |
false |
tooltip.rows |
Specifies the number of rows used to display the tooltip content |
client |
-1 |
tooltip.columns |
Specifies the number of columns used to display the tooltip content |
client |
-1 |
tooltip.usePredefinedColor |
Indicates whether this tooltip should use the item color |
client |
false |
tooltip.color |
Specifies the default tooltip color in case usePredefinedColor is set to false or the item color cannot be automatically determined |
client |
NONE |
tooltip.syncInterval |
Specifies the frequency at which synchronization should occur |
client |
5000 |
tooltip.size |
Specifies the size of this tooltip, if applicable |
client |
128 |
| |
|
|
|
validation.enable |
Indicates whether the action associated with this validation rule should be allowed |
server |
true |
validation.suppressValidationInCreative |
Indicates whether this validation rule should be suppressed for creative players |
server |
true |
validation.requiresPlayerOnGround |
Indicates whether a player should be on the ground in order to satisfy this validation rule |
server |
true |
validation.requiresSilkTouch |
Indicates whether a player should have a tool enchanted with the Silk Touch enchantment in order to satisfy this validation rule |
server |
true |
You can edit any of these values directly in the config file or via ModMenu.
Development
Dependency Installation
To use the API, add Packed Inventory as a dependency in your build script:
build.gradle:
repositories {
  maven {
    name = "Modrinth"
    url = "https://api.modrinth.com/maven"
    content {
      includeGroup "maven.modrinth"
    }
  }
}

dependencies {
  modImplementation "maven.modrinth:packed-inventory:${project.packed_inventory_version}"
}
gradle.properties:
packed_inventory_version=/* version (e.g., 0.3.0+1.20.3) */
Entrypoints
The API introduces two new entrypoints that you can specify in your mod metadata:
| Name |
Description |
Interface |
Side |
packed-inventory |
Will be run first and in any environment |
PackedInventoryInitializer |
* |
packed-inventory-client |
Will be run second and only on the client side |
PackedInventoryClientInitializer |
client |
fabric.mod.json:
{
  "entrypoints": {
    "packed-inventory": [
      "a.b.c.MyMod"
    ],
    "packed-inventory-client": [
      "a.b.c.MyClientMod"
    ]
  }
}
Inventory Views
Meet inventory views! This is the core concept of this mod that enables us to edit inventories provided by their respective items without ever interacting with their block forms.
Let's register a simple inventory viewer (the component that provides inventory views) for the ender chest item:
public class MyMod implements PackedInventoryInitializer {
    @Override
    public void registerInventoryViewers(InventoryViewerRegistry registry, PackedInventoryApiConfig config) {
        registry.register(
            // We need to "extract" an inventory from the given context.
            // In this case, it's straightforward because ender chests have
            // a shared inventory that can be retrieved from the player.
            (inventory, slot, player) -> player.getEnderChestInventory(),

            // While this absolutely could be a predicate -
            // `(inventory, slot, player) -> inventory.getStack(slot).isOf(Items.ENDER_CHEST)`,
            // this form is preferred.
            Items.ENDER_CHEST
        );
    }
}
And that's it! You should be able to open the game, hover over an ender chest in your inventory, press k, and it will cause the inventory edit screen to pop up.
As for the next step, let's establish some rules to ensure our inventory viewer operates in a fair and non-cheaty way. To edit the ender chest inventory, a player should:
- Be on the ground, and
- Have a pickaxe enchanted with the Silk Touch enchantment, or
- Be in Creative mode.
To achieve this, we will use the InventoryValidators class, which contains some useful predefined inventory validators. Keep in mind that you can always create a new one from scratch.
public class MyMod implements PackedInventoryInitializer {
    @Override
    public void registerInventoryViewers(InventoryViewerRegistry registry, PackedInventoryApiConfig config) {
        registry.register(
            (inventory, slot, player) -> player.getEnderChestInventory(),

            // isInCreative || isOnGround && hasSilkTouch
            InventoryValidators.IS_IN_CREATIVE.or(
                InventoryValidators.IS_ON_GROUND.and(InventoryValidators.HAS_PICKAXE_WITH_SILK_TOUCH)
            ),

            Items.ENDER_CHEST
        );
    }
}
We're getting there! Now, you will see a friendly error message when attempting to open an ender chest in midair and/or without a pickaxe enchanted with the Silk Touch enchantment. However, the moment you switch to Creative mode, all restrictions will disappear.
One last thing to do is to make our inventory viewer configurable. After all, we have the config parameter for a reason ;)
public class MyMod implements PackedInventoryInitializer {
    @Override
    public void registerInventoryViewers(InventoryViewerRegistry registry, PackedInventoryApiConfig config) {
        // Let's register a validation config entry for the Ender Chest item.
        // The API provides these predefined configs (although you can create new ones):
        // - ValidationConfig: can be enabled/disabled.
        // - GenericValidationConfig: extends ValidationConfig, defines rules for being on the ground and suppressing validation for creative players.
        // - SilkTouchableGenericValidationConfig: extends GenericValidationConfig, defines a rule for having a Silk Touch tool in the inventory.
        config.registerValidationConfig(Items.ENDER_CHEST, SilkTouchableGenericValidationConfig::new);

        // Inventory viewer may be completely disabled by the user in the config.
        var isEnabled = InventoryValidators.config(Items.ENDER_CHEST, config, ValidationConfig.DEFAULT, ValidationConfig::isEnabled);

        // Suppress validation for creative players only if the config says so.
        var isInCreative = InventoryValidators.config(Items.ENDER_CHEST, config, GenericValidationConfig.DEFAULT, GenericValidationConfig::isSuppressedInCreative).and(InventoryValidators.IS_IN_CREATIVE);

        // Require the player to be on the ground only if the config says so.
        var isOnGround = InventoryValidators.config(Items.ENDER_CHEST, config, GenericValidationConfig.DEFAULT, x -> !x.requiresPlayerOnGround()).or(InventoryValidators.IS_ON_GROUND);

        // Require the player to have a Silk Touch tool in their inventory only if the config says so.
        var hasSilkTouch = InventoryValidators.config(Items.ENDER_CHEST, config, SilkTouchableGenericValidationConfig.DEFAULT, x -> !x.requiresSilkTouch()).or(InventoryValidators.HAS_PICKAXE_WITH_SILK_TOUCH);

        registry.register(
            (inventory, slot, player) -> player.getEnderChestInventory(),

            isEnabled.and(isInCreative.or(isOnGround.and(hasSilkTouch))),

            Items.ENDER_CHEST
        );
    }
}
This way, all restrictions can be configured via ModMenu or directly in the config file.
And after that, you've successfully integrated an item with Packed Inventory. Congratulations!
Inventory View Handlers
So, we've learned about inventory views, but where did that inventory edit screen come from? That's where the InventoryViewHandler comes in.
Most of the time, you do not need to register a custom handler if your inventory:
- Implements
NamedScreenHandlerFactory, or
- Implements
ScreenHandlerFactory, or
- Has a conventional size (i.e., 9, 18, 27, 36, 45, or 54) that can be processed by a
GenericContainerScreenHandler.
But, just as usual, you can register your own InventoryViewHandler:
public class MyMod implements PackedInventoryInitializer {
    @Override
    public void registerInventoryViewHandlers(InventoryViewHandlerRegistry registry, PackedInventoryApiConfig config) {
        registry.register(
            (inventoryView, parentInventory, slot, player) -> {
                var name = parentInventory.getStack(slot).getName();
                var playerInventory = player.getInventory();
                var namedFactory = new SimpleNamedScreenHandlerFactory((sId, inv, p) -> new GenericContainerScreenHandler(ScreenHandlerType.GENERIC_9X3, sId, playerInventory, inventoryView, 3), name);

                player.openHandledScreen(namedFactory);
            },

            Items.ENDER_CHEST
        );
    }
}
Note that you are not limited to just opening a handled screen; you can literally do whatever you want with the provided inventory view.
Inventory Validation Failure Handlers
So, we can customize inventory view handling, but what about failure handling? Of course, you can tweak that too.
By default, errors are sent to the corresponding player's action bar, but you can change this behavior:
public class MyMod implements PackedInventoryInitializer {
    @Override
    public void registerInventoryValidationFailureHandlers(InventoryValidationFailureHandlerRegistry registry, PackedInventoryApiConfig config) {
        registry.register(
            (failureReason, inventory, slot, player) -> {
                var text = failureReason.toText();
                if (text != null) {
                    player.sendMessage(text, false);
                }
            },

            Items.ENDER_CHEST
        );
    }
}
Tooltips
What is good inventory management without descriptive tooltips? Let's create one for ender chests using TooltipProvider!
// Note that tooltips are completely client-side, so we use
// `PackedInventoryClientInitializer` instead of `PackedInventoryInitializer` here.
public class MyClientMod implements PackedInventoryClientInitializer {
    @Override
    public void registerTooltipProviders(TooltipProviderRegistry registry, PackedInventoryApiConfig config) {
        registry.register(
            TooltipProvider.builder()
                .tooltipText((stack, context) -> List.of(Text.of("This is an ender chest")))
                .build()

            Items.ENDER_CHEST
        );
    }
}
This way, the ender chest's tooltip will be replaced with the text "This is an ender chest." However, this is not helpful, is it? The problem with ender chests is that the client does not have any information about their contents. So, is this a dead end? Of course not. We are going to use some magic:
public class MyClientMod implements PackedInventoryClientInitializer {
    @Override
    public void registerTooltipProviders(TooltipProviderRegistry registry, PackedInventoryApiConfig config) {
        registry.register(
            TooltipProvider.builder()
                .useSyncData(GenericContainerTooltipSyncData::of)
                .tooltipData((stack, context, syncData) -> GenericContainerTooltipData.of(syncData.getInventory()))
                .build()

            Items.ENDER_CHEST
        );
    }
}
After specifying that our TooltipProvider needs TooltipSyncData (in this case, I use the predefined GenericContainerTooltipSyncData because we only care about the ender chest's inventory), we can use it in the subsequent calls to tooltipData, tooltipText, etc. We'll delve into TooltipSyncData a bit later; for now, let's assume that everything just works.
Note that we override the ender chest's TooltipData with GenericContainerTooltipData. If you're not familiar with the vanilla treatment of this sort of things, when an item provides a TooltipData, Minecraft looks for a corresponding TooltipComponent. This component allows you to render anything you want inside a tooltip. GenericContainerTooltipData is provided by the API, so you don't need to worry about supplying the game with a tooltip component for it. However, if you want to use custom tooltip data, you'll need to register a tooltip component manually through Fabric API, like so:
TooltipComponentCallback.EVENT.register(tooltipData -> {
    if (tooltipData instanceof MyTooltipData) {
        return new MyTooltipComponent((MyTooltipData)tooltipData);
    }
    return null;
});
Alright, now we have a fancy tooltip that shows us the contents of the ender chest. Once again, it's time to make everything configurable:
public class MyClientMod implements PackedInventoryClientInitializer {
    @Override
    public void registerTooltipProviders(TooltipProviderRegistry registry, PackedInventoryApiConfig config) {
        // Let's register a tooltip config entry for the Ender Chest item.
        // The API provides these predefined configs (although you can create new ones):
        // - TooltipConfig: can be enabled/disabled; compact mode can be switched on or off.
        // - GenericTooltipConfig: extends TooltipConfig, defines properties commonly used by containers.
        // - GenericSyncedTooltipConfig: extends GenericTooltipConfig, defines the `syncInterval` property used by tooltip providers requiring synchronization data.
        config.registerTooltipConfig(Items.ENDER_CHEST, GenericSyncedTooltipConfig::new);

        registry.register(
            TooltipProvider.builder()
                // Tooltip can be enabled/disabled in the config or by the key bind (`Left Shift` by default)
                .when((stack, context) -> config.getTooltipConfigOrDefault(stack.getItem()).isEnabled())
                .useSyncData(GenericContainerTooltipSyncData::of)
                .tooltipData((stack, context, syncData) -> {
                    var cfg = config.getTooltipConfigOrDefault(stack.getItem());
                    var inventory = syncData.getInventory();
                    if (!cfg.shouldShowWhenEmpty() && inventory.isEmpty()) {
                        return null;
                    }

                    var color = cfg.usePredefinedColor() ? DyeColor.GRAY : cfg.color();
                    if (cfg.isCompact()) {
                        return GenericContainerTooltipData.ofZipped(inventory, cfg.rows(), cfg.columns(), color);
                    } else {
                        return GenericContainerTooltipData.of(inventory, cfg.rows(), cfg.columns(), color);
                    }
                })
                // Make the synchronization interval for this TooltipProvider configurable
                .syncInterval(stack -> config.getTooltipConfigOrDefault(stack.getItem(), GenericSyncedTooltipConfig.DEFAULT).syncInterval())
                .build(),

            Items.ENDER_CHEST
        );
    }
}
Tooltip Sync Data Providers
As mentioned earlier, to make the example above work, we need some information from the server. That's where TooltipSyncData and TooltipSyncDataProviders come into play.
We already use GenericContainerTooltipSyncData in our ender chest's tooltip provider, so let's go back to the server and teach it how to handle it:
public class MyMod implements PackedInventoryInitializer {
    @Override
    public void registerTooltipSyncDataProviders(TooltipSyncDataProviderRegistry registry, PackedInventoryApiConfig config) {
        registry.register(
            // On the server side, we need to create the same TooltipSyncData
            // and populate it with contents that are not present on the client.
            // Everything else will be handled by Packed Inventory automatically.
            (stack, player) -> GenericContainerTooltipSyncData.of(player.getEnderChestInventory()),

            Items.ENDER_CHEST
        );
    }
}
With just a few lines of code, everything works as expected.
Installation
Requirements:
- Minecraft
1.20.x
- Fabric Loader
>=0.15.0
- Fabric API
>=0.83.0
You can download the mod from:
Building from sources
Requirements:
Linux/MacOS
git clone https://github.com/Kir-Antipov/packed-inventory.git
cd packed-inventory

chmod +x ./gradlew
./gradlew build
cd build/libs
Windows
git clone https://github.com/Kir-Antipov/packed-inventory.git
cd packed-inventory

gradlew build
cd build/libs


 模组

 模组

 模组

 模组
 模组

 模组
评论 0
登录后参与评分
还没有评论,来抢沙发吧