MassRelay
如果有服务器管理员正在使用此插件,并且希望获得免费宣传,我将非常乐意在页面底部列出你的服务器。
描述
这个服务器模组将《质量效应》(Mass Effect)中的质量中继站加入了 Minecraft!正如《质量效应》中的质量中继站允许玩家探索银河系一样,本模组中的质量中继站将让你能够探索整个最大尺寸 Minecraft 地图的宽度(从原点起可达 30,000,000 格!)。当服务器管理员从控制台运行 `generaterelays` 命令时,这些质量中继站便会生成。插件会在地图上的某个随机位置(X 和 Z 坐标可能达到数百万格)建造一座主中继站,然后在主中继站周围 100,000x100,000 的区域中填充次级中继站。
什么?你不知道什么是主中继站和次级中继站?好吧,安静下来孩子们,因为我要告诉你们了。次级中继站以 100 个为一组出现在地图上,同一组内的所有次级中继站共享相同的整数地址。中继站的地址格式为 A.X,其中 X 可以是 00 到 99 之间的任意数字,而 A 是群组编号。同一群组内的所有次级中继站彼此相对靠近,全部位于地图上同一个 100,000x100,000 的区域内。因此,次级中继站的传输范围仅为 150,000 格,只能将你传送至该范围内的其他中继站。例如,如果你位于中继站 3.23,你可以传送至任何小数点前数字为 3 的其他中继站,例如 3.64、3.83 或 3.00。

在单个群组内旅行这一切都很好,但如果你想出去探索地图的其余部分呢?那么你需要前往另一个群组,而唯一的方法是使用主中继站。群组的间距可能达数百万格,这对次级中继站来说是个大问题,因为它们只有 150,000 格的传输范围。然而,主中继站可以将玩家传送到任何其他主中继站,同时玩家也可以在主中继站所在的群组内与任何其他次级中继站之间相互传送。本质上,主中继站的作用类似于次级中继站,只是你可以使用它传送到任何其他主中继站。你可以通过其独特的设计来区分主中继站,另外它的地址会是整数形式,例如 1.0 或 0.0 。例如,从 2.0 中继站出发,玩家可以传送到 3.0 或 1.0,但从 0.0 中继站出发,玩家只能传送到 1.0。

不过,如何使用这些中继站呢?很简单。你只需要走到中继站那里(它们位于地图的最高高度层,所以位置相当高),然后站在中继站中心那个两格高的空间中间。一旦站在那里,输入命令 /relay x.xx,其中 x.xx 是你想要前往的中继站地址。你也可以直接输入 /relay 来获取你所处中继站的地址。

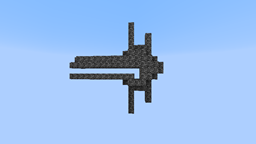
中继站是宏伟的外星科技造物,由一种极其珍贵的物质——零素(element zero)驱动(你们 Minecraft 玩家称之为钻石块)。在下图中,你可以看到质量中继站的零素核心,此时其维护舱盖处于打开状态(通常它是关闭的)。如果质量中继站内部的零素核心被摧毁,下次有人尝试在其中使用 /relay 命令时,维护舱盖将会打开,暴露出原本放置核心的位置。在零素核心被替换之前,玩家无法从此中继站进出;一旦核心被替换且玩家使用了 /relay 命令,维护舱盖就会关闭,玩家便可再次从此中继站通行。只有战略性地大量部署 TNT,或者创造模式下的 OP 玩家,才能损坏零素核心。

您还可以使用零素方块和铁方块来建造自己的原型中继站。一对这样的中继站(类似于《质量效应》中的“枢纽”)会形成一个独立于主中继网络的专属质量中继网络。建造原型中继站的方法如下:在地面放置一个零素核心(钻石方块),然后在其侧面用铁方块向上搭建一座 4 格高的塔。接着,在钻石方块上放置一块告示牌,以指定该中继站对的某些属性。在告示牌的第一行,输入字母 "a" 或 "b"(不带引号)。这代表中继站对中的哪一边是 A 端、哪一边是 B 端,因为您只能从中继站 "a" 前往中继站 "b",而不能从 "b" 前往 "a",这与只能从“枢纽”前往中继站纪念碑而无法反向通行的规则相同。第二、第三和第四行则是该原型中继站对应双子中继站的坐标。要轻松获取钻石方块的坐标,只需在钻石方块上放置一块告示牌并右键点击该钻石方块即可。此时,告示牌会自动显示该钻石方块的三个坐标值。但请注意,您必须在告示牌上填写的是**该中继站双子中继站**的坐标。当一对原型中继站都建造完毕,并且各自告示牌上已正确填入关于对方的信息后,它们就可以使用了。使用方法很简单:只需站在中继站 "a" 的钻石方块上,输入 /relay 。这将把您传送到中继站 "b",但请记住,除非您在附近建造另一对中继站,否则无法从中继站 "b" 返回中继站 "a"。
这张图片展示了一个尚未在钻石方块上放置信息告示牌的原型中继站。别忘了正确填写告示牌内容!

您的飞船:神堡号 (The Normandy)
那么,当中继站的零素核心损坏,而两个中继站相距数千甚至数百万米时,人们该如何前往修复呢?除了利用质量中继站外,您还可以使用小块的零素为属于您自己的飞船上的超光速(FTL)引擎供能!只需手持任意数量的零素弹丸(钻石或钻石方块)(手持物品即表示您身处飞船内),您将进入飞行模式(您可以双击跳跃进行飞行,且不会受到跌落伤害)。如果您右键点击,您将自动向前移动,速度取决于您手中持有的钻石数量(或钻石方块数量乘以 9)。如果再次右键点击,您将停止自动向前移动,但仍保持在飞行模式。持续向前飞行每秒大约消耗 1 个红石粉,而在飞行模式下悬停则不消耗红石粉。然而,如果您将手中的物品切换为除钻石以外的任何物品,您将停止自动向前移动并退出飞行模式(落地时将面临巨大的跌落伤害风险)。如果您手中持有 10 个或更多钻石,您的移动速度可能会过快以至于不适合许多服务器,因此在这种情况下,超光速引擎进行了调整。由于每持有 1 个钻石会使您以约 20 米/秒的速度前进,当您手持 10 个或更多钻石并右键点击时,您将朝着您注视的方向传送一段距离(距离为您手中钻石数量乘以 20),并消耗 1 个红石粉。这模拟了一秒钟的旅行时间,同时减轻了对所在服务器的压力。您无法使用此方法垂直上下传送,这意味着如果您打算使用 10 个或更多钻石进行旅行,需要先飞到高空,因为在低空尝试旅行时,您很可能会穿模进入方块或山体之中。这使得前往中继站的旅程漫长而艰辛,但并非不可能!
还记得您在《质量效应 2》中钟爱的资源采集小游戏吗?没错,探测功能已添加到 Minecraft 中!由于您需要拥有飞船才能对行星进行探测/扫描,因此您的背包中必须至少有一个钻石才能执行扫描/探测操作。在执行扫描和探测之前,您需要制作探测器。本段下方的图片展示了制作一组 5 个探测器的配方。如果您需要记忆,可以这样想:探测器由铁钻头、青金石电路和红石推进系统组成。一旦您有了用于扫描的探测器,只需手持探测器,对着视线范围内的任意方块右键点击。探测器随后将以该方块为起点,向下延伸至基岩层,列出 5x5 区域内的矿石清单。每种矿石的数量将显示在其名称首字母旁边(G 代表金,D 代表钻石,R 代表红石等)。如果您看到了心仪的矿石,请手持红石火把左键点击,即可对该区域进行探测。这将消耗一个探测器,并给予您与扫描结果大致相当的矿石量。扫描结果与实际开采量之间的误差是由于采矿效率低下导致的:矿石在被开采时会发生爆炸,从而销毁一小部分产量。

神堡号还配备了护盾,其效果根据您持有的零素核心的大小而有所不同。如果您手持钻石并遭到玩家或生物的攻击,您的动能屏障将使您不受伤害,并消耗 1 个红石粉。如果您手持钻石方块并遭到玩家或生物的攻击,您的旋涡屏障将使攻击者受到与您原本会受到的伤害相同的伤害,同时消耗 1 个红石粉。此外,如果您手持钻石方块并受到投射物(如箭矢)攻击,您的护盾会将投射物重定向到您面对的方向;如果您正面对着攻击者,护盾会将投射物反弹回去。
如果你手持一个大型元素零核心(即手中拿着钻石块),左键点击即可发射泰尼克斯炮。泰尼克斯炮每次发射会消耗一个铁块和红石粉,其光束强度取决于你手中持有的钻石块数量。泰尼克斯炮的工作原理是在你注视的位置引发一次相当于 TNT 规模的爆炸,然后根据你手中持有的钻石块数量重复此过程。当钻石块数量足够多时,该炮可以凿穿山脉直达基岩层,或贯穿敌方基地。
命令
/generaterelays world number:此命令仅可从控制台运行。将 world 替换为你希望生成中继器的世界名称,将 number 替换为你希望生成的集群数量。每个集群包含 100 个中继器。第 0 号集群(你首次生成的第一个集群)的中心始终位于坐标 (0,0),主中继器 0.00 也位于 (0,0)。你可以多次运行此命令;每次运行时,它会在上次结束的集群数量基础上继续添加新集群(这样管理员日后若想添加更多集群,便无需从头开始)。如果省略 number 参数,默认值为 500,生成大约需要 13 小时。
/relay x.xx、/relay 和 /relay x.xx 1:这些命令可由玩家在大质量中继器内部中心位置执行。默认情况下对所有玩家启用。x.xx 代表玩家希望传送至的中继器地址。若未提供地址,系统将显示你当前所在中继器的地址。如果你是管理员(op)且在 x.xx 后添加了其他内容,即使你当前并未站在中继器内,系统也会将你传送至该中继器。
/nearbyrelays x:此命令默认对玩家禁用。如果你将 x 替换为一个数字,它将在你当前位置的指定半径内搜索中继站并向你显示。
权限
MassRelay.relay:这是使用 /relay 命令所需的权限,默认设置为 true。
MassRelay.nearbyrelays:这是使用 /nearbyrelays 命令所需的权限,默认设置为 false。
MassRelay.ftl:默认为 true。将其设置为 false 可防止超光速(FTL)功能与你运行的其他飞行插件产生冲突。玩家仍可以使用钻石进行飞行,但切换到非钻石物品不会剥夺他们的飞行权限。
MassRelay.probe:默认为 true。这允许玩家使用探测功能。设置为 false 以禁止使用探测器。
plugins/MassRelay/config.yml 选项及默认值
randomRelayHeight: false 如果设置为 true,中继站将在随机高度生成。如果启用此项,将覆盖 relayHeight 的设置数值。
relayHeight: 245 设置中继站的生成高度。不要高于 245 或低于 6,否则中继站的顶部或底部可能会被截断。
relaysPerCluster: 100 每个集群中包含多少个次级中继站。
secondaryRelayRange: 150000 次级中继站的运输距离。如果设置得过低,则无法保证集群内的全面访问。
worlds: worldList 在生成 config.yml 文件时,它会列出所有存在的世界,并在每个世界名称后加上单词 true。若要在此世界中禁用此插件,请将世界名称后的 true 改为 false。在世界中禁用该插件可以让创造模式的飞行行为恢复正常,并防止非创造模式玩家使用超光速引擎飞行。
运行此插件的服务器
- CrystalCraft : crystalcraft.sytes.net:25805
- Buttercraft : 184.164.136.210:25590
MassRelay
If anyone is running this plugin on their server and wants free advertising, I would be more than happy to list your server at the bottom of the page.
Description
This server mod adds mass relays from Mass Effect to minecraft! In the same way that mass relays allow players in Mass Effect to explore the galaxy, the mass relays in this mod will allow you to explore the entire width of a maximum minecraft map (up to 30,000,000 from the origin!). These mass relays are generated with the server admin runs the generaterelays command from the console. The plugin will pick a random point somewhere on the map (the x and z coordinates could be in the millions!), build a primary relay there, and then populate the 100,000x100,000 area around the primary relay with secondary relays.
What's that? You don't know what primary relays and secondary relays are? Well settle down kiddies, because I'm about to tell you. Secondary relays come in clusters of 100 on the map and all secondary relays in the same cluster will share the same integer address. A relay's address will look like A.X, where the X could be any number from 00 to 99, and the A is the cluster number. All secondary relays in the same cluster will be relatively close to each other, all of them inhabiting the same 100,000x100,000 area on the map. As such, secondary relays only have a range of 150,000 meters and thus can only teleport you to other relays within that range. For example, if you are at relay 3.23, you could teleport to any other relay with 3 as the number before the decimal, such as 3.64 or 3.83 or 3.00 .
That's all good and well for traveling within a single cluster, but what if you want to get out and explore the rest of the map? Then you will need to get to another cluster, and the only way to do that is to use a primary relay. The clusters could be millions of blocks apart, which is a big problem for secondary relays as they only have a range of 150,000 blocks. However, primary relays can teleport players to any other primary relay, as well as players being able to teleport to and from any other secondary relays in the same cluster as a primary relay. Essentially, a primary relay acts just like a secondary relay, except that you can teleport to any other primary relay with it. You can tell a primary relay apart by it's distinctive design, and also by the fact that it will have a whole number address, such as 1.0 or 0.0 . For example, from the relay 2.0 a player could teleport to 3.0 or 1.0, however from the relay 0.0 a player could only teleport to 1.0 .
How does one use the relays though? Well it's simple. All you have to do is make your way up to the relay (they are at the maximum height level of the map, so they are pretty far up) and stand in the middle of the two block high space in the center of the relay. Once you are standing there, type the command /relay x.xx where x.xx will be the address of the relay you want to travel to. You can also just type /relay to receive the address of the relay you are inside.
Relays are magnificent pieces of alien technology powered by an extremely valuable substance called element zero (you minecraftians know it as diamond block). In the below photo, you can see the element zero core of a mass relay while it has it's maintenance hatch open (it is usually closed). In the event that the element zero core inside the mass relay is destroyed, the next time someone tries to use the /relay command inside it, a maintenance hatch will open, exposing the place where the core should be. Players cannot travel to or from this relay until the element zero core is replaced, and once it is replaced and a player uses the /relay command, the maintenance hatch will close and players can travel from this relay once again. Only a strategic placement of a massive amount of tnt can damage the element zero core, or an op in creative mode.
You can also use blocks of element zero and iron to construct your own prototype relays. A pair of these relays, like The Conduit in Mass Effect, make up their own mass relay network separate from the main relay network. You can construct a prototype relay by placing an element zero core (diamond block) on the ground and building a tower 4 high of iron blocks to the sides of it. You then put a sign on the diamond block that specifies certain attributes about this relay pair. On the first line of the sign, you put either the letter "a" or "b", without the quotes. This represents which side is which in a relay pair, as you can only travel from relay "a" to relay "b", not from "b" to "a", just like you can only travel from The Conduit to the relay monument but you cannot in the reverse order. The second, third, and fourth lines are the coordinates of this prototype relay's twin. To easily find the coordinates of a diamond block simply place a sign on top of a diamond block and right click the diamond block. The sign will then write the three coordinates of this diamond block on itself. Keep in mind however that it is the coordinates of this relay's twin that you must put on it's sign. After both prototype relays in a pair are built and the correct information about each other are entered onto their signs, they are ready to use. To use it, you simply stand on the diamond block of relay "a" and type /relay . This will teleport you to relay "b", but keep in mind that there is no way to travel from relay "b" to relay "a" unless you build another relay pair close by.
This picture shows a prototype relay without the information sign on the diamond block. Don't forget to fill out the sign correctly!
Your Ship, The Normandy
But how would one travel to a relay to fix a broken element zero core when they can be thousands or millions of meters apart? Well along with mass relays using the substance, you can also use smaller pieces of element zero to power your own FTL drives in your very own spaceship! Simply hold any number of element zero pellets (diamonds or diamond blocks) in your hand (holding them in your hand means that you are in your ship!) and you will be in fly mode (you can fly by double jumping and you don't take any fall damage). If you right click, you will automatically move forward at a speed that is dependent on how many diamonds (or diamond blocks multiplied by 9) you are holding. If you right click again, you will stop moving forward automatically, but you will still be in fly mode. Flying forward constantly consumes about 1 redstone dust per second, but hovering in fly mode consumes no redstone dust. However, if you switch to any other item in your hand besides diamonds, you will stop moving forward automatically and you will leave fly mode (leaving you vulnerable to massive fall damage when you hit the ground). If you have 10 or more diamonds in your hand, your movement speed may be too much for many servers, so the ftl drives in these cases have been tweaked. Since you move forward at about 20 m/s per diamond, when you right click with 10 or more diamonds in your hand you will be teleported a certain distance forward in the direction you are looking (the distance is determined by the number of diamonds you are holding multiplied by 20) and you will lose one redstone dust. This emulates one second of travel while taking it easy on the server you play on. You cannot teleport up or down using this method, which means that you want to have flown up high before you attempt to travel with 10 or more diamonds, as you are likely to phase into a block or mountain if you are at low altitude. This makes travel to relays long and arduous, but possible!
Remember your favorite resource-gathering mini-game in Mass Effect 2? That's right, probing has been added to minecraft! Since you need to own a spaceship to probe/scan planets, you need to have at least one diamond in your inventory to scan/probe. Before you can scan and probe, you need to create probes. The picture below this paragraph shows the recipe for creating a set of 5 probes. If you need to remember, just think of the probe having an iron drill bit, lapiz circuitry, and a redstone propulsion system. Once you have probes to scan with, just right click with the probe in your hand at any block within sight. The probe will then give you a list of ores in a 5X5 column from that block down to bedrock. The numbers of ores in the column are displayed next to the first letter of their names (G for gold, D for diamond, R for redstone, etc.). If you like what you see, left click with the redstone torch in your hand and you will probe the area. This consumes one probe and will give you about as much ore as was listed in the scan. The inacuracy from scan to probe haul is because, due to inefficient mining methods, ores explode as they are mined, thus destroying some small percentage of the yield.
The Normandy also comes equipped with shields which have varying effect based on how large your element zero core is. If you are holding diamonds in your hand and you get attacked by a player or mob, your kinetic barriers make it so you will receive no damage and one redstone dust will be used up. If you are holding diamond blocks in your hand and you get attacked by a player or mob, your cyclonic barriers make it so that player or mob will be injured the same amount that you would have been, at the cost of one redstone dust. Also, if you are holding a diamond block and a projectile is shot at you, such as an arrow, your shield will redirect the projectile to whichever direction you are facing, so if you are facing the attacker you will fire the projectile back at them.
If you have a large element zero core (are holding a diamond block in your hand) and you left click, you will fire the Thanix Cannon. The Thanix Cannon uses up one iron block and one redstone dust each time it fires, and the strength of it's beam is determined by how many diamond blocks you are holding. The Thanix Cannon works by causing a single TNT sized explosion at the location you are looking, and then repeats this process for however many diamond blocks you are holding. With a sufficient number of diamond blocks, the cannon can burrow a hole through a mountain, down to bedrock, or through an enemy base.
Commands
/generaterelays world number : This command can only be run from the console. World is replaced with the name of the world you want to populate with relays and number is replaced with the number of clusters you want to populate it with. There are 100 relays in a cluster. Cluster number 0 (the first cluster you ever generate) will always be centered on coordinates (0,0) and primary relay 0.00 will be at (0,0). You can run this command multiple times, each time it is run it will continue adding clusters from the number of clusters it ended on last time (this is so admins can add more clusters if they want later on, without having to start over from scratch). If you choose not to include a number, it will default to 500, which will take about 13 hours to generate.
/relay x.xx and /relay and /relay x.xx 1 : This command can be executed from the center of the inside of a mass relay by players. It is enabled for all players by default. The x.xx is the relay address they want to travel to. If you fail to include an address, it will tell you the address of the relay you are currently standing in. If you add anything after the x.xx and you are an op, it will teleport you to that relay even if you are not standing in a relay currently.
/nearbyrelays x : This command is disabled for players by default. If you replace the x with a number, it will search for relays within that radius from your current position and display them to you.
Permissions
MassRelay.relay : This is the permission for using the /relay command, and is set to true by default.
MassRelay.nearbyrelays : This is the permission for using the /nearbyrelays command, and is set to false by default.
MassRelay.ftl : True by default. Set this to false to keep the ftl feature from interfering with other flight plugins you are running. Player will still be able to fly around with the diamonds, but switching to a non-diamond item will not deny them flight permission.
MassRelay.probe : True by default. This allows players to use the probe function. Set to false to disallow probes.
plugins/MassRelay/config.yml options and defaults
randomRelayHeight: false If set to true, relays will be generated at random heights. This overrides the relayHeight number if set to true.
relayHeight: 245 This sets the height relays will be generated at. Don't go above 245 or below 6, or the top or bottom of the relay will be cut off.
relaysPerCluster: 100 How many secondary relays you want in a cluster.
secondaryRelayRange: 150000 The distance that secondary relays can transport you. If set lower than this, cluster-wide access is not guaranteed.
worlds: worldList When the config.yml file is generated, it will create a list of all present worlds with the word true after their name. To disable this plugin for a world, change the word true to false after the world name. Disabling the plugin for a world will allow creative flight to behave correctly once again and prevent non-creative players from flying with FTL drives.
Servers That Run This Plugin
- CrystalCraft : crystalcraft.sytes.net:25805
- Buttercraft : 184.164.136.210:25590

 插件
 插件
 插件

 插件

 插件

 插件

评论 0
登录后参与评分
还没有评论,来抢沙发吧