TravelGates
传送系统与下界传送门替代方案
最新版本:v1.10.18 [1.6.4-R0.1]
在 GitHub 上查看 TravelGates 的源代码。
描述
本插件旨在设置传送目的地,当玩家站在另一个目的地上时,可被传送到这些目的地。为了像在不同服务器之间那样隔离目的地,可以清空玩家的物品栏。传送后,玩家将面向与创建目的地时的 OP(管理员)相同的方向。传送功能也支持跨世界操作。您还可以使用下界传送门进行传送:只需在下界传送门前放置一个“TravelGates”告示牌,并让告示牌朝向玩家的头部即可。传送方块还允许您在现有目的地周围进行传送。此外,您还可以管理附加世界。
查看 此页面 以获取有关传送系统的更详细信息。
本插件支持多语言。插件仅内置两种语言(英语和法语)。你可以修改消息文件,或创建其他语言的自定义文件。
与 Bukkit 的兼容性:
本插件必须搭配 Craftbukkit 1.1-Rx 版本使用。旧版本将无法正常工作。
视频教程
- ANDREJJGaming 制作的教程。(安装 + 游戏内操作指南)
- Minecrafter9842 制作的教程。(安装 + 游戏内操作指南)
- VariationVault 制作的教程。(游戏内操作指南)
- LastWishSpain 制作的教程。(完整的西班牙语教程)
- AbsintoJ 制作的教程。(完整的葡萄牙语教程)
从零开始配置本插件
- 下载最新构建版本:TravelGates-x.x.x.zip,其中 x.x.x 为最新版本号
- 解压该压缩包。你将获得两个文件:TravelGates-x.x.x.jar 和 resources-x.x.x.zip
- 解压 resources-x.x.x.zip 压缩包
- 在你的 Minecraft 服务器目录下的 "plugins" 文件夹中创建一个名为 "TravelGates" 的目录(可选)
- 将 TravelGates-x.x.x.jar 文件移动到 "plugins" 目录中
- 在你通过解压前一个压缩包创建的 resources 目录中,将 travelgates.conf 文件移动到 "TravelGates" 目录中
- 使用你选择的语言文件重复上一步。你可以在“resources\messages”目录中找到语言文件的示例。(可以随意更新现有文件或创建自己的文件)
- 按照 Readme(页面或文件)中的描述配置配置文件,或者查看下面这一节中的所有配置参数。
- 重启 Minecraft 服务器
- 尽情享受吧!
请参阅 README 页面以获取更多信息。
您还可以前往 英文语言示例文件 页面来配置游戏内消息。
查看 权限页面 以了解本插件中使用的权限节点。如果您想使用权限但不知道如何设置,请查阅 此 Bukkit Wiki 页面。否则,只需在本插件的配置中禁用权限,那么非 OP 玩家将获得用户权限,而只有 OP 玩家将获得管理员权限。
如果您想查看默认配置文件的示例,请点击这里!
配置参数
- language: 设置用于向玩家显示消息的语言。必须与 TravelGates 目录中消息文件的文件名相同。(例如:language=en -> messages_en.lang
- usepermissions: (true/false) 使用 PermissionsBukkit、PermissionsEx、Permissions 2x/3x 或原生 Bukkit 权限(按此顺序,取决于您安装的插件)
- teleportwithsign: (true/false) 启用通过点击告示牌进行传送的功能
- teleportwithportal: (true/false) 启用下界传送门替换功能
- debug: (true/false) 用于在插件加载时启用调试模式。
- clearallinventory: (true/false) 当“i”选项设置为目的地时,用于清除盔甲内容
- protectadmininventory: (true/false) 当启用清除库存选项时,用于保护管理员的库存
- tpblock: (type[,data]/disabled) 用于选择传送方块。Type 是材质名称(例如 "wool"),data 是羊毛颜色(例如 "lime")或树木种类(例如 "birch")。您可以使用数字数据或其名称。
插件使用方法
主要命令是 "/travelgates",您也可以使用别名 "/tg"。
所有命令和目的地均不区分大小写。
请参阅示例页面,以查看本插件提供的最“复杂”命令的示例。
管理员命令:
- /tg {destination}:传送玩家
- /tg add {destination} [-options]:添加一个目的地。
- /tg del {destination}:删除一个目的地。
- /tg save:强制保存所有目的地
- /tg debug:切换调试模式
- /tg dtm:显示或隐藏传送消息
- /tg options {destination} -[options]:更新目的地的选项。“-”字符是必须的。
- /tg update {destination} -[options]:与 /tg options 相同
- /tg worlds ({world}|*) [-lu] [world_type]:显示当前已加载的世界,不带任何选项。世界名称的命名规则与目的地相同。可以使用通配符 * 来显示服务器目录中的所有世界。使用选项 [-lu] 可以加载或卸载世界。如果不带选项,将显示世界的状态(已加载或未加载)。如果使用 l 选项,可以添加世界类型:(normal|nether|end),默认为 normal。如果世界中还有玩家,则无法卸载该世界。
- /tg config:显示当前配置
- /tg perms:切换权限激活状态(如果启用权限,则重新加载权限配置)
- /tg signtp:切换是否使用告示牌进行传送
- /tg portaltp:切换是否使用下界传送门进行传送
- /tg clearallinv:切换“清除所有物品栏”选项的状态
- /tg clearallinv:切换“保护管理员物品栏”选项的状态
- /tg autosave:切换自动保存功能
- /tg tpblock:修改或切换 TP 区块限制
- /tg {destination} [-f]:将玩家传送到目的地 前提是他站在某个有效位置上。如果使用 -f 参数,则可以随时随地进行传送。
用户命令:
- /tg list:显示玩家可用的所有目的地。
- /tg details {destination}:向玩家显示所有目的地、它们的位置和选项。你可以指定一个目的地以查看其详细信息。
- /tg restrict {destination}:显示从给定目的地出发所允许的目的地列表
- /tg loc {destination}:显示目的地的位置。
- /tg name:显示玩家当前站立位置的名字。
- /tg help:显示插件的简短帮助信息。
- /tg {destination}:传送到该目的地。
其他传送方式:
- 右键点击包含 [TG] 或 [TRAVELGATES](不区分大小写)以及另一个行或同一行(顺序无关)上已有目的地名称的告示牌:效果等同于 /tg {destination}。
- 使用下界传送门:在下界传送门上放置 TravelGates 告示牌(见上文),并设置其为 “-ON-” 状态(在 messages 文件中定义),通过拉杆或直接放置在告示牌上进行配置,然后像往常一样使用传送门。告示牌必须放置在面向玩家头部的传送门方块上。你可以将目的地设置在黑曜石方块上,或者传送门旁边的方块上。
- 使用传送方块:如果你使用传送方块(例如浅绿色羊毛),你将被传送。你需要用这种方块覆盖包含目的地的矩形区域才能被传送。距离目的地的最大范围为 5 个方块(加上目的地方块本身则为 6 个)。所有这些方块必须处于同一高度,且位于添加目的地时玩家位置的正下方。
- 有关下界传送门和传送方块功能的更详细信息,请查看此页面。
可用选项:
- i = 旅行到目的地时清空物品栏
- a = 仅限管理员传送
- s = 添加新目的地或更新选项时立即保存
- p = 按以下格式设置你的目的地位置:-p(world,x,y,z) 或 -p(x,y,z),其中 "y" 可以等于 "?"
- r = 设置玩家允许前往的限制性目的地,格式如下:-r{dest1,dest2,dest3} -r{+dest1,-dest2} -r{} -r
- f = 强制传送到目的地(无需站在其他目的地上)
示例:/tg add mydest -iar{test}p(world,5,?,20)s -> 添加名为 "mydest" 的目的地,传送后清空物品栏,"mydest" 仅限管理员使用,"test" 是唯一允许前往的目标目的地,位置在世界 "world" 中 x=5, y=最高可用高度, z=20,最后保存新目的地。
更多详尽信息请参阅 README.txt 文件
关于下界传送门使用的更多信息:
- 你必须使用 TravelGates 告示牌。因此,需要包含目的地和 TravelGates 标签。
- 你可以使用拉杆来切换传送门的状态,也可以手动输入。
- 状态可以在 messages 文件中修改,而不必使用 -ON- 和 -OFF-
- -ON- 配合标签 [TG](或 [TRAVELGATES])以及一个有效的目的地:你将被传送到该目的地
-OFF- 原版下界传送。
如果告示牌无效,你将被传送到下界。
如果目的地与传送门所在位置相同,传送将被取消。如果传送门未放置在现有的目标位置上,或不与现有目标位置相邻,传送也将被取消。
媒体资料
GitHub 源代码:
源代码
视频:
关于下界传送门的最新 YouTube 视频(v1.5)
法语 YouTube 预告片(v1.0)
图片:
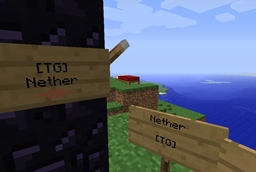
一些 TravelGates 传送告示牌的示例:


用于启用/禁用下界传送门替换的告示牌控制:


更新日志
请参阅更改日志页面
后续版本
版本 2 已停止开发。
已知问题
- 如果你添加了其他维度世界,下界传送门将不会把你传送到下界。请创建另一个下界世界并将 TravelGate 传送门链接到该世界,或者将传送门链接到原版下界世界。
- 这不是一个 Bug,但你需要了解这一点:如果你尝试手动修改配置文件,并使用 /reload 命令重新加载所有插件,它将无法生效。所有数据都在插件禁用时保存,使用的是当前的游戏内配置。因此,你手动更改的配置将被忽略。
遇到 Bug 时
如果遇到任何 Bug,请在游戏中使用
/tg debug 命令,并通过创建
新工单发送给我服务器日志。你也可以在插件加载开始时通过在配置文件中设置 "debug=true" 来启用调试模式。谢谢。
TravelGates
Teleportation System & Nether Portals Substitution
Latest version: v1.10.18 [1.6.4-R0.1]
Watch the source code of TravelGates on GitHub.
Description
This plugin intends to set
teleporting destinations where player can be teleported
if he is standing on anonther destination. To split destinations as if they were on separated servers, player's inventory can be cleared. The player is facing the same direction, after being teleported, as the OP when the destination is created. The teleportation works through different worlds too. You can also use
Nether Portals to be teleported. Just add a "TravelGates" Sign on the Nether Portal, facing the player's head.
Teleportation blocks also allow you to be teleported around an existing destination. You can also manage
additional worlds.
Check this page for more detailed information about the teleportation system.
This plugin is multilangual. There are only 2 languages (English and French) provided with the plugin. You can modify the messages file or create your own in another language.
Compatibility with Bukkit:
This plugin must be used with Craftbukkit version 1.1-Rx. Previous versions won't work.
Video tutorials
- Tutorial by ANDREJJGaming. (Installation + Ingame how-to)
- Tutorial by Minecrafter9842. (Installation + Ingame how-to)
- Tutorial by VariationVault. (Ingame how-to)
- Tutorial by LastWishSpain. (Complete tutorial in Spanish)
- Tutorial by AbsintoJ. (Complete tutorial in Portuguese)
How to setup this plugin from scratch
- Download the latest build: TravelGates-x.x.x.zip, where x.x.x is the latest version
- Extract this archive. You have two files : TravelGates-x.x.x.jar and resources-x.x.x.zip
- Extract the resrouces-x.x.x.zip archive
- Create a directory named "TravelGates" in your "plugins" directory, inside the directory of your Minecraft server (optionnal)
- Move the TravelGates-x.x.x.jar file in the "plugins" directory
- Inside the resources directory you have created by extracting the previous archive, move the travelgates.conf file in the "TravelGates" directory
- Repeat the previous step with the language file of your choice. You can find samples of language files in the "resources\messages" directory. (feel free to update existing files or make your own)
- Configure the configuration file as it is described in the Readme (page or file) or check the next section below with all configuration paramaters.
- Restart the Minecraft server
- Enjoy !
Please see the README page for more information.
You can also go to the english language sample file page to configure the ingame messages.
Check the Permissions page for more information about permissions nodes used in this plugin. If you want to use permissions but don't know how to set them, check this Bukkit wiki page. Otherwise, just disable permissions in the configuration of this plugin and op/non-op conditions will apply (users permissions will be given to all non-op players and admins permissions only for op players).
If you want to see an example of the default configuration file, click here !
Configuration parameters
- language: set the language used to display messages to players. Has to be the same value as the message file name in the TravelGates directory. (Example : language=en -> messages_en.lang
- usepermissions: (true/false) use PermissionsBukkit or PermissionsEx or Permissions 2x/3x or Native Bukkit Permissions (in that order, depending on what plugin you have)
- teleportwithsign: (true/false) enable the sign to teleport by clicking on it
- teleportwithportal: (true/false) enable Nether Portals substitution
- debug: (true/false) used to enable the debug mode when the plugin is loading.
- clearallinventory: (true/false) used to clear the armor content when the "i" option is set to a destination
- protectadmininventory: (true/false) used to protect admin inventory when the clear inventory option is enabled
- tpblock: (type[,data]/disabled) used to select the teleport block. Type is for a material (example "wool") and data is for the wool color (ex: "lime") or the tree species (ex: "birch"). You can use the numerical data or its name.
Plugin usage
Main command is "/travelgates" but you can use the alias "/tg".
All commands and destinations are case insensitive.
See the Examples page to see examples of the most "complicated" commands this plugin offers.
Admin commands:
- /tg {destination} : teleport player
- /tg add {destination} [-options] : add a destination.
- /tg del {destination} : delete a destination.
- /tg save : force to save all destinations
- /tg debug : toggle the debug mode
- /tg dtm : display or not the teleport messages
- /tg options {destination} -[options] : update destination's options. Tthe "-" character is mandatory.
- /tg update {destination} -[options] : same as /tg options
- /tg worlds ({world}|*) [-lu] [world_type]: display available loaded worlds with no options. World name use the same pattern as destinations. Wildcard * can be used to display all worlds in the server directory. Use options [-lu] to load or unload a world. Without options, it will display the state of the world (loaded or unloaded). With the l option is used, you can add the world type : (normal|nether|end), default is normal. You can't unload worlds which have still some players.
- /tg config: display current configuration
- /tg perms : toggle the permissions activation (reload permissions configuration if you enable them)
- /tg signtp : toggle the usage of sign to teleport
- /tg portaltp : toggle the usage of the nether portal to teleport
- /tg clearallinv : toggle the state of the clear all inventory option
- /tg clearallinv : toggle the state of the protect admin inventory option
- /tg autosave : toggle the auto save
- /tg tpblock : modify or toggle the tp block
- /tg {destination} [-f] : teleport player to the destination if he is standing on an existing location. If using -f, the teleportation can be done from everywhere.
Users commands:
- /tg list : display all destinations available to the player.
- /tg details {destination} : display all destinations, their locations and options to the player. You can specify a destination to see its own details.
- /tg restrict {destination} : display allowed destinations from the given destination
- /tg loc {destination} : display location of the destination.
- /tg name : display the name of the location where the player is standing.
- /tg help : display short help of the plugin.
- /tg {destination} : teleport to the destination.
Other teleportation means:
- Right click on a sign containing on a line [TG] or [TRAVELGATES] (case insensitive) and on another line or on the same line (order doesn't matter) the name of an existing destination : do the same as /tg {destination}.
- Use Nether Portals : Place a TravelGates' sign (see above) on a Nether Portal with the "-ON-" state (defined in messages file), configured with a lever or directly on the sign, and use the Portal as usual. The sign has to be placed on the portal bloc facing the head of the player. You can place the destination on the Obsidian blocks or on blocks beside of the portal.
- Using a teleport block: You can be teleported if you use a teleportation block, for instance lime wool. You have to cover a rectangle surface containing the destination with this kind of block to be teleported. Max range around the destination is 5 block (6 with the destination block). All these block have to be at the same height. Just under the player location when the destination has been added.
- Check this page for more detailed information about Nether Portals and Teleportation block features.
Available options:
- i = clear inventory while travelling to a destination
- a = admin teleport only
- s = instant save when adding a new destination or updating the options
- p = set the position of your destination as following -p(world,x,y,z) or -p(x,y,z), and "y" can be equal to "?"
- r = set restricted destinations where players are allowed to go as following : -r{dest1,dest2,dest3} -r{+dest1,-dest2} -r{} -r
- f = force the teleportation to a destination (without being on another destination)
Example: /tg add mydest -iar{test}p(world,5,?,20)s -> Add the destination "mydest", clear the inventory after being teleported, "mydest" is only for admins, the "test" destination is the one target destination allowed to travel to, the location is in the world named "world" at the location x=5, y=max available height, z=20, and finally save the new destination.
More exhaustive information in the README.txt file
More about the Nether Portals usage:
- You have to use a TravelGates sign. So, the destination and the TravelGates tag.
- You can use a lever to toggle the state of the Portal or type it manually.
- The states can be modified in the messages file, instead of using -ON- and -OFF-
- -ON- with the tag [TG] (or [TRAVELGATES]) and an existing destination : you will be teleported to the destination
- -OFF- Regular Nether teleportation.
- If the Sign is invalid, you will be teleported to the Nether.
- If the destination is the same where the portal is standing, teleportation will be canceled. If the Portal is not placed on an existing destination, or adjacent to an existing destination, the teleportation will also be canceled.
Medias
Source code on GitHub :
Source Code
Videos :
New youtube video of Nether Portals (in v1.5)
French youtube trailer (in v1.0)
Pictures:
Some example of TravelGates's teleportation Signs:
Sign control to enable/disable the Nether Portal Substitution :
Changelog
Please see the Changeslog page
Next versions
Version 2 stopped.
Known bugs
- If you add other worlds, Nether Portal won't send you to the Nether. Make another nether world and link a TravelGate portal to it or link the portal to the regular Nether world.
- It is not a bug, but you have to know it. If you try to modify the configuration file manually and try to reload all plugins with the /reload command, it would not work. All data is saved when the plugin is disabled, with the current ingame config. So, your configuration manually changed will be ignored.
In Case of Bugs
If you encounter some bugs, please use the
/tg debug in game command and send me the server logs by creating a
new ticket.You can also enable the debug mode at the beginning of the plugin loading by using the configuration "debug=true" in the configuration file. Thanks.


 插件
 插件
 插件
 插件

 插件
 插件
评论 0
登录后参与评分
还没有评论,来抢沙发吧